Entity Framework Query Samples
Devart offers you to try Entity Framework functionality of dotConnect for Oracle with Entity Framework Query Samples.
The Entity Framework Query Samples application is a test framework for different databases and data providers within ADO.NET Entity Framework. It is intended to help you learn the features of the different query languages available in the Entity Framework, and to let you visualize how the results and the translated store queries look like.
This package is based on the original work by Microsoft, which was available by the following link: http://code.msdn.microsoft.com/EFQuerySamples. It is no longer available, but you may view the archived version of the page.
Requirements
Oracle 9.2.0.4 or higher is required for Entity Framework Query Samples. To connect to Oracle, you need a Trial or Professional version of the dotConnect for Oracle installed on your system. ADO.NET Entity Framework requires .NET Framework 3.5 Service Pack 1 installed. Visual Studio 2008 Service Pack 1 is required to compile the sample.
Installation and Configuration
First, create a new copy of the NortwhindEF database. The sample contains the DB folder, which includes subfolders for every database with scripts or ready-to-use database files.
Second, open the App.config file and change connection strings for the databases you are going to use.
After that, you can compile and run the sample.
Running Samples
There are 2 ways to run samples: the interactive mode and batch mode.
To run samples in the interactive mode, compile and run the project without any command-line arguments. Using the tree on the left-hand side, locate a sample you are interested in and click Run. You can run samples against different providers, by selecting them from the drop-down menu.
To run samples in the batch mode, run "SampleQueries.exe /runall /pause". It will open the console where each sample is executed sequentially and any exceptions are reported.
You can also pass "/log filename.txt" which will save results of all samples to a file. To specify a different provider, pass "/connectionString cs", where "cs" is the name of the connection string defined in "SampleQueries.exe.config"
For example:
SampleQueries.exe /log log.txt /connectionString "NorthwindEF (Oracle)" /runall /pause
Oracle does not support some keywords in SQL statements, such as EXCEPT. Therefore, some queries that are translated to SQL using these keywords fail (some tests for relational and set operators).
Creating Entity Framework Query Samples Model with Entity Developer
You can build the same model yourself with Entity Developer . To build the model, perform the following steps.
Generating a Model
After you have created the required database, run Entity Developer and import the database to the model. To do it, perform the following steps.
-
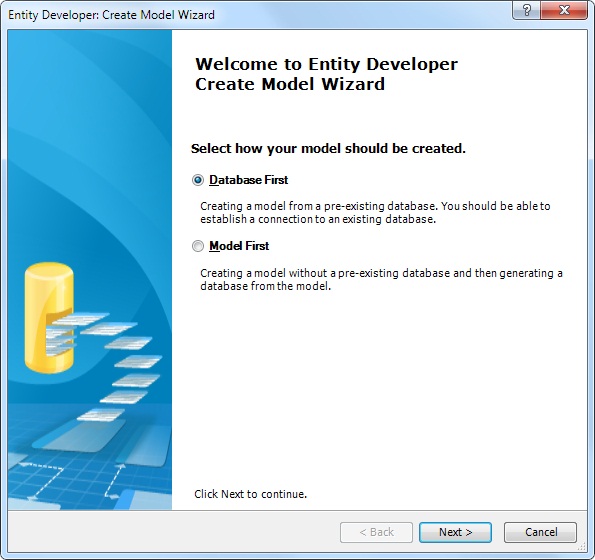
Select New Model from the File menu.
The New Project page is displayed.
-
Select Entity Model, specify its Name and click Create.
Create Model Wizard is displayed.
-
Click Next.
The Set up data connection properties page is displayed.
-
Select a database provider in the Provider drop-down list and set the required
connection parameters, then click Next.
The Choose Model Contents page is displayed.
-
Select the Generate From Database option and click Next.
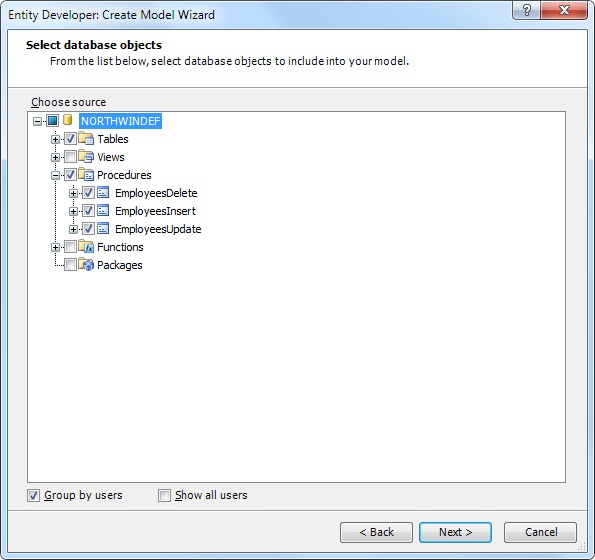
The Select Database Objects page is displayed.
-
Select the check box of the Tables node to select all tables and check
boxes of the EmployeesInsert, EmployeesUpdate, and EmployeesDelete procedures, then
click Next.
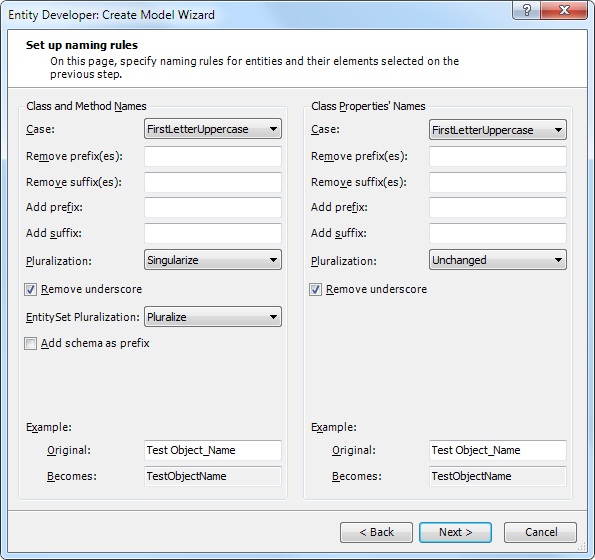
The Set up naming rules page is displayed.
-
Select Unchanged in both Case drop-down lists for classes, methods,
and their members and click Next.
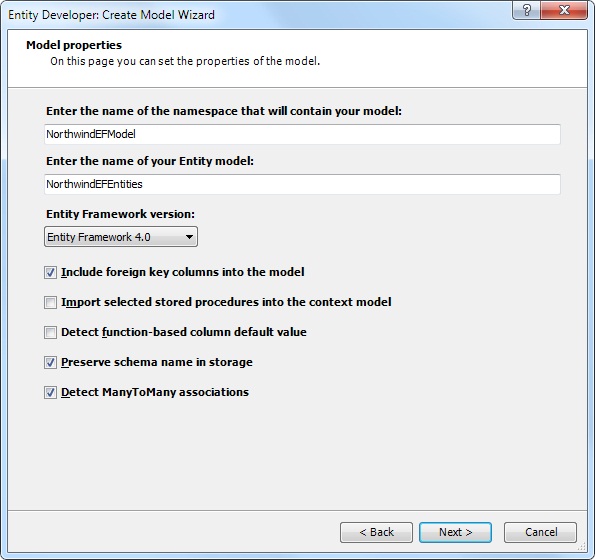
The Model properties page is displayed.
-
Enter the model name and namespace (for example, NorthwindEFModel) to place the
model in, then click Next.
The Choose Model Diagram Contents page is displayed.
-
Select the entities to be displayed on the diagram and click Next.
The Choose Code Generation Template page is displayed.
-
Select the required code generation template and click Next.
The Entity Developer: Create Model Wizard final page is displayed.
- Click the Finish button.
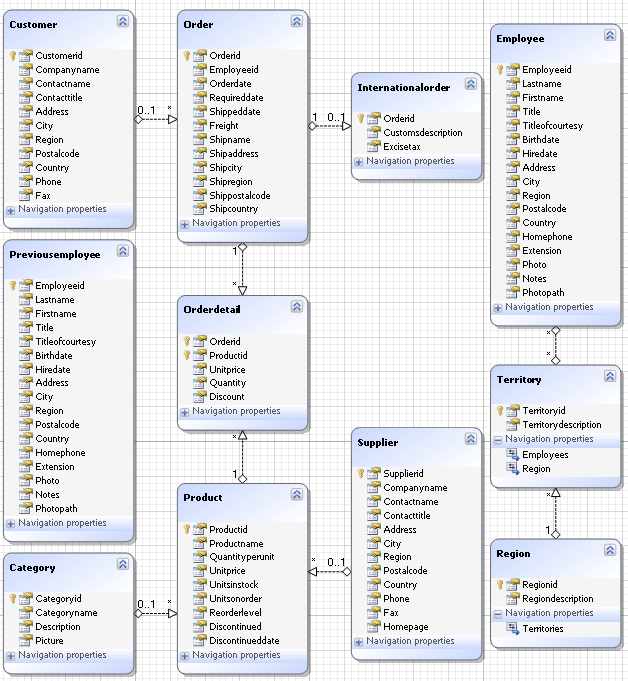
Now we have the model, but it is not the same as Entity Framework Query Samples Model. It is not possible to create inheritances and complex types automatically from the database, we should create them manually.
Creating Complex Type
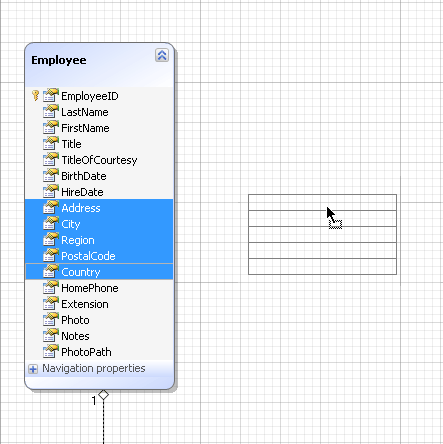
Let's create complex type CommonAddress instead of the Address, City, Region, PostalCode, and Country properties. To do this, perform the following steps:
- Click the Address property in the Employee class, then press SHIFT and click the Country property holding down the SHIFT key.
-
Drag the selected properties out of the Employee class and drop them onto the
empty diagram space.
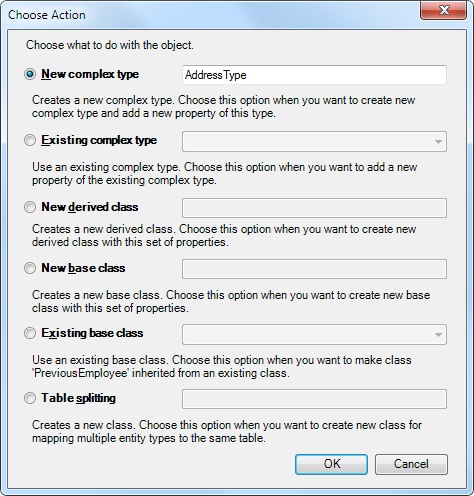
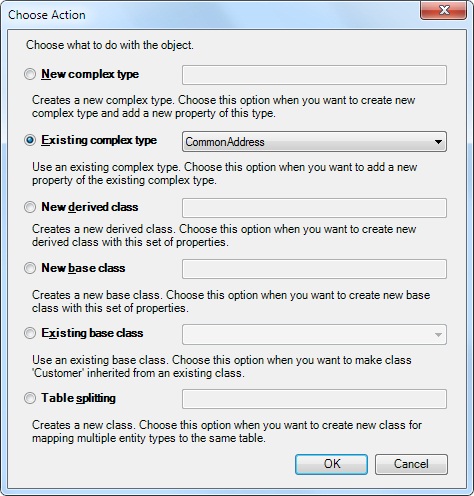
-
In the Choose Action dialog box, click New complex type and then click
OK.
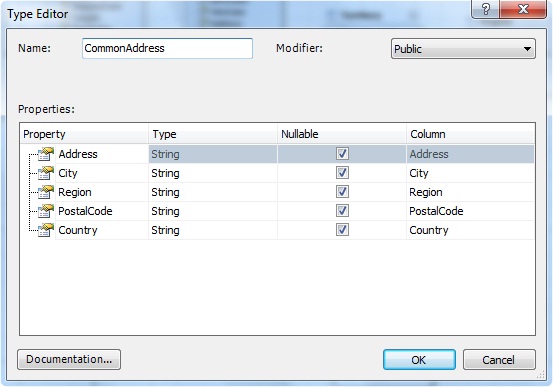
- Double-click the complex type, displayed on the diagram.
-
In the editor, enter CommonAddress in the Name field and click OK.
After this, we should remap these properties in the Customer, Supplier, Order, and PreviousEmployee classes to the CommonAddress complex type. Perform the following steps:
- Click the Address property in the Customer class, then press SHIFT and click the Country property holding down the SHIFT key.
- Right-click the selection and select Migrate from the popup menu.
-
In the Choose Action dialog box, click Existing complex type and then click
OK.
- Right-click the displayed property "CommonAddress" in the Customer class and select Edit from the popup menu.
- In the editor, enter Address in the Name field and click OK.
- Repeat steps 1-5 for the Supplier and PreviousEmployee classes.
Inheritances
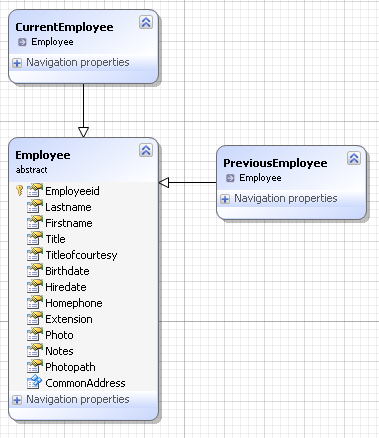
Now let's create inheritance relationships like in the Entity Framework Query Samples Model. This model contains three types of inheritances: Table Per Type with Order and InternationalOrder classes, Table Per Hierarchy with Product and DiscontinuedProduct classes, and Table Per Concrete type with Employee, CurrentEmployee, and PreviousEmployee classes.
Table Per Concrete Type hierarchy
In Table Per Concrete type hierarchy each non-abstract hierarchy class is mapped to one table. CurrentEmployee is mapped to the Employee table, PreviousEmployee class is mapped to the PreviousEmployee table. They have the same parent abstract class Employee. To create Table Per Concrete type hierarchy, perform the following steps:
-
Double-click the Employee class
The Class Editor dialog box is displayed.
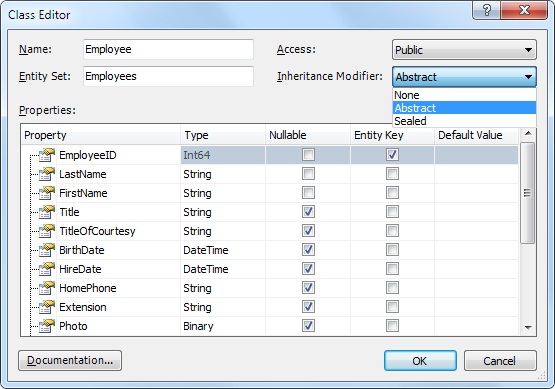
- In the editor, select Abstract in the Inheritance Modifier drop-down list and click OK.
- Click the PreviousEmployee class on the diagram and press the DELETE key.
- Click the Add Class to Context button on the Entity Framework Model toolbar or press ALT+C.
- Right-click the displayed class and select Rename from the popup menu.
- Enter "PreviousEmployee" and press ENTER.
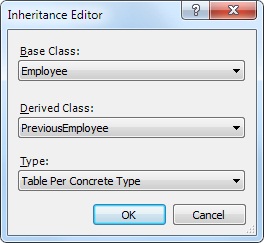
- Click the Employee class and then PreviousEmployee class while holding down the SHIFT key.
- Click the Add Inheritance to ContextModel button on the Entity Framework Model toolbar or press ALT+I
-
Select Table Per Concrete Type in the Type drop-down list and click
OK
.
- Click the Add Class to Context button on the Entity Framework Model toolbar or press ALT+C.
- Right-click the displayed class and select Rename from the popup menu.
- Enter "CurrentEmployee" and press ENTER.
- Click the Employee class and then the CurrentEmployee class while holding down the SHIFT key.
- Click the Add Inheritance to ContextModel button on the Entity Framework Model toolbar or press ALT+I
- Select Table Per Concrete Type in the Type drop-down list and click OK .
- Right-click the Employee class and select Mapping Details from the popup menu.
- In the displayed Mapping Details dialog box, select <Delete> from the drop-down list in the first row of the Storage Entities grid and click OK.
- Right-click the CurrentEmployee class and select Mapping Details from the popup menu.
- In the displayed Mapping Details dialog box, select Employee from the drop-down list in the first row of the Storage Entities grid and click OK.
- Right-click the PreviousEmployee class and select Mapping Details from the popup menu.
-
In the displayed Mapping Details dialog box, select PreviousEmployee from
the drop-down list in the first row of the Storage Entities grid and click
OK.
- Remove the association between the Employee and Territory entities. Select it and click the DELETE button.
- Select a table EmployeesTerritories in the Model Explorer (Storage model node). Right-click it and select Add class from the popup menu. The new association will be created.
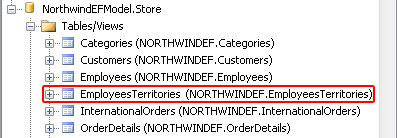
Table Per Type hierarchy
In the Table Per Type hierarchy, each hierarchy class is mapped to one table. The Order class is mapped to the Order table, the InternationalOrder class is mapped to the InternationalOrder table. To create the Table Per Type hierarchy, perform the folowing steps:
- Click the Add Inheritance to ContextModel button on the Entity Framework Model toolbar or press ALT+I
-
In the editor, select Order in the Base Class drop-down list and InternationalOrder
in the Derived Class drop-down list and click OK.
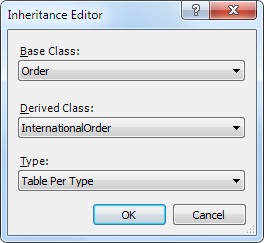
- Select Table Per Type in the Type drop-down list and click OK
-
Remove the association between the Order and InternationalOrder
classes. This association becomes redundant after the inheritance releationship
is defined.
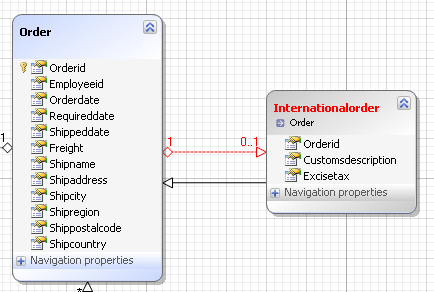
- Drop the OrderId field from the InternationalOrder class.
- Right-click the InternationalOrder class and select Mapping Details from the popup menu.
-
Map the OrderId column to the following property.
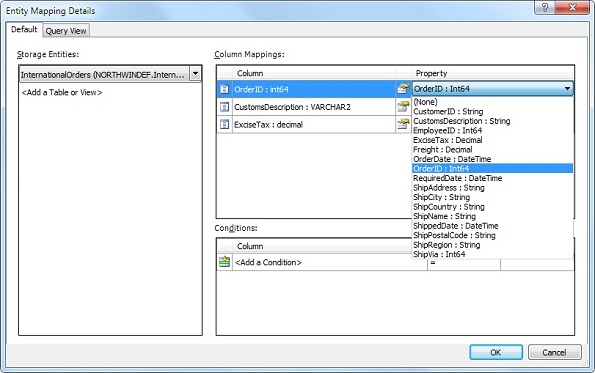
Table Per Hierarchy hierarchy
In the Table Per Hierarchy hierarchy, all hierarchy classes are mapped to the same table. To create the Table Per Hierarchy hierarchy, perform the folowing steps:
- Click the Discontinued property in the Product class and press the DELETE key.
- Drag the DiscontinuedDate property out of the Product class and drop it onto the empty diagram space.
- In the displayed Choose Action dialog box, click New derived class and then click OK.
- Double-click the class, displayed on the diagram.
- In the editor, enter DiscontinuedProduct in the Name field and click OK .
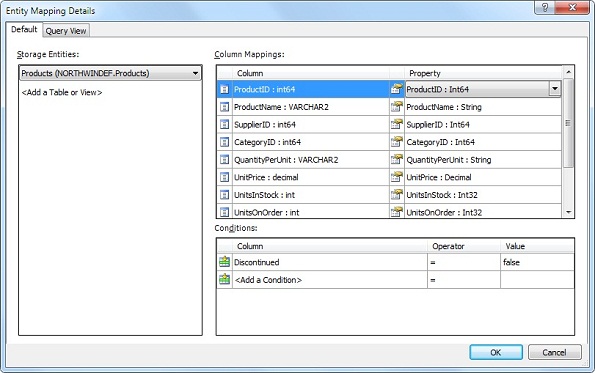
- Right-click the Product class and select Mapping Details from the popup menu.
- In the displayed Mapping Details dialog box, select Discontinued in the drop-down list of the Column column in the Conditions grid.
-
Enter "false" into the Value column of the Conditions
grid and click OK.
- Right-click the DiscontinuedProduct class and select Mapping Details from the popup menu.
- In the displayed Mapping Details dialog box, select Discontinued in the drop-down list of the Column column in the Conditions grid.
- Enter "true" into the Value column of the Conditions grid and click OK.
Configuring behavior
Now we have almost the same model as Entity Framework Query Samples Model. All we need to change is to assign these methods to Employee insert, update, and delete actions. Perform the following steps to complete Entity Framework Query Samples Model:
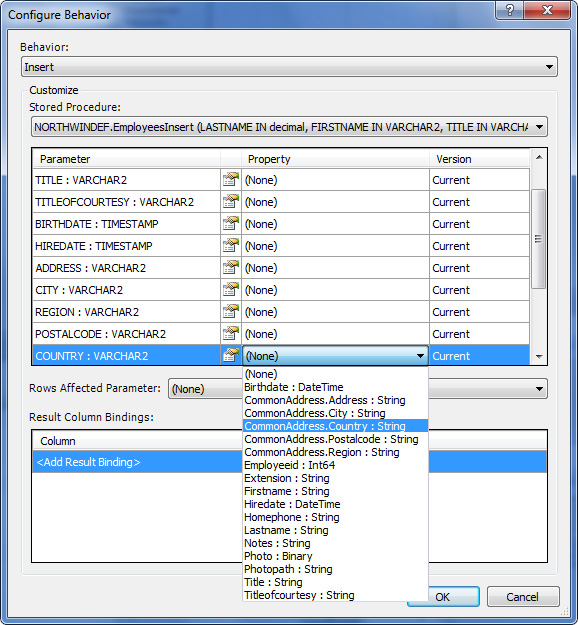
- Right-click the CurrentEmployee class and select Configure behavior from the popup menu.
- Select Insert in the Behavior drop-down list.
- Select the EmployeesInsert stored procedure in the Stored Procedure drop-down list.
-
Assign the corresponding CurrentEmployee properties to the parameters in the grid
below by selecting the corresponding property from the drop-down list in the Property
column.
- Select Update in the Behavior drop-down list.
- Repeat steps 3 - 4 with the EmployeesUpdate procedure.
- Select Delete in the Behavior drop-down list.
- Select the EmployeesDelete stored procedure in the Stored Procedure drop-down list.
- Assign the Employeeid property to the only parameter in the grid below by selecting the corresponding property from the drop-down list in the Property column.
- Click OK.
Now look at the Error List window. It displays error messages and warnings of your model. After we configured the behavior of the CurrentEmployee class, the following error is displayed: " If an EntitySet mapping includes a function binding, function bindings must be included for all types. The following types do not have function bindings: NorthwindEFModel.PreviousEmployee. " This error means that if we assigned functions to insert, update, and delete operations for one hierarchy class, we should do the same for all non-abstract classes in the hierarchy.
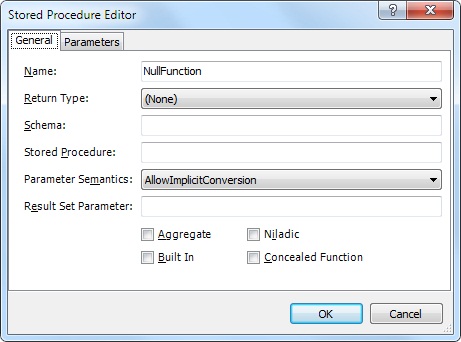
So we will create the stub function and assign it to insert, update, and delete the operations of the PreviousEmployee class.
- Right-click the Stored Procedures node in the Model Explorer and select Add Procedure from the popup menu
-
Enter "NullFunction" into the Name box and click OK.
- Right-click the PreviousEmployee class and select Configure behavior from the popup menu.
- Select Insert in the Behavior drop-down list.
- Select the NullFunction stored procedure in the Stored Procedure drop-down list.
- Repeat steps 4-5 for the Update and Delete operations and click OK.
Generating code
The model is complete now. Let's generate code for it. Perform the following steps to generate the code.
- Create a folder for context (for example, Context) and a folder for entities (for example, Entities).
-
Navigate to the Model Explorer window, select the template and click it
to display the Properties window for the selected template.
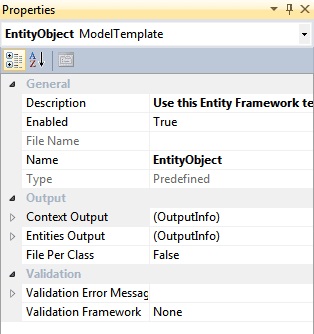
- In the Context Output row, select the Context folder created in Step 1 of this procedure.
- In the Entities Output row, select the Entities folder created in Step 1 of this procedure.
- Ensure that you have a physical connection to the database server.
- To generate code and mapping, click the Generate Code for Context Model button on the Model toolbar. The Generation Progress dialog box is displayed to indicate the progress of the code generation.
The context and entities are successfully generated and stored in the specified folders.