Datetime Generator for MySQL: How to Create Random Datetime Data
When developing databases, it is necessary to generate sample data for testing and validating database functionality to detect any issues before they appear in production. Gata generation is very often used by database developers, database administrators, analysts, or testers. In data generation scenarios, users have populate tables with different random data, including datetime values if they work work with time-related information.
In the article, we'll explore what DATETIME and TIMESTAMP are and how they differ. We'll also examine how to generate random timestamp and datetime data using the MySQL Data Generator tool available in the MySQL GUI tool - dbForge Studio for MySQL.
What is a DATETIME data type in MySQL?
DATETIME is a data type that stores values representing both date and time. When retrieving or inserting data into a MySQL column with the assigned DATETIME data type, the default format is 'YYYY-MM-DD HH:MM:SS'. The minimum allowable value is 1000-01-01 00:00:00, and the maximum value equals 9999-12-31 23:59:59. MySQL typically uses 5 bytes to store a DATETIME value. However, if it includes a trailing fractional second with microseconds precision (up to 6 digits), the format becomes 'YYYY-MM-DD HH:MM:SS[.fraction]'', for example, 2017-01-22 10:01:00.999999.
For DATETIME values with fractional second precision, additional storage is required. One or two fractional second precision need 1 byte, three and four require 2 additional bytes, and five or six need 3 additional bytes. For example, storing the 2017-01-22 10:01:00.999999 value will use 8 bytes: 5 bytes for 2017-01-22 10:01:00 and 3 bytes for .999999. In contrast, storing the 2017-01-22 10:01:00.9 value will require MySQL to use 6 bytes: 5 bytes for 2017-01-22 10:01:00 and 1 byte for .9.
If you need to populate a column with the current date and time, you can use the result of the CURRENT_TIMESTAMP or NOW() function as the default value. For example, you can create the table as follows:
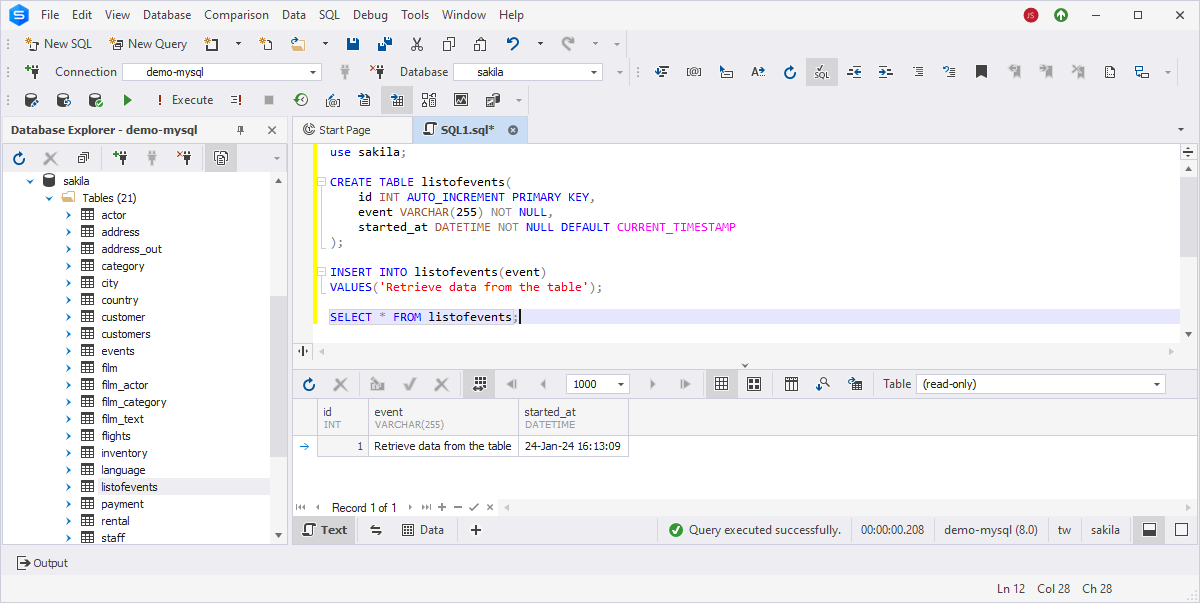
CREATE TABLE listofevents(
id INT AUTO_INCREMENT PRIMARY KEY,
event VARCHAR(255) NOT NULL,
started_at DATETIME NOT NULL DEFAULT CURRENT_TIMESTAMP);
Then, insert data and retrieve it to see the result:
What is a TIMESTAMP data type in MySQL?
In MySQL, TIMESTAMP serves as a data type to store precise date and time information, representing a specific point in time. The TIMESTAMP data type is commonly used for columns to record logging events, such as the addition or last update of rows in a table.
The TIMESTAMP data type supports a range from '1970-01-01 00:00:01' UTC to '2038-01-19 03:14:07' UTC. However, for temporal values beyond 2038, it is recommended to use DATETIME over TIMESTAMP. When adding a TIMESTAMP value to a table, MySQL converts it from the time zone associated with the connection to UTC for storage. Conversely, during retrieval, MySQL converts the stored UTC value back to the time zone of the current connection. It should be noted that this conversion is applied only to TIMESTAMP and doesn't extend to other temporal data types, such as DATETIME.
The default time zone for the connection aligns with that of the MySQL server. Alternatively, users can connect to the MySQL server using a different time zone. In situations where a TIMESTAMP value was initially inserted by a client in a different time zone, the value retrieved in subsequent queries may differ from the value originally stored in the database.
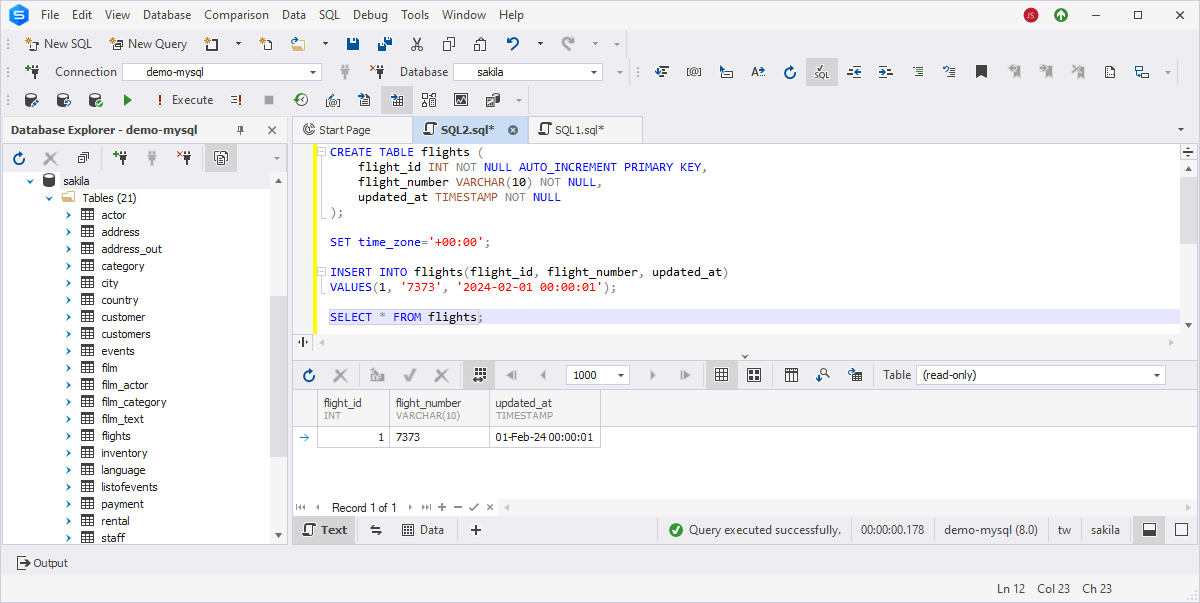
Let's look at the example showcasing how the TIMESTAMP value is generated in MySQL. To begin, create the flights table and set the time zone of the session to '+00:00' to maintain consistency and avoid complications related to time zone differences:
-- create a table

CREATE TABLE flights (
flight_id INT NOT NULL AUTO_INCREMENT PRIMARY KEY,
flight_number VARCHAR(10) NOT NULL,
updated_at TIMESTAMP NOT NULL);

-- set the time zone of the session to '+00:00'
SET time_zone='+00:00';
Then, insert data into the table including the TIMESTAMP value and retrieve the data using the SELECT query:
-- insert data into the flights table
INSERT INTO flights(flight_id, flight_number, updated_at)
VALUES(1, '7373', '2024-02-01 00:00:01');

-- retrieve data from the table
SELECT * FROM flights;
The result would be as follows:
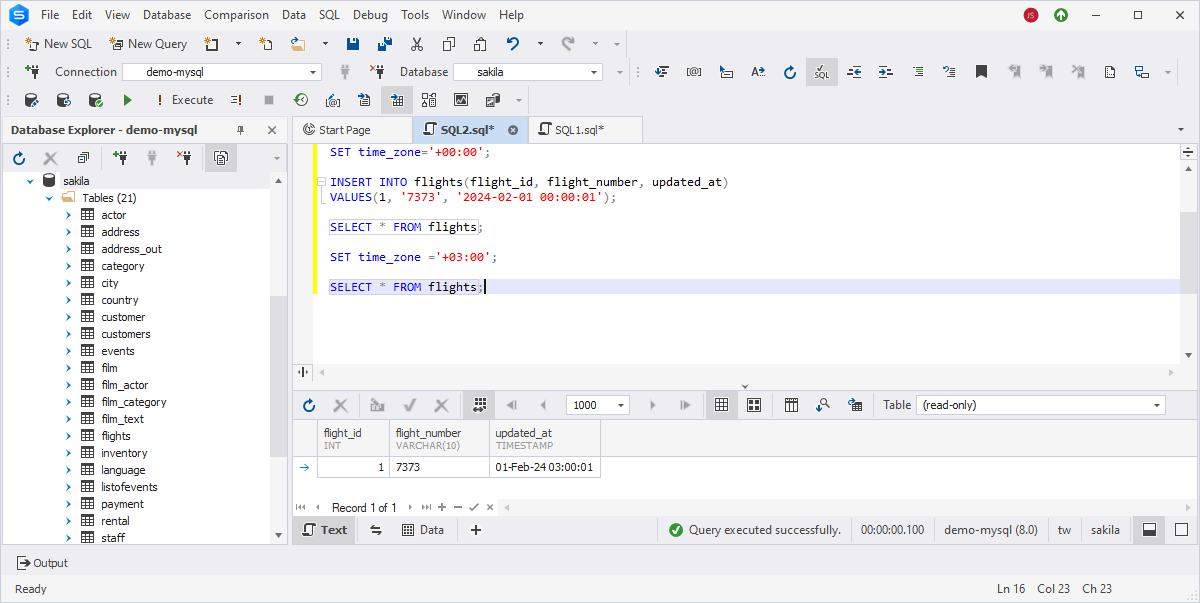
However, when we change the time zone and query data from the table, a time value will be adjusted to conform to the new time zone. This means that the retrieved timestamps will be adapted to the updated time zone setting. For example:
Differences between DATETIME and TIMESTAMP
DATETIME and TIMESTAMP may seem to be similar, but still they have differences in terms of range, storage, and behavior - let's find out them. Here is a table summarizing the key differences between DATETIME and TIMESTAMP in MySQL:
| Characteristic | DATETIME | TIMESTAMP |
|---|---|---|
| Range of values | '1000-01-01 00:00:00' to '9999-12-31 23:59:59' | '1970-01-01 00:00:01' to '2038-01-19 03:14:07' |
| Storage size | 8 bytes with additional 0-3 bytes for storage of fractional seconds | 4 bytes with additional 0-3 bytes for storage of fractional seconds |
| Automatic initialization & updating | Supported starting with MySQL 5.6.5 | Supported with the DEFAULT CURRENT_TIMESTAMP and ON UPDATE CURRENT_TIMESTAMP clauses |
| Conversion | No conversion | MySQL converts the values of the TIMESTAMP data type from the current time zone to UTC and converts it back to the current time zone during insertion and retrieval |
| Usage considerations | Wider range, manual timestamp management | Limited range, automatic timestamp management, smaller storage size |
Generate random datetime data from column
It is time to see how easy it is to generate MySQL test data and populate the table using the MySQL Data Generator tool available in the Studio. This powerful tool provides over 200 generators to fill tables with commonly used data types in the most efficient and quickest way.
Open the Studio and on the ribbon, select Database > Tasks > New Data Generation. Alternatively, in Database Explorer, right-click the required database and select Tasks > New Data Generation. The Data Generator Project Properties dialog opens, where you need to choose the connection and database from the dropdown list for data generation.
On the Options page, you can customize the default data generation settings. Click Open to open the Data Generation document.

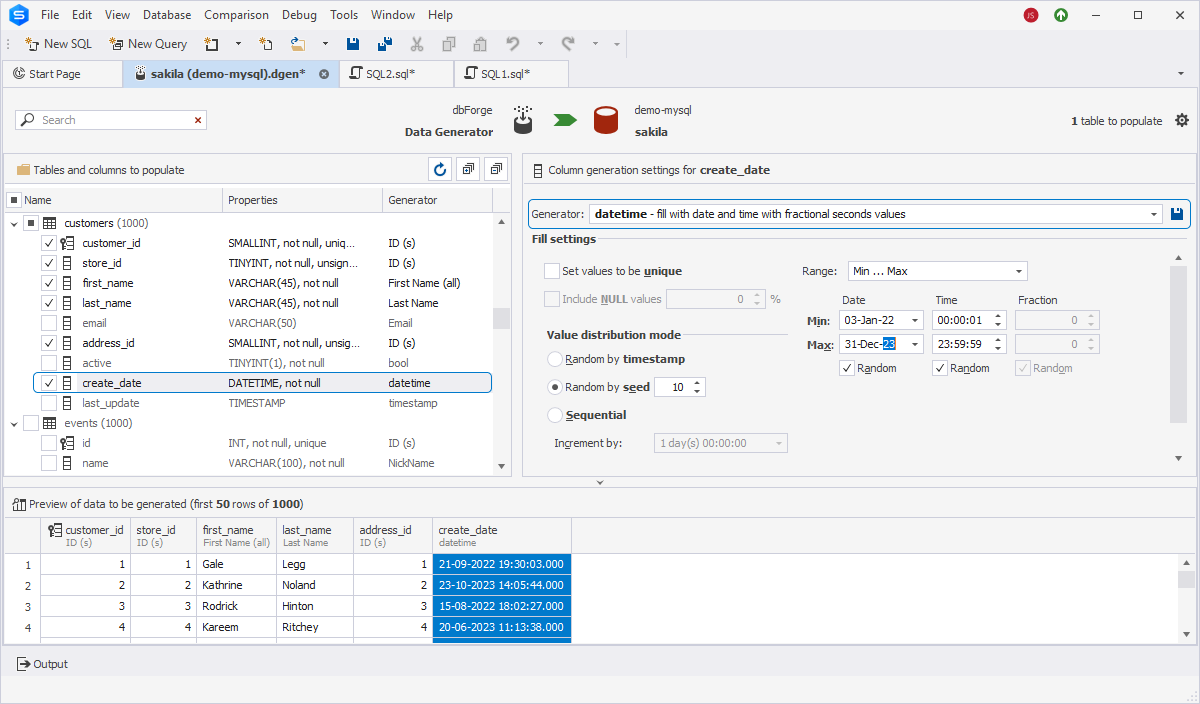
The Data Generation document opens with two panes. The left-side pane displays the tables and columns you can populate. The right-side pane allows you to adjust the settings for the selected table and columns. All the changes are displayed in real-time.
To proceed, under Tables and columns to populate, select the create_date column of the customers target table. The datetime generator generates the date and time with fractional seconds values. It contains the basic and custom data generation rules, which you can configure in the right-side pane:
- Set values to be unique
- Include NULL values and specify the proportion of those in a generated dataset
- Define how the randomly generated data will be distributed: by timestamp, by seed, or sequentially. For sequential distribution, specify the increment value - a day for the DATETIME data type.
-
Adjust the range of dates
- Min ... Max: Set the minimum and maximum values of the range
- Offset from column: Select a column as a time reference-point
- Offset from now: Set the minimum and maximum number of days starting from the current date
After that, you can preview the changes in the lower grid before applying them.
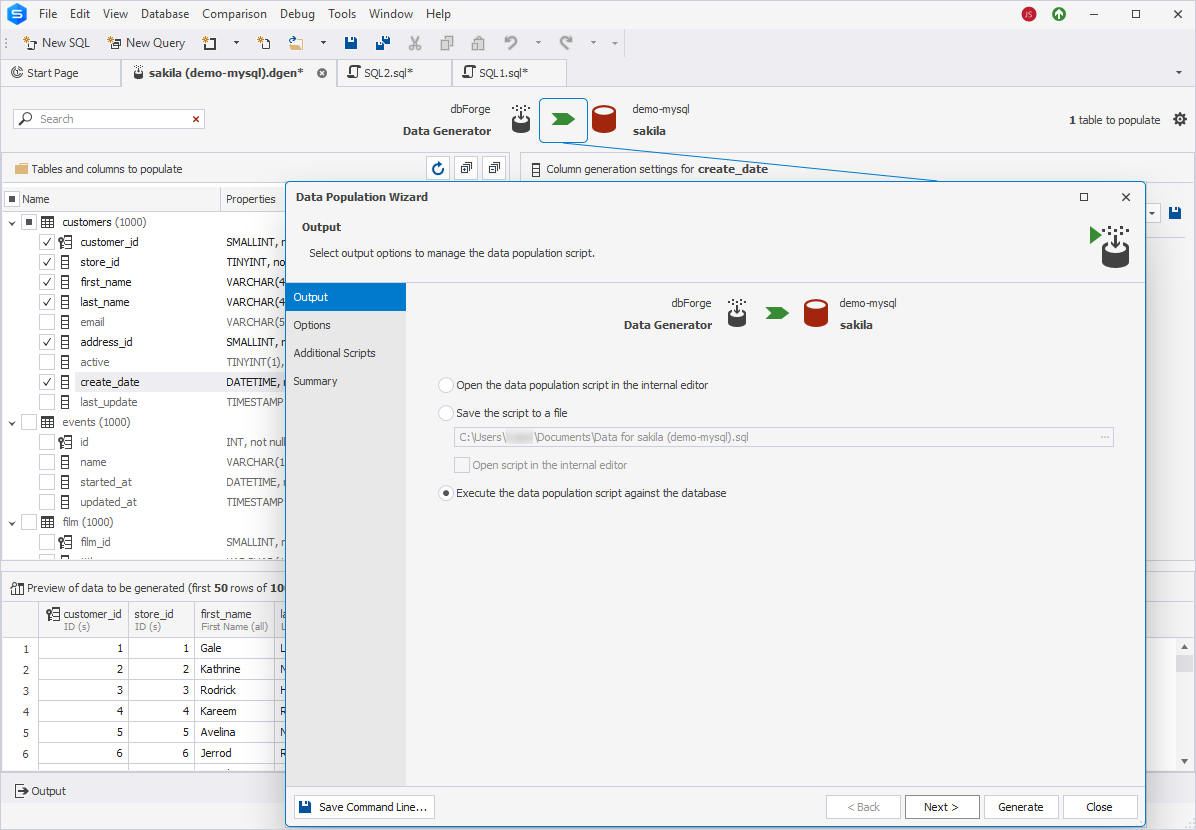
To inititate the data generation process, click Populate to the target database. This will open the Data Population Wizard, where you can select output and general data population options, specify scripts to be executed before or after data population, and review the data population actions and warnings.
So, go through all the pages of the wizard to customize the data generation process, and click Generate to generate data.
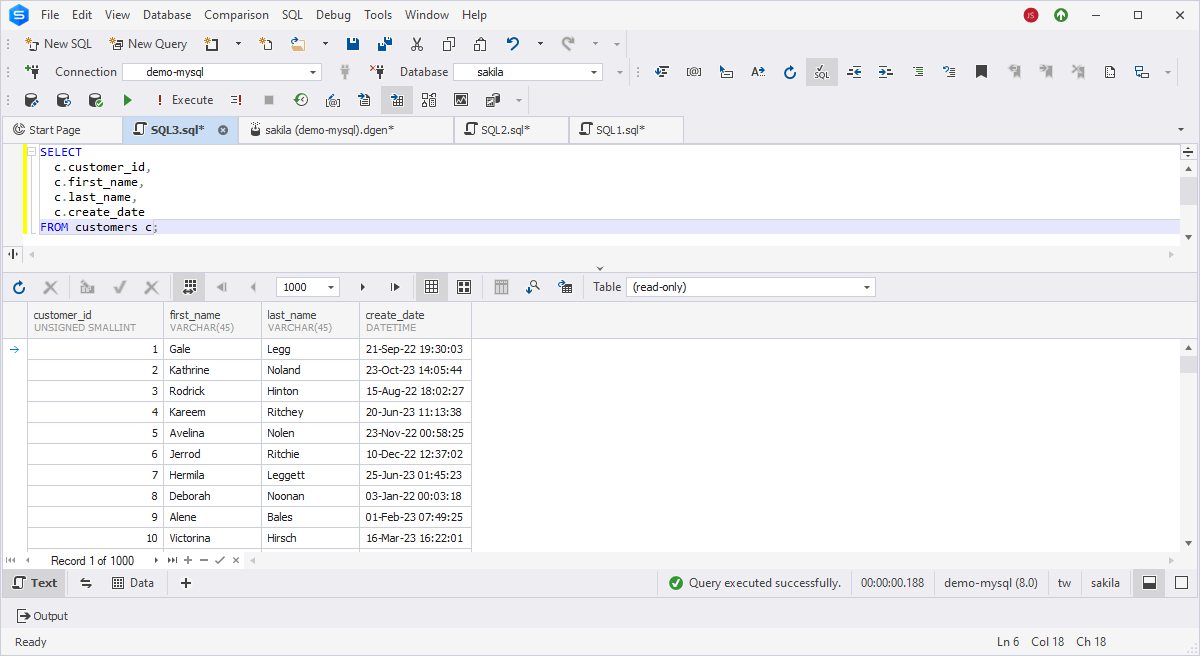
To verify that the column has been populated with the datetime values, retrieve data by executing the SELECT query:
Create timestamp random table data from now
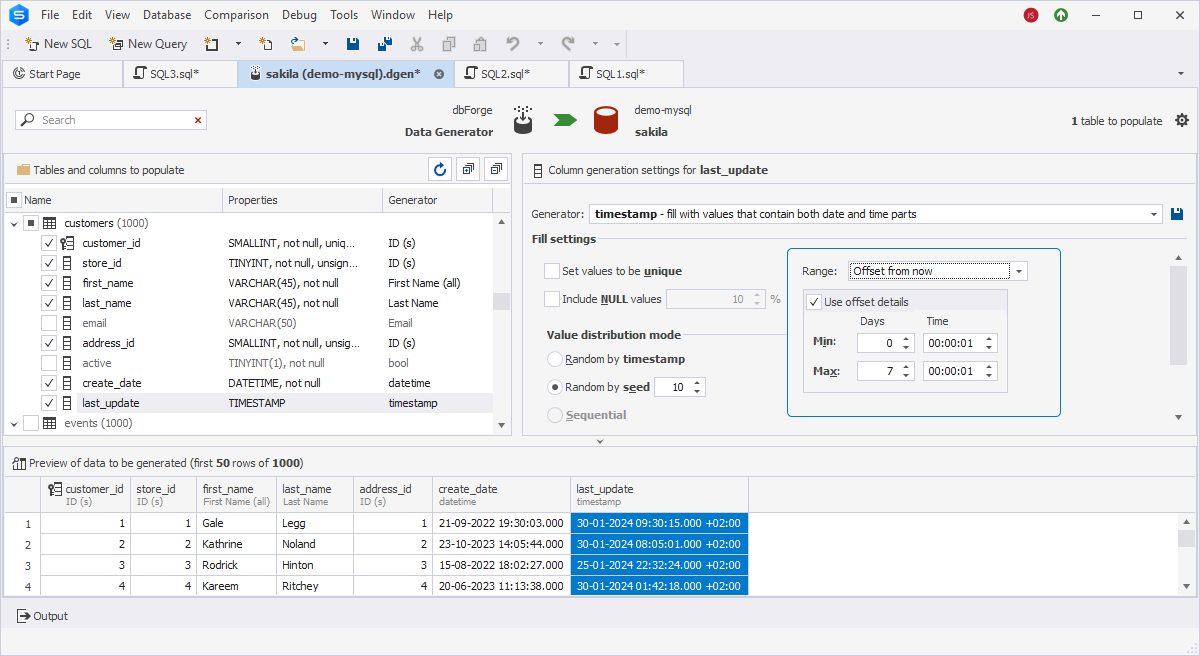
Let's generate random data for the column starting from the current date and time using the Data Generator tool built into the Studio.
Begin by opening the Data Generation document. In the left-side tree view, select the checkbox next to the column you want to assign and generate timestamp data. In the right-side pane, navigate to Fill settings and select Offset from now from the Range dropdown list. Then, select the Use offset details checkbox and specify the minimum and maximum number of days and time to be added to the reference point.
To ensure that the generated data meets your requirements, preview the values to be generated in the lower grid.
Then, on top of the Data Generation document, click Populate data to the target database to open Data Population Wizard. Here you can set up data population and output options, or insert additional scripts that will be executed after or before data population. After the project has been configured, click Generate to populate the table with data.
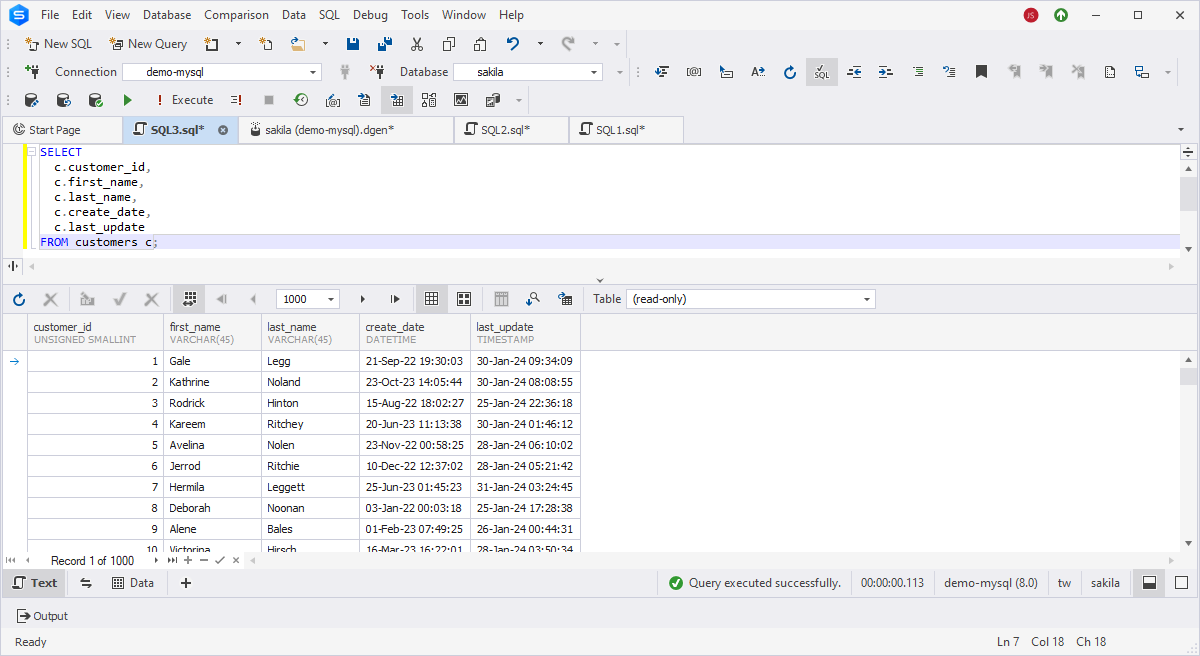
Upon the data retrieval, we'll see that the last_update column with the assigned TIMESTAMP data type has been populated according to the specified range.
More functions in Data Generator for MySQL
The Devart team has also developed a standalone tool - dbForge Data Generator for MySQL for data generation. Here are some key benefits it offers for database professionals and developers, facilitating efficient and effective test data generation.
- Support for a wide range of data types, including numeric, string, date, time, and more, which allows users to generate diverse and realistic test datasets
- Rich library of over 200 predefined generators for creating various types of data for multiple data scenarios
- Customization of data generation rules by setting ranges, specifying patterns, and defining relationships between columns
- Support for the generation of data with foreign key relationships, ensuring consistency and integrity in the generated datasets
- Creation of scenarios for data generation for specific testing scenarios
- Visualization of data in the real-time preview pane to validate that the generated data aligns with your expectations and requirements
- Support for automation of data generation tasks through command-line functionality

Conclusion
We have explored several ways for generating realistic random datetime and timestamp data for testing purposes. The most convenient approach is through the use of a visual data generation tool within dbForge Studio for MySQL. It provides robust support for various data types, allowing users to define precise rules for data generation, set ranges, and establish relationships between columns. To fully experience all the features of dbForge Studio for MySQL, download a free 30-day trial version of the tool and learn how easy it is to generate and populate tables with random and test data to enhance your daily activities.