Db2 is a cross-platform database management system (DBMS) developed by IBM. It provides a robust relational database engine along with integrated support for selected NoSQL features, making it a powerful and flexible data platform.
Thanks to its strong analytical and transactional capabilities, Db2 remains a popular choice in modern software development. However, reliable connectivity between the database and the application is essential, and this is where modern data providers from the dotConnect product line become especially useful.
In this article, we will explore how to connect to Db2 using dotConnect for Db2 and demonstrate several connection approaches.
Why dotConnect for DB2?
Advanced ORM support
Fully supports EF Core, Dapper, NHibernate, and LinqConnect, enabling developers to build scalable and maintainable data access layers when working with IBM Db2 databases.
Full ADO.NET compliance
Conforms to the latest ADO.NET standards and recent industry innovations for seamless and consistent integration with .NET applications.
Db2-specific data types
Includes the full range of IBM Db2 data types and database features, allowing accurate mapping and reliable handling of Db2-specific structures within .NET applications.
Secure connection options
Offers strong security capabilities, including SSL connections, proxy support, and advanced network configuration, protecting data in transit and enabling flexible deployment scenarios.
IDE integration
Provides seamless Visual Studio integration and rich design-time support, simplifying connection setup, schema exploration, and rapid application development.
Priority support & frequent updates
Includes priority support, detailed documentation, and regular updates, ensuring reliability and continuous compatibility with new .NET and Db2 releases..
Download and activate dotConnect for Db2
You can start using dotConnect for Db2 immediately with a 30-day free trial. Choose one of the following installation options:
You can establish an SSL connection to a Db2 database using the Devart.Data.Db2 library with the specified connection string parameters. Modify your code as follows:
staticvoidMain(
string[] args
)
{
// Define your connection string with SSL parametersstring connectionString =
"" +
"Server=127.0.0.1;" +
"User Id=TestUser;" +
"Password=TestPassword;" +
"Database=TestDB;" +
"Security=SSL;" +
"SSLClientKeystash=path/to/your/keystash.sth;" +
"SSLClientKeystoredb=path/to/your/keystore.kdb;" +
"License Key=**********;";
// Create a new Db2Connection objectusing (Db2Connection connection =
new Db2Connection(connectionString))
{
try
{
// Open the connection
connection.Open();
Console.WriteLine(
"Connection successful!"
);
}
catch (Db2Exception ex)
{
// Handle any errors that may have occurred
Console.WriteLine(
$"Error: {ex.Message}"
);
}
}
}
SSL parameters:
Security=SSL - defines using SSL for security.
SSLClientKeystash - defines the path to the SSL stash (.sth) file used for the SSL connection. This file contains the SSL certificate and key information.
SSLClientKeystoredb - defines the path to the SSL key database file used for the SSL connection. This file stores SSL certificates and keys.
Connection strings
The following table lists common connection string parameters used when connecting to IBM Db2 with dotConnect.
These properties define the authentication type, server location, credentials, and default schema settings.
Property
Description
Authentication
String representing the type of authentication to be used.
The default value is SERVER. Acceptable values are:
SERVER, SERVER_ENCRYPT, DATA_ENCRYPT, KERBEROS, GSSPLUGIN, CERTIFICATE
Server
Host and port to connect to, separated by a colon.
Example: db2server:5000. The port is optional
Data Source/Host/Server
Host name or IP address of the Db2 server
User ID/User
Db2 login account used for authentication
Password
Password for the Db2 login account
Database
Name of the database. If not specified, the database name is assumed
to be the same as the user name
Current Schema
Default user ID to be used as the owner of unqualified SQL objects
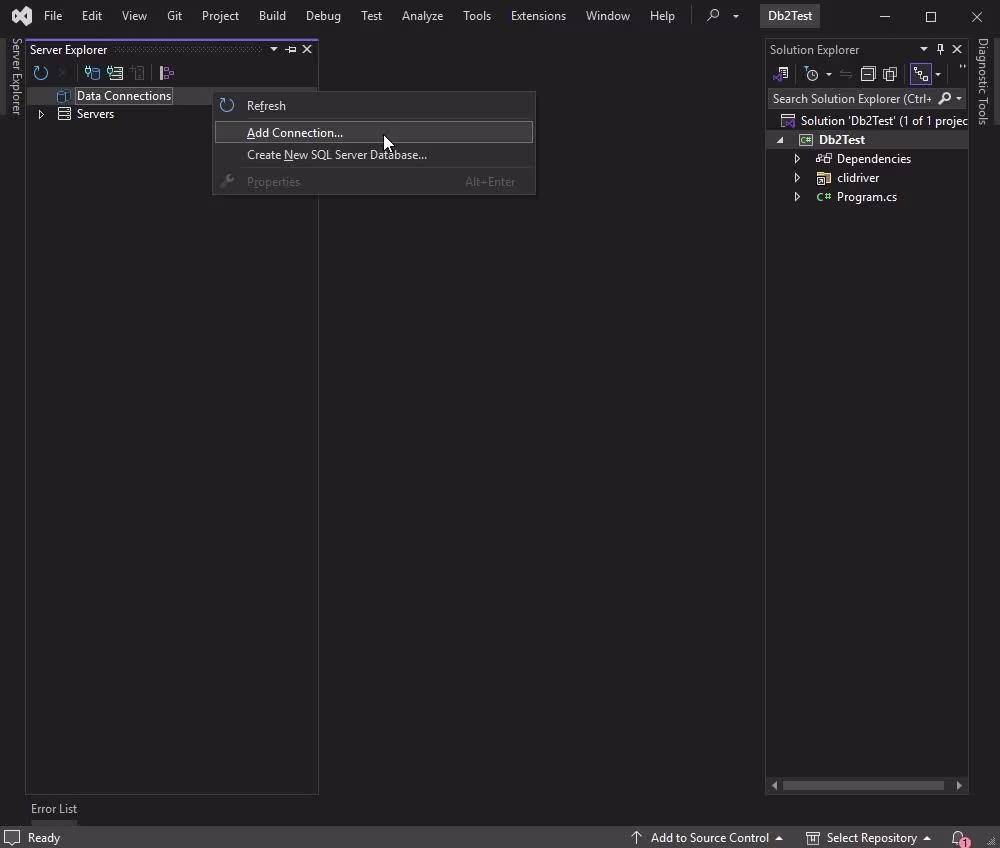
In the Server Explorer pane, right-click Data Connections and select Add Connection from the menu.
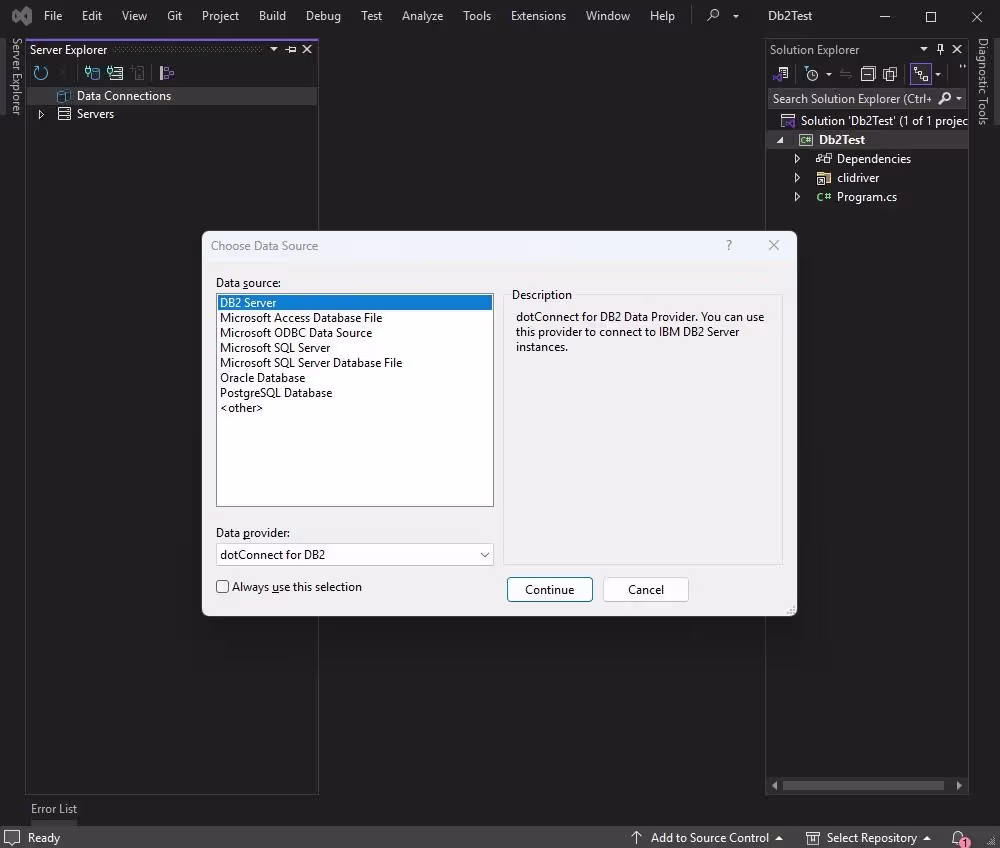
The Choose Data Source dialog opens. Select dotConnect for Db2 from the list of installed data providers. Click Continue.
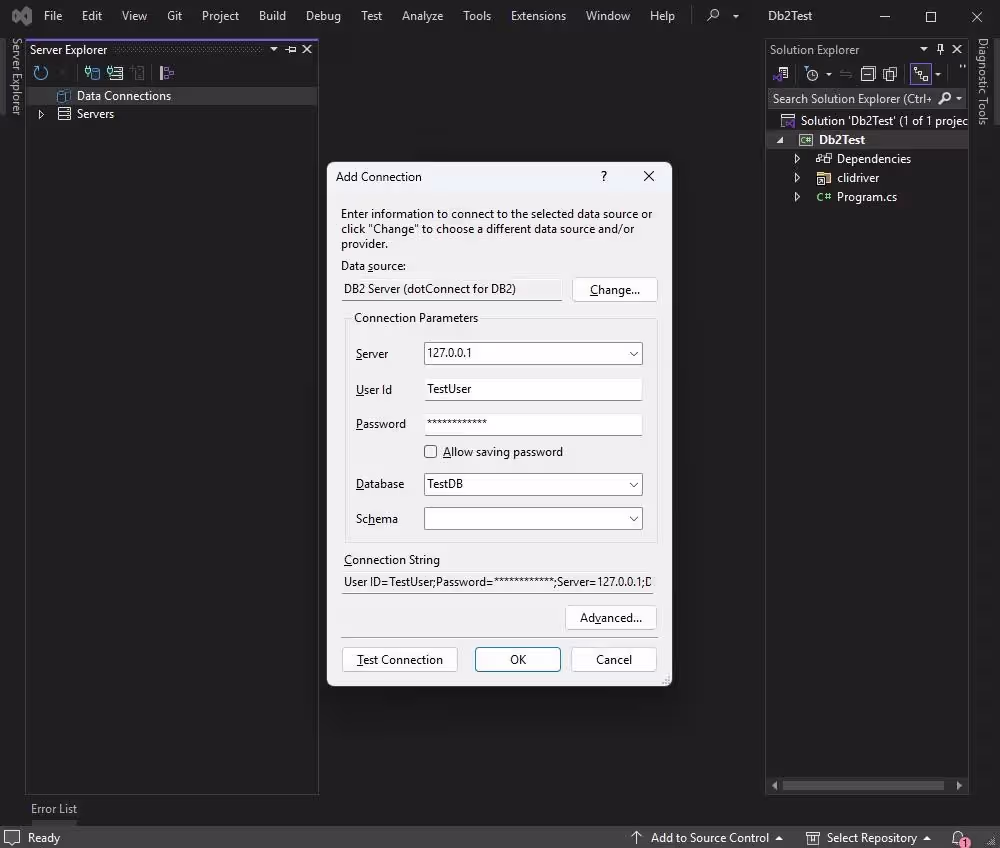
In the Add Connection dialog, fill in the necessary connection properties. Click Test Connection to verify that all the settings are correct, and you can connect to the Db2 database.
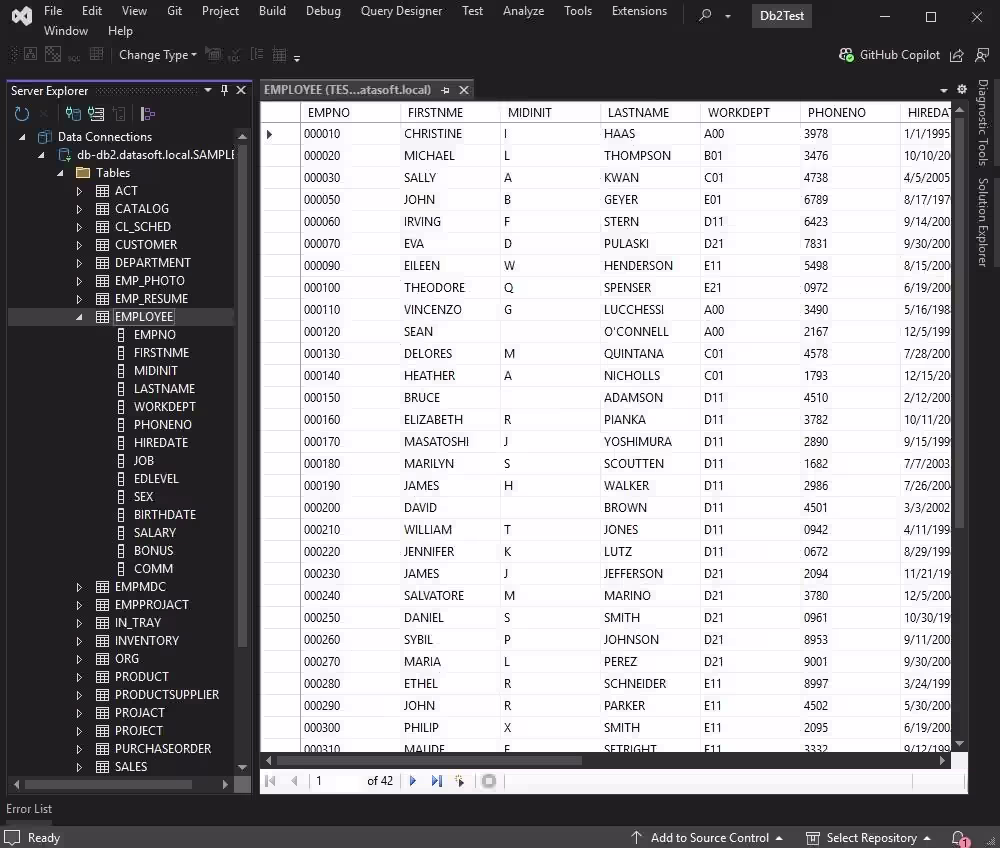
After that, expand the newly created data connection to view the database structure. You can view the list of tables in the database and columns in tables.
To retrieve data from a particular table, right-click its name and select Retrieve Data from Table. This action opens a new query window with the SELECT statement for fetching data from the table.
Connect with EF Core using Entity Developer
To create an EF Core model from the Db2 database, use the visual ORM designer Entity Developer, which allows you to visually design and generate EF Core models, making database application development faster and easier.
If Entity Developer is not installed, close Visual Studio, download Entity Developer, and install it by following the on-screen instructions.
Follow the detailed illustrated guide to create your database model using Entity Developer. When the process is complete, the generated model will open automatically. Review the model and the generated context classes.
Connect with EF Core using Scaffold-DbContext
Follow the instructions below to connect to a Db2 database using EF Core and scaffold the database context. This process generates the EF Core model classes and a DbContext based on your existing Db2 database schema.
Go to Tools > NuGet Package Manager > Package Manager Console. Run the following command to scaffold the DbContext and entity classes from your Db2 database. Make sure to replace the connection string with your actual connection details.
Notice that the -OutputDir Models parameter specifies the output directory to which the generated model classes are placed (in this case, it is Models). After running the scaffold command, EF Core will generate the DbContext class and entity classes in the specified output directory.
Review the generated code to ensure it matches your database schema.
Conclusion
Given all the benefits, it is no surprise that Db2 is a popular choice among .NET developers. However, one of the key challenges is maintaining reliable connectivity between the database and the application. This challenge is effectively addressed by Devart's dotConnect for Db2—a user-friendly and reliable solution that enables seamless connection to the data source from a .NET application on any operating system.
You can try dotConnect for Db2 in your projects with a fully functional 30-day free trial. Explore its capabilities in your daily workflows and see how it enhances your application development.
FAQ
How do you install and activate dotConnect for Db2 in a .NET project?
Install dotConnect for Db2 using the EXE installer or by adding the
Devart.Data.DB2
NuGet package to your project. Then obtain your Activation Key from your
Devart Customer Portal
and include it in the connection string using the License Key parameter.
How do you create a connection to IBM Db2 using dotConnect in C#?
Define a connection string that includes Server, Database,
User Id, Password, and the License Key. Then create a
DB2Connection instance with this string and call Open()
inside a try/catch block to test the connection and handle errors.
How do you enable secure connections to Db2 with dotConnect?
dotConnect for Db2 supports secure connections using SSL encryption.
Enable SSL parameters in the connection string or configure them on the
Db2 server and client to establish an encrypted connection.
Can you connect to Db2 using Entity Framework Core and dotConnect?
Yes. You can use Entity Developer to visually create an EF Core model from
the Db2 database, or run Scaffold-DbContext with the
Devart.Data.DB2.EFCore package and a dotConnect connection string
(including License Key) to generate the DbContext and entity classes.
Does dotConnect for Db2 support Db2-specific data types?
Yes, dotConnect fully supports IBM Db2 data types and database features,
ensuring accurate data mapping and reliable data access in .NET applications.
Is it possible to connect to Db2 using Visual Studio Server Explorer with dotConnect?
Yes. In Visual Studio Server Explorer, add a new Data Connection,
select dotConnect for Db2 as the provider, enter your Db2 server credentials,
test the connection, and browse database objects directly from the IDE.
I'm a technical content writer who loves turning complex topics — think SQL, connectors, and backend chaos–into content that actually makes sense (and maybe even makes you smile). I write for devs, data folks, and curious minds who want less fluff and more clarity. When I'm not wrangling words, you'll find me dancing salsa, or hopping between cities.