Reliable database connectivity is crucial, as applications need a way to store, manage, insert, and retrieve data to function effectively. PostgreSQL stands out as a favored option for application development because of its open-source nature, rich feature set, reliability, and excellent performance. With the backing of a vast developer community and comprehensive documentation, PostgreSQL ensures that help is always within reach.
Developers who work on .NET applications can integrate PostgreSQL as the backend to gain a reliable, scalable, and cost-effective solution that adapts to evolving needs. In this article, we'll delve into some of the most effective techniques for establishing a connection between a .NET application and PostgreSQL.
Why dotConnect for PostgreSQL?
Advanced ORM support
Fully supports EF Core, Dapper, NHibernate, LinqConnect, and other modern data access technologies for efficient and reliable data management.
Full ADO.NET compliance
Conforms to the latest ADO.NET standards and recent industry innovations for seamless and consistent integration with .NET applications.
PostgreSQL-specific data types
Includes many PostgreSQL-specific features and fully supports all unique data types for accurate and complete data representation.
Secure connection options
Provides robust security with support for SSL/SSH connections, connecting via proxy servers, embedded servers, and HTTP tunneling.
IDE integration
Features native integration with Visual Studio and complete design-time support for accelerated development.
Priority support & frequent updates
Includes priority support, detailed documentation, and regular updates for continuous improvement.
Download and activate dotConnect for PostgreSQL
You can start using dotConnect for PostgreSQL immediately with a 30-day free trial. Choose one of the following installation options:
To connect to a PostgreSQL database, replace the code in Program.cs and specify the relevant values for Host, Port, User Id, Password, Database, Schema, and License Key. The result should look like this:
staticvoidMain(string[] args) {
// Define the connection stringstring connectionString =
"Host=<server>;" +
"Port=<port>;" +
"User Id=<user_id>;" +
"Password=<password>;" +
"Database=<database_name>;" +
"Schema=public;" +
"License Key=**********;";
// Create a new connection objectusing(PgSqlConnection connection = new PgSqlConnection(connectionString)) {
try {
connection.Open();
// Optionally set schema if neededvar cmd = new PgSqlCommand("SET search_path TO public;", connection);
cmd.ExecuteNonQuery();
Console.WriteLine("Connection successful!");
} catch (Exception ex) {
Console.WriteLine("An error occurred: " + ex.Message);
}
}
}
Based on your requirements, you may want to extend this sample to run queries and add more robust exception handling. Press F5 or click Start on the toolbar.
Connection strings
Property
Description
Host
Specifies the host name or IP address of the PostgreSQL server.
Port
Specifies the port on which the PostgreSQL server listens.
User Id
Specifies the user ID used to authenticate with PostgreSQL.
Password
Specifies the password for the user ID.
Database
Specifies the default database to use after connecting.
Schema
Specifies the PostgreSQL schema to use.
License Key
Specifies your license key. This is required only when you use .NET Standard-compatible assemblies.
Connect using the SSL/TLS connection
To establish an SSL connection to the database by using the specified connection string parameters, update your code in Program.cs to match the following format.
staticvoidMain(string[] args) {
// Define the connection string with SSL options
PgSqlConnectionStringBuilder connectionStringBuilder = new PgSqlConnectionStringBuilder {
Host = "<host>",
UserId = "<user_id>",
Password = "<password>",
Database = "<database_name>",
SslMode = SslMode.Require,
SslOptions = new SslOptions {
CACert = @"C:\root.crt",
Cert = @"C:\client.crt",
Key = @"C:\client.key"
},
LicenseKey = "**********"
};
// Create a new connection objectusing(PgSqlConnection connection = new PgSqlConnection(connectionStringBuilder.ConnectionString)) {
try {
// Open the connection
connection.Open();
Console.WriteLine("SSL connection opened successfully.");
// Check the connection stateif (connection.State == System.Data.ConnectionState.Open) {
Console.WriteLine("Connection is open.");
} else {
Console.WriteLine("Connection is not open.");
}
} catch (Exception ex) {
Console.WriteLine("An error occurred: " + ex.Message);
}
}
}
Press F5 or click Start on the toolbar.
Connect using Server Explorer
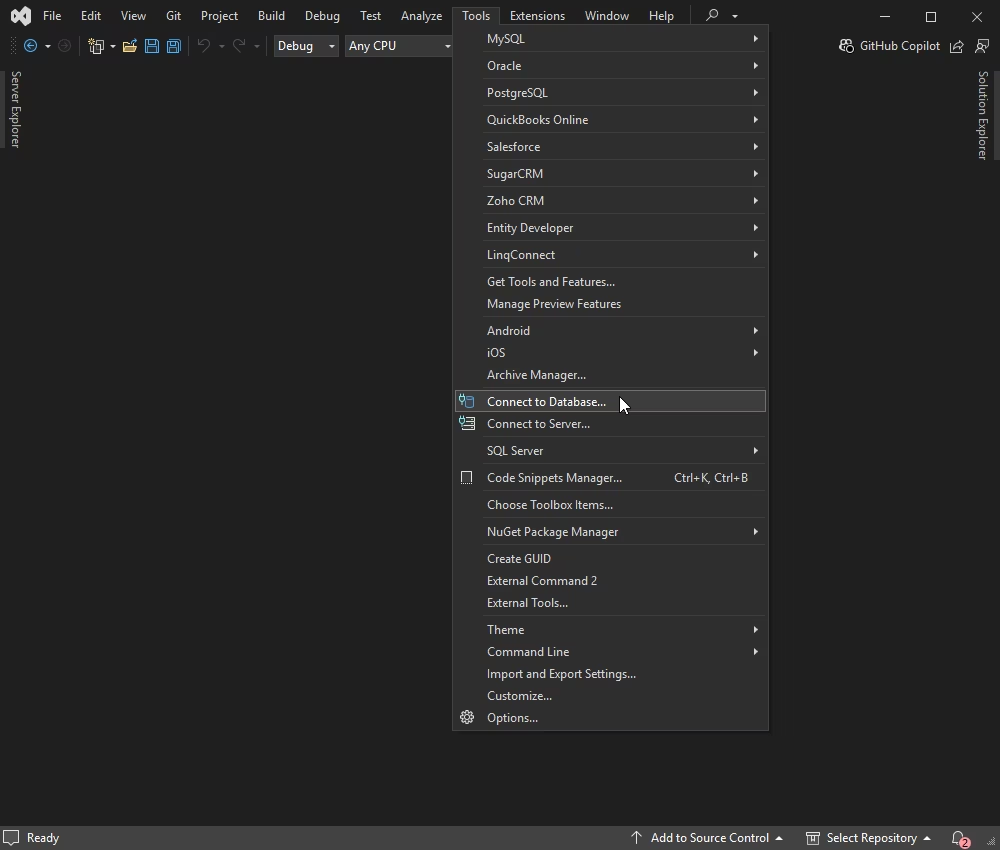
To connect to your PostgreSQL database in Visual Studio by using the built-in Data Explorer, follow these steps:
1. On the Tools menu, select Connect to Database.
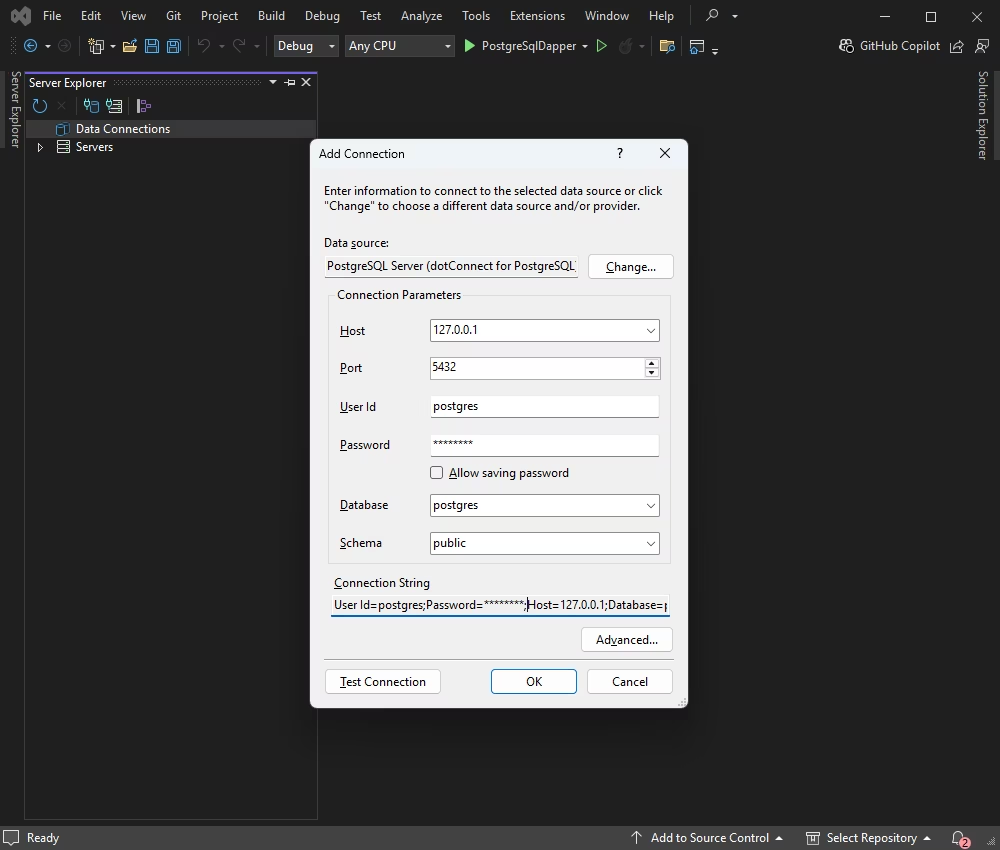
2. In the Add Connection dialog, select PostgreSQL as the data source, and then click OK.
3. Enter your server connection details, and then click OK.
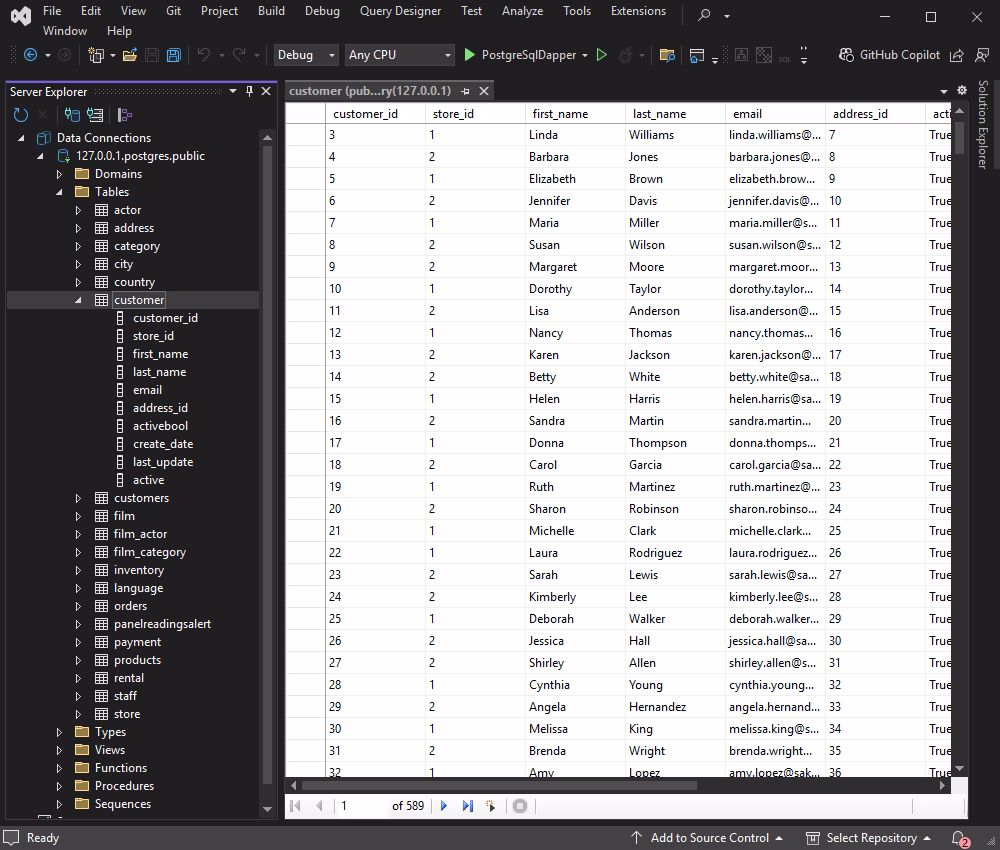
Once connected, you can browse tables, run queries, and manage data directly in Visual Studio.
Connect with EF Core using Entity Developer
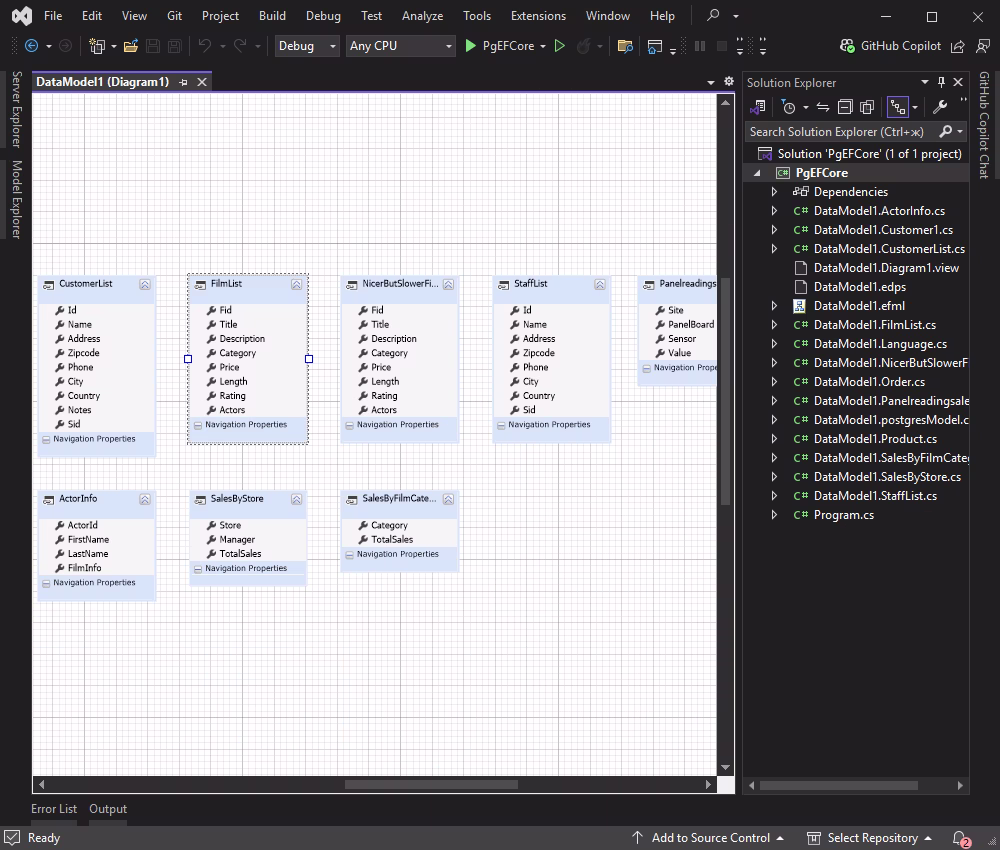
If you need to create an EF Core model from your PostgreSQL database, use a visual ORM designer such as Entity Developer.
Entity Developer lets you design and generate EF Core models visually, so you can build the data layer faster and with less manual work. If you do not have Entity Developer installed, close Visual Studio, download Entity Developer, and complete the installation by following the on-screen instructions.
To build your database model, follow the detailed illustrated guide for Entity Developer. When the process finishes, Entity Developer opens the generated model. You can work with the diagram, edit fields and relationships, and generate SQL to apply changes—either as a script or directly to the database.
All steps in this guide use Visual Studio. If you work in VS Code, JetBrains Rider, or a similar IDE, you can run Entity Developer as a standalone application and work with your models just as efficiently.
Use the following example to check a database connection in an EF Core C# Console application when connection settings are stored in the DbContext class.
classProgram {
staticvoidMain(string[] args) {
// Create an instance of the DbContextvar context = new DvdRentalContext();
try {
// Attempt to open the connection
context.Database.OpenConnection();
Console.WriteLine("Connection opened successfully.");
// Check the connection stateif (context.Database.GetDbConnection().State == System.Data.ConnectionState.Open) {
Console.WriteLine("Connection is open.");
} else {
Console.WriteLine("Connection is not open.");
}
} catch (Exception ex) {
Console.WriteLine("An error occurred: " + ex.Message);
} finally {
// Close the connection
context.Database.CloseConnection();
}
}
}
Connect with EF Core using Scaffold-DbContext
1. First, make sure EF Core tools are available in your environment. Install the CLI tool globally.
dotnet tool install --global dotnet-ef
2. Install the EF Core tools package for your project (Package Manager Console).
3. Generate the DbContext and entity classes from your PostgreSQL database. Run the following command in the Package Manager Console (replace the connection values as needed).
4. Review the generated DbContext and entity classes and verify that they reflect your database schema.
Video tutorial: How to connect a .NET console application to a PostgreSQL database
Conclusion
This article provides detailed guidance on how to connect .NET applications to a PostgreSQL database by using several approaches. It covers multiple connection options, including SSL/TLS, and shows how to use Entity Framework Core with Scaffold-DbContext.
Devart dotConnect for PostgreSQL can help improve application responsiveness and reduce overhead in common database operations. Start a free trial to evaluate connectivity, performance, and security in your .NET projects.
FAQ
How do you install and activate dotConnect for PostgreSQL in a .NET project?
Install dotConnect for PostgreSQL either by running the Windows installer (EXE) or by adding the Devart.Data.PostgreSql NuGet package to your .NET project. Then, retrieve your activation key from the Devart Customer Portal and specify it in your connection string by using the License Key parameter to activate the provider and connect successfully.
How do you create a connection to PostgreSQL using dotConnect in C#?
Define a connection string that includes Host, User Id, Password, Database, and (if required) License Key. Then create a PgSqlConnection with this string and call Open() inside a try/catch block to verify the connection and handle any errors.
How do you enable SSL/TLS for secure PostgreSQL connections with dotConnect?
Add SslMode=Require and provide the certificate file paths (for example, CACert, Cert, and Key) in the connection string. Then create a PgSqlConnection with this string and call Open() to establish an encrypted SSL/TLS session.
Can you connect to PostgreSQL using Entity Framework Core and dotConnect?
Yes, you can connect to PostgreSQL using Entity Framework Core and dotConnect. You can either use Entity Developer to visually create an EF Core model from the database and generate the DbContext and entity classes, or run Scaffold-DbContext with a dotConnect connection string (including License Key) to scaffold the DbContext and entities from an existing database.
Is it possible to connect to PostgreSQL using Visual Studio Server Explorer with dotConnect?
Yes. In Visual Studio Server Explorer, you can add a new Data Connection, select dotConnect for PostgreSQL as the data provider, enter your PostgreSQL connection details, test the connection, and then browse and work with database objects directly in the IDE.
I'm a technical content writer who loves breaking complex tech topics into clear and helpful content
that's enjoyable to read. With a solid writing background and growing skill in software development and
database tools, I create content that's accurate, easy to follow, and genuinely useful. When I'm not
writing, you'll probably find me learning something new or sweating it out at the gym.