This tutorial shows how to perform data operations in .NET applications using Dapper. With dotConnect for PostgreSQL,
you can create Dapper models, build a console application, and execute CRUD operations through a reliable connection class that allows efficient and smooth database interaction.
Why dotConnect for PostgreSQL?
Advanced ORM support
Fully supports EF Core, Dapper, NHibernate, LinqConnect, and other modern data access technologies for efficient and reliable data management.
Full ADO.NET compliance
Conforms to the latest ADO.NET standards and recent industry innovations for seamless and consistent integration with .NET applications.
PostgreSQL-specific data types
Includes many PostgreSQL-specific features and fully supports all unique data types for accurate and complete data representation.
Secure connection options
Provides robust security with support for SSL/SSH connections, connecting via proxy servers, embedded servers, and HTTP tunneling.
IDE integration
Features native integration with Visual Studio and complete design-time support for accelerated development.
Priority support & frequent updates
Includes priority support, detailed documentation, and regular updates for continuous improvement.
Download and activate dotConnect for PostgreSQL
You can start using dotConnect for PostgreSQL immediately with a 30-day free trial. Choose one of the following installation options:
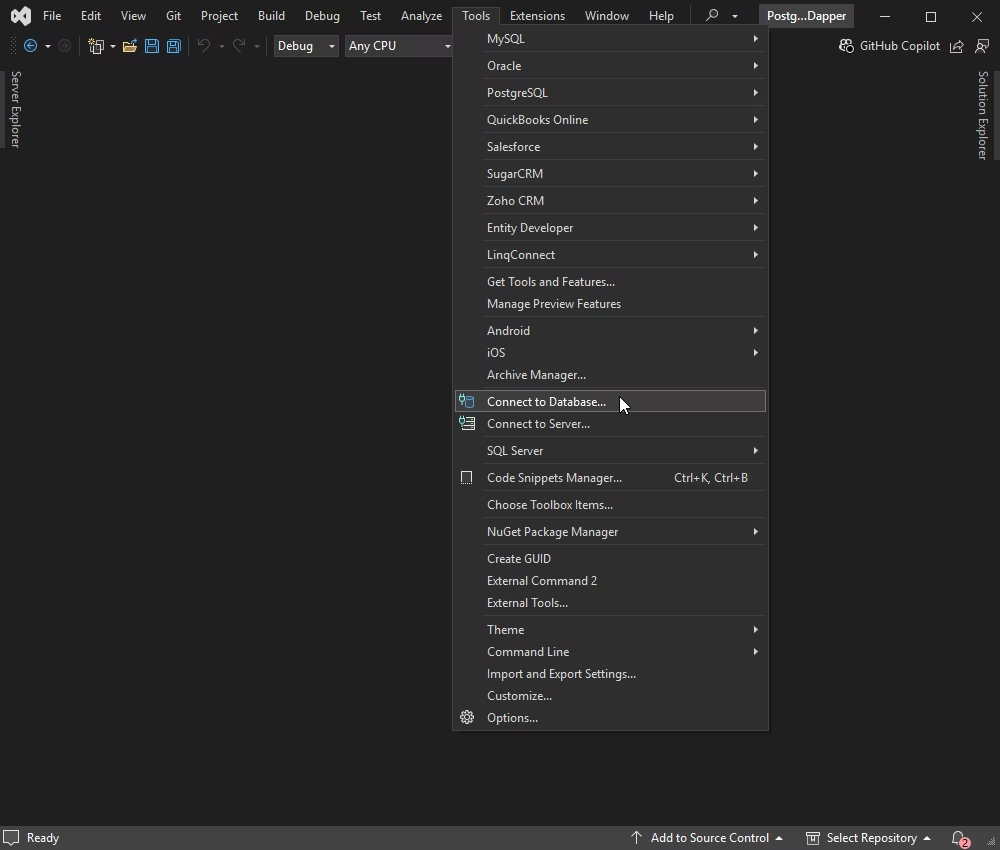
To connect to your PostgreSQL database using Visual Studio's built-in Data Explorer:
1. Go to the Tools menu and select Connect to Database.
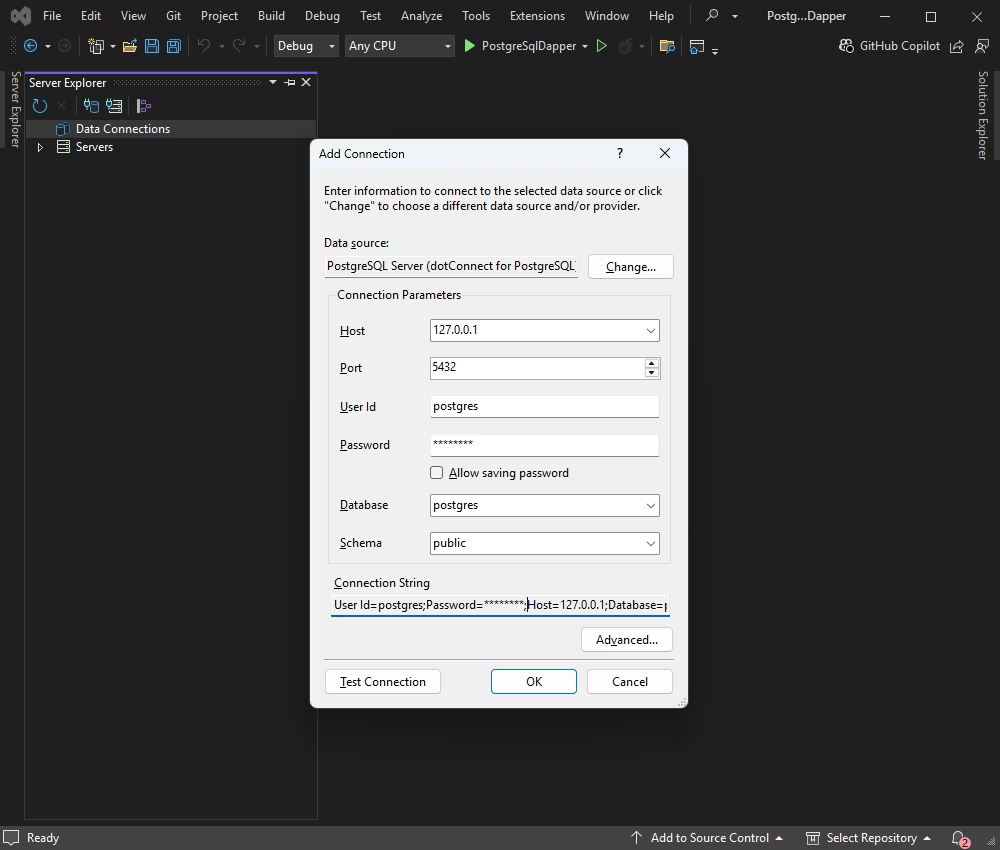
2. In the Add Connection dialog, choose PostgreSQL as the data source.
3. Enter your server details and credentials, then click Connect.
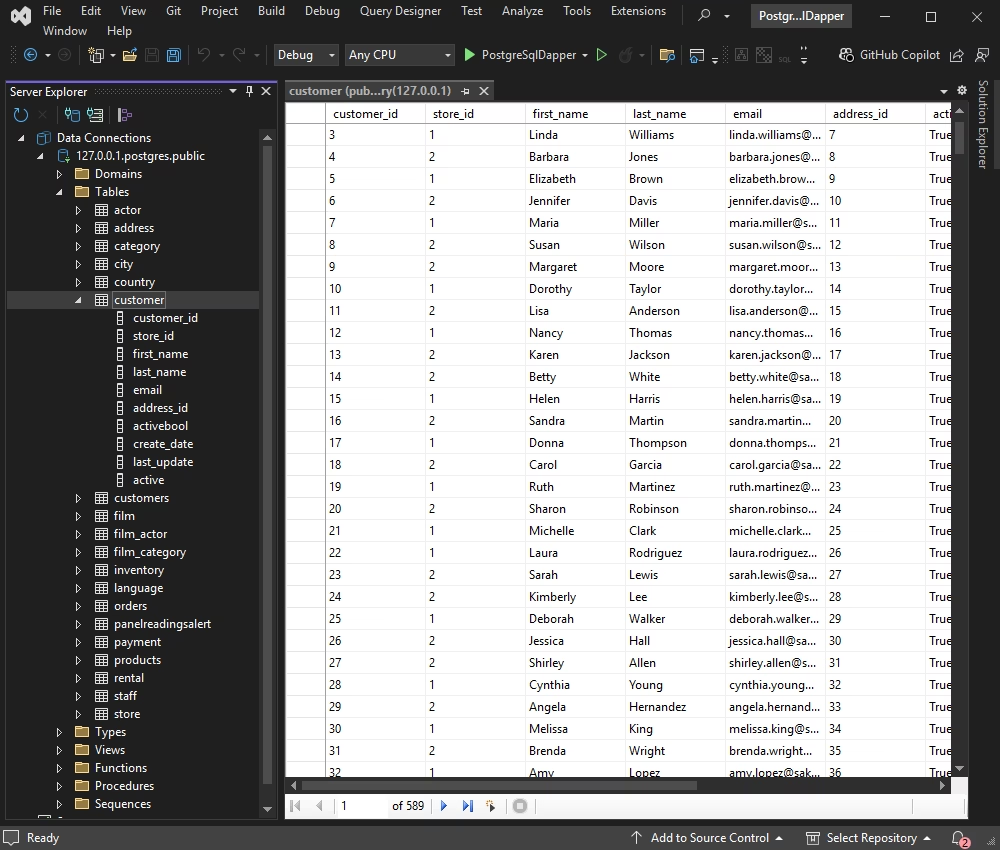
Once connected, you can use Data Explorer to browse tables, run queries, and manage data directly from within Visual Studio.
Connect to PostgreSQL and retrieve data
In this section, we'll demonstrate how to establish a connection to your PostgreSQL database from the application, execute a query, and display the results from the Customer table in the console.
Create a reusable connection class
Define a static class to store your connection string. Create a file named DatabaseConfig.cs and add the following code:
Replace the placeholder values with your actual PostgreSQL credentials. If you're using the licensed version of dotConnect for PostgreSQL, include your License Key in the connection string.
Connection strings
Property
Description
Host
Host name or IP address of the PostgreSQL server
Port
Port on which the PostgreSQL server listens
User Id
User ID used to authenticate with PostgreSQL
Password
Password for the user ID
Database
Default database to use after connecting
Schema
PostgreSQL schema to use
License Key
Your license key. This is required only when you use .NET Standard-compatible assemblies.
Create a model class for the Customer table
Next, define a class that maps to the Customer table. Create a file named Customer.cs and insert the following code into it:
using System.Data;
using Dapper;
using Devart.Data.PostgreSql;
namespaceDapperPostgresExample
{
classProgram
{
staticvoidMain(string[] args)
{
using (IDbConnection db = new PgSqlConnection(DatabaseConfig.ConnectionString))
{
try
{
db.Open();
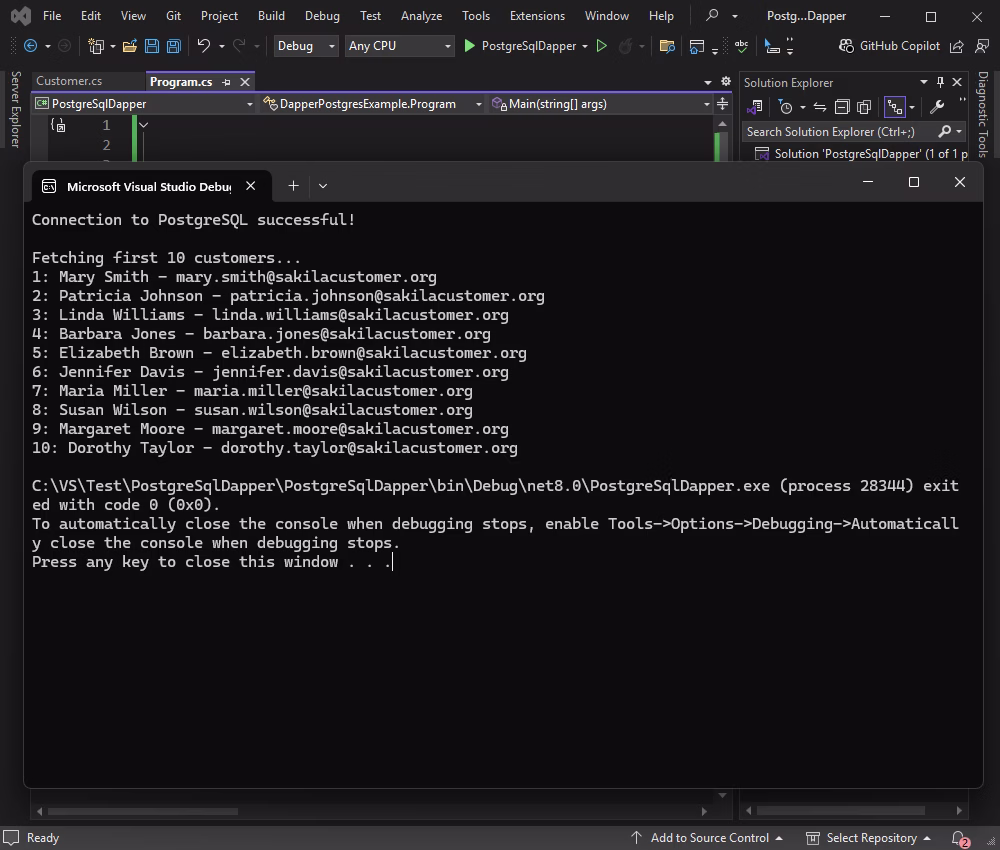
Console.WriteLine("Connection to PostgreSQL successful!");
// Fetch and display customers
DisplayCustomers(db);
}
catch (Exception ex)
{
Console.WriteLine($"Connection failed: {ex.Message}");
}
}
}
privatestaticvoidDisplayCustomers(IDbConnection db)
{
Console.WriteLine("\nFetching first 10 customers...");
string selectQuery = "SELECT customer_id AS Customer_Id, first_name AS First_Name, last_name AS Last_Name, email FROM Customer ORDER BY customer_id LIMIT 10;";
var customers = db.Query<Customer>(selectQuery);
foreach (var customer in customers)
{
Console.WriteLine($"{customer.Customer_Id}: {customer.First_Name}{customer.Last_Name} - {customer.Email}");
}
}
}
}
Run the application
Build and run your application by pressing F5 or selecting Start from the Visual Studio menu. If everything is set up correctly,
the console will display the first 10 records from the Customer table.
Batch insert new records using Dapper
This example demonstrates how to insert multiple records into a PostgreSQL database using Dapper within a single transaction.
This approach improves performance and ensures that the entire operation is atomic—meaning either all records are inserted, or none if an error occurs.
Update the Main method
Replace your existing Main method with the following code to include the batch insert and result display.
using System.Data;
using Dapper;
using Devart.Data.PostgreSql;
namespaceDapperPostgresExample
{
classProgram
{
staticvoidMain(string[] args)
{
using (IDbConnection db = new PgSqlConnection(DatabaseConfig.ConnectionString))
{
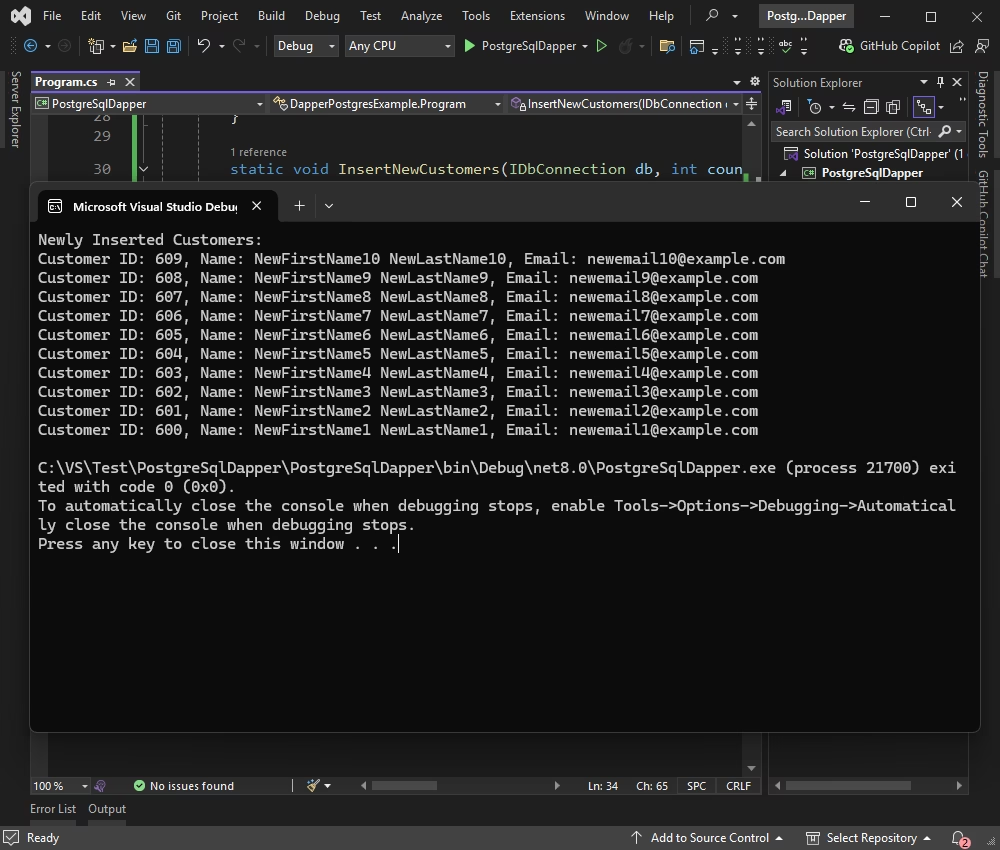
// Insert 10 new rows
InsertNewCustomers(db, 10);
// Fetch and display the newly inserted customersstring selectQuery = "SELECT customer_id, first_name, last_name, email FROM customer ORDER BY customer_id DESC LIMIT 10";
var newCustomers = db.Query<Customer>(selectQuery).ToList();
Console.WriteLine("Newly Inserted Customers:");
foreach (var customer in newCustomers)
{
Console.WriteLine($"Customer ID: {customer.Customer_Id}, Name: {customer.First_Name}{customer.Last_Name}, Email: {customer.Email}");
}
}
}
staticvoidInsertNewCustomers(IDbConnection db, int count)
{
string insertQuery = @"
INSERT INTO customer(first_name, last_name, email, store_id, address_id, active, create_date)
VALUES(:First_Name,:Last_Name,:Email, 1, 1, 1, NOW())
";
for (int i = 0; i < count; i++)
{
db.Execute(insertQuery, new
{
First_Name = $"NewFirstName{i + 1}",
Last_Name = $"NewLastName{i + 1}",
Email = $"newemail{i + 1}@example.com"
});
}
}
}
}
Output example
When you run the application, you should see the following result:
Update PostgreSQL data using Dapper
In this example, we'll batch update customers whose customer_id values are between 590 and 599. We'll modify their first and last names, then display the updated records in the console.
using System.Data;
using Dapper;
using Devart.Data.PostgreSql;
namespaceDapperPostgresExample
{
classProgram
{
staticvoidMain(string[] args)
{
using (IDbConnection db = new PgSqlConnection(DatabaseConfig.ConnectionString))
{
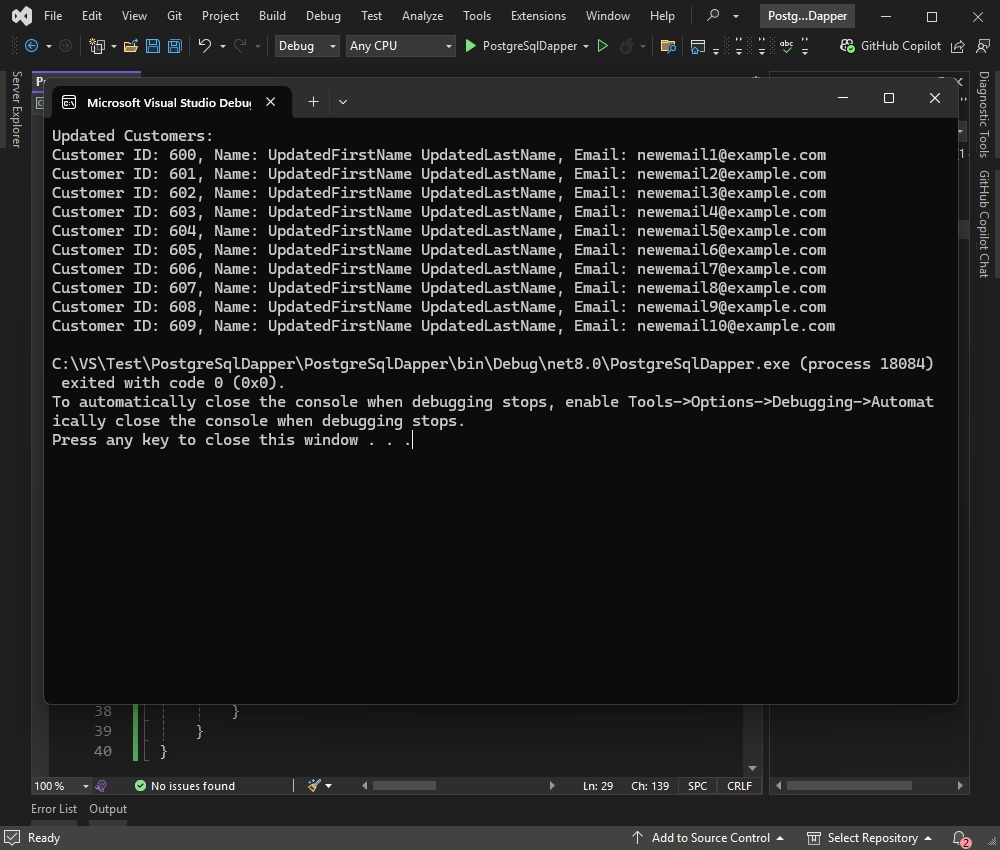
// Update customers with Customer_Id between 600 and 609string updateQuery = @"
UPDATE customer
SET first_name =:FirstName,
last_name =:LastName
WHERE customer_id BETWEEN 600 AND 609 ";
db.Execute(updateQuery, new
{
FirstName = "UpdatedFirstName",
LastName = "UpdatedLastName"
});
// Fetch and display the updated customersstring selectQuery = "SELECT customer_id, first_name, last_name, email FROM customer WHERE customer_id BETWEEN 600 AND 609";
var customers = db.Query<Customer>(selectQuery).ToList();
Console.WriteLine("Updated Customers:");
foreach (var customer in customers)
{
Console.WriteLine($"Customer ID: {customer.Customer_Id}, Name: {customer.First_Name}{customer.Last_Name}, Email: {customer.Email}");
}
}
}
}
}
Build and run the application to insert sample data and view the results.
Delete PostgreSQL data using Dapper
In this example, we'll delete multiple customer records with customer_id values between 590 and 599. If your database includes related records
(such as rentals or payments), ensure they are removed first.
Note
This example assumes that related records have been handled in advance.
using System.Data;
using Dapper;
using Devart.Data.PostgreSql;
namespaceDapperPostgresExample
{
classProgram
{
staticvoidMain(string[] args)
{
using (IDbConnection db = new PgSqlConnection(DatabaseConfig.ConnectionString))
{
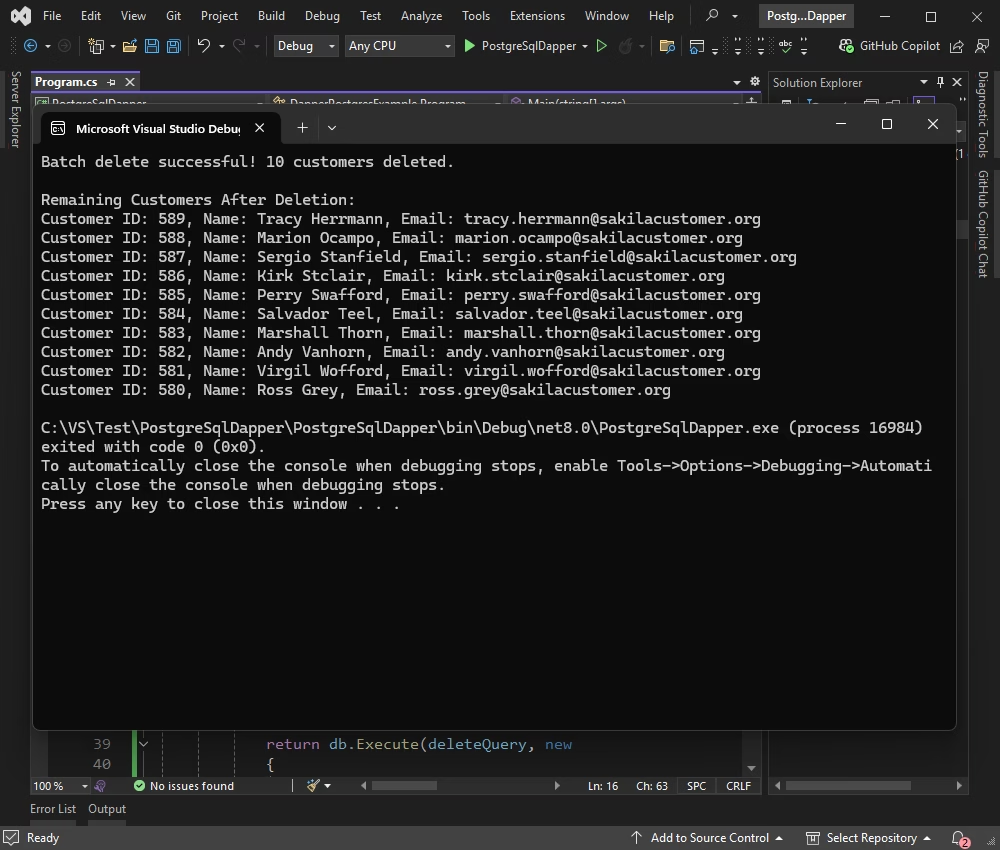
// Delete rows with customer_id between 610 and 619int deletedCount = DeleteCustomers(db, 610, 619);
// Display the result of the deletion
Console.WriteLine($"Batch delete successful! {deletedCount} customers deleted.");
// Fetch and display the remaining customersstring selectQuery = "SELECT customer_id, first_name, last_name, email FROM customer ORDER BY customer_id DESC LIMIT 10";
var remainingCustomers = db.Query<Customer>(selectQuery).ToList();
Console.WriteLine("\nRemaining Customers After Deletion:");
foreach (var customer in remainingCustomers)
{
Console.WriteLine($"Customer ID: {customer.Customer_Id}, Name: {customer.First_Name}{customer.Last_Name}, Email: {customer.Email}");
}
}
}
staticintDeleteCustomers(IDbConnection db, int startId, int endId)
{
string deleteQuery = @"
DELETE FROM customer
WHERE customer_id BETWEEN :StartId AND :EndId ";
return db.Execute(deleteQuery, new
{
StartId = startId,
EndId = endId
});
}
}
}
The retrieved data is displayed in the console, showing the ID, first name, last name, and email of each remaining customer.
Video tutorial: Connect PostgreSQL using Dapper ORM
Conclusion
In this tutorial, we explored how integrating Dapper with PostgreSQL using dotConnect for PostgreSQL simplifies data operations in .NET applications.
The powerful features of dotConnect, combined with Dapper's lightweight and efficient design, provide a fast and flexible approach to managing PostgreSQL database interactions.
Together, these tools enable you to build scalable, maintainable, and high-performance .NET solutions with seamless PostgreSQL connectivity.
FAQ
How do you install and activate dotConnect for PostgreSQL in a .NET project?
Install dotConnect for PostgreSQL either by running the Windows installer (EXE) or by adding the Devart.Data.PostgreSql NuGet package to your .NET project. Then, retrieve your activation key from the Devart Customer Portal and specify it in your connection string by using the License Key parameter to activate the provider and connect successfully.
How do you create a connection to PostgreSQL using dotConnect in C#?
Define a connection string that includes Host, User Id, Password, Database, and (if required) License Key. Then create a PgSqlConnection with this string and call Open() inside a try/catch block to verify the connection and handle any errors.
How do you enable SSL/TLS for secure PostgreSQL connections with dotConnect?
Add SslMode=Require and provide the certificate file paths (for example, CACert, Cert, and Key) in the connection string. Then create a PgSqlConnection with this string and call Open() to establish an encrypted SSL/TLS session.
Can you connect to PostgreSQL using Entity Framework Core and dotConnect?
Yes, you can connect to PostgreSQL using Entity Framework Core and dotConnect. You can either use Entity Developer to visually create an EF Core model from the database and generate the DbContext and entity classes, or run Scaffold-DbContext with a dotConnect connection string (including the License Key) to scaffold the DbContext and entities from an existing database.
Is it possible to connect to PostgreSQL using Visual Studio Server Explorer with dotConnect?
Yes. In Visual Studio Server Explorer, you can add a new Data Connection, select dotConnect for PostgreSQL as the data provider, enter your PostgreSQL connection details, test the connection, and then browse and work with database objects directly in the IDE.
I'm a technical content writer who loves turning complex topics — think SQL, connectors, and backend chaos–into content that actually makes sense (and maybe even makes you smile). I write for devs, data folks, and curious minds who want less fluff and more clarity. When I'm not wrangling words, you'll find me dancing salsa, or hopping between cities.