This tutorial explains how to use NHibernate for data operations in .NET applications. Using dotConnect for Oracle, we will create NHibernate models, develop a console application, and implement CRUD operations with a reliable connection class for seamless database interaction.
Why dotConnect for Oracle?
Advanced ORM support
Fully supports EF Core, Dapper, NHibernate, LinqConnect, and more for efficient data management.
Full ADO.NET compliance
Conforms to the latest ADO.NET standards for seamless integration with .NET applications.
Oracle-specific data types
Supports Oracle-specific features and data types for accurate and complete data representation.
Secure connection options
Provides robust security with support for SSL/SSH connections, connecting via proxy servers, embedded servers, and HTTP tunneling.
IDE integration
Features native integration with Visual Studio and complete design-time support for accelerated development.
Priority support & frequent updates
Includes priority support, detailed documentation, and regular updates for continuous improvement.
Download and activate dotConnect for Oracle
You can start using dotConnect for Oracle immediately with a 30-day free trial. Choose one of the following installation options:
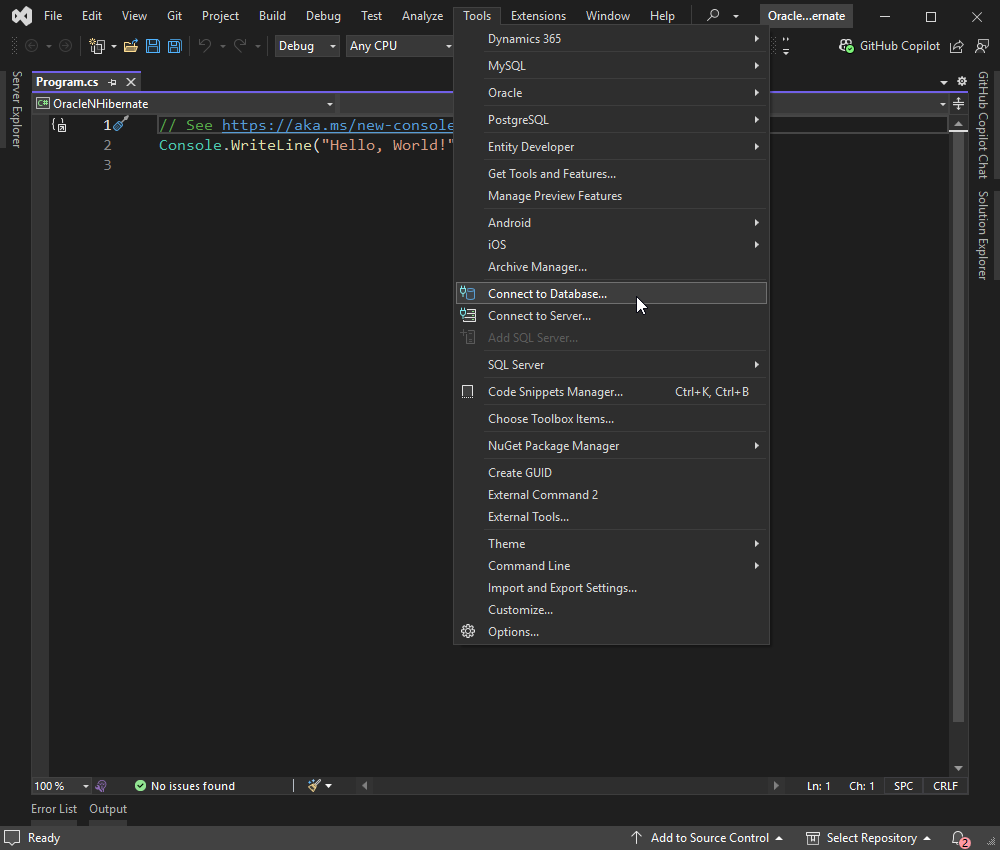
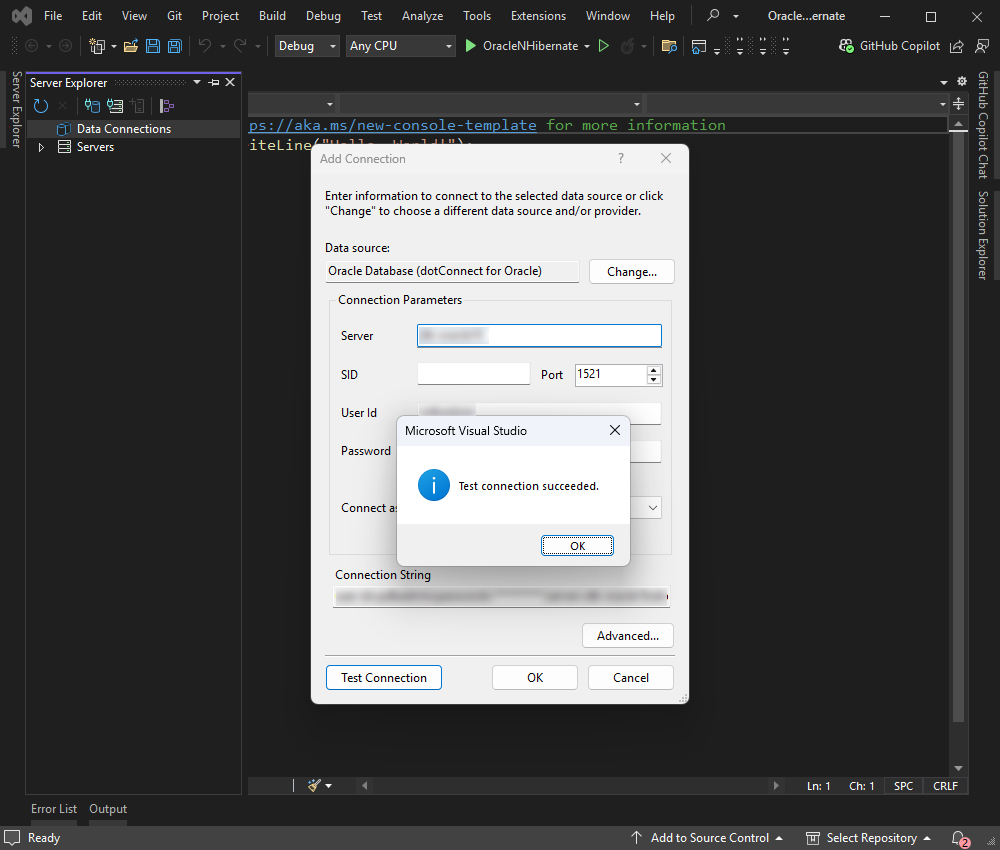
Connect to Oracle using the built-in Data Explorer, click Tools and select Connect to Database.
Then, choose the Oracle data source, fill in the details of your Oracle database connection, and click OK.
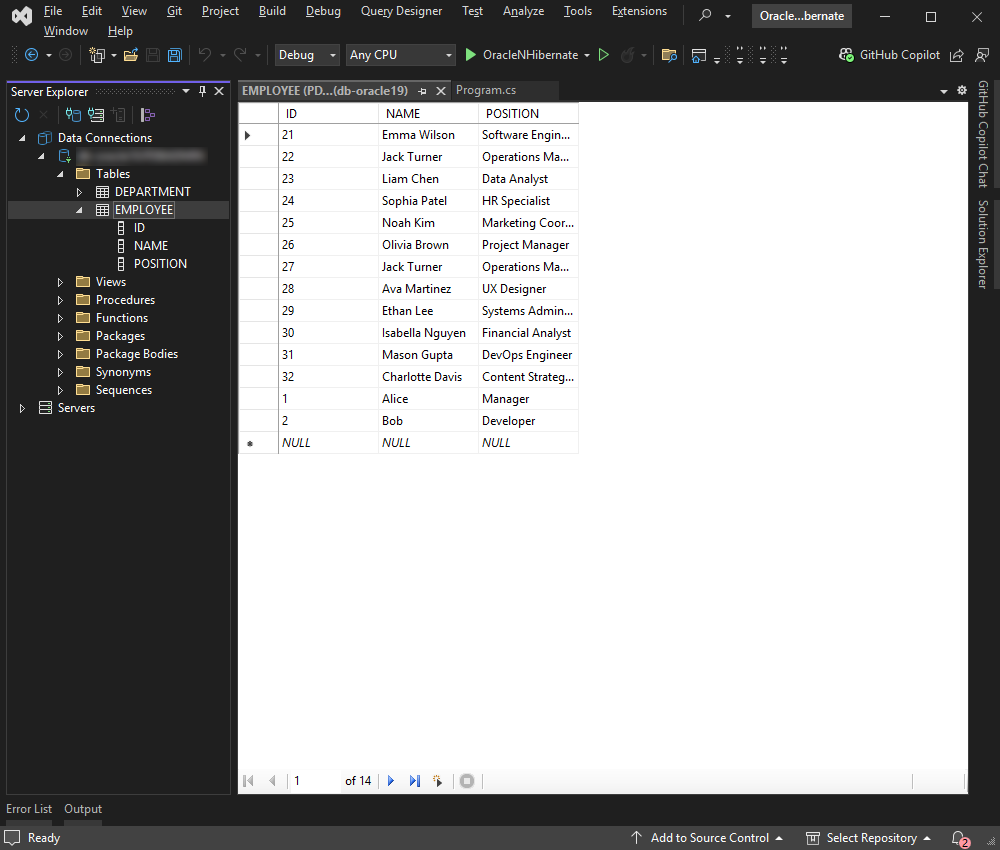
After establishing the connection, select the tables and fields you want to work with and retrieve the data.
Create an NHibernate model via Entity Developer
Entity Developer allows you to visually design and generate EF Core models, making database application development faster, easier, and more efficient. If you don't have it already installed, close your Visual Studio instance and download Entity Developer. Install it following the on-screen instructions.
Follow the detailed illustrated guide to create your database model using Entity Developer. When this process is complete, the model you created opens, so you can work with it.
Given that you have the DataModel1.EMPLOYEE.cs, DataModel1.EMPLOYEE.hbm.xml, and app.config files already set up, let's integrate everything into a console application.
Configure NHibernate SessionFactory
Create a new class NHibernateHelper.cs in your project:
Replace the placeholders in the connection string with your actual Oracle database credentials.
Note
If you're using a purchased dotConnect for Oracle license, include the license key in the connection strings.
Direct mode options properties
Property
Meaning
Direct
Specifies whether to use the Direct mode
Server
States the IP address or hostname of the Oracle server
Port
Indicates the port number for the Oracle server
ServiceName
Determines the service name for the database instance
Sid
Specifies the Oracle System Identifier (SID) for the database instance
UserId
States the Oracle database username
Password
Defines the password that is associated with the Oracle database username
License Key
Specifies your license key; it is required only when using .NET Standard-compatible assemblies
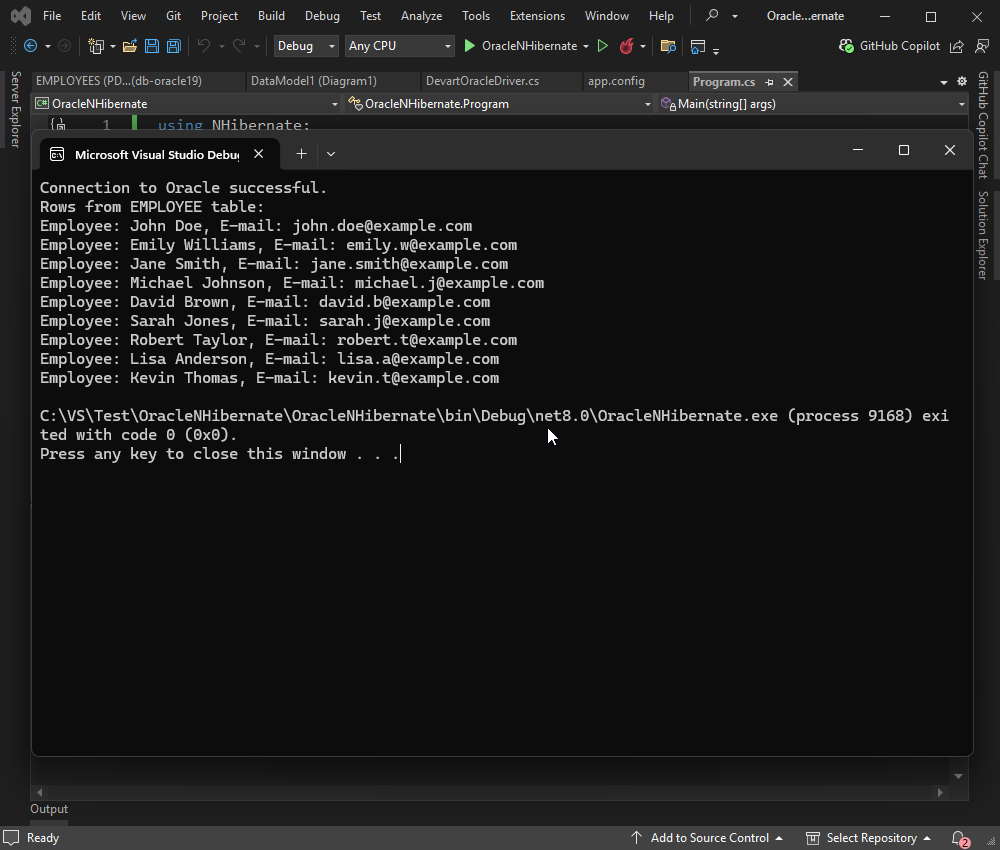
Connect to Oracle and retrieve data
In this example, we connect a C# console application to an Oracle database using NHibernate and retrieve records from the EMPLOYEE table. The application opens a session through
the NHibernateHelper, performs a LINQ query to fetch all employees, and prints each employee’s first name, last name, and email to the console. If the connection or query fails,
the exception is caught and an error message is displayed. For successful execution, ensure that the EMPLOYEE class is properly mapped to the Oracle table and that the NHibernateHelper is correctly configured with your database settings.
using NHibernate;
namespaceOracleNHibernate
{
classProgram
{
staticvoidMain(string[] args)
{
try
{
using (ISession session = NHibernateHelper.OpenSession())
{
Console.WriteLine("Connection to Oracle successful.");
// Use the correct entity class and property namesvar employees = session.Query<EMPLOYEE>().ToList();
Console.WriteLine("Rows from EMPLOYEE table:");
foreach (var employee in employees)
{
Console.WriteLine($"Employee: {employee.FIRSTNAME}{employee.LASTNAME}, E-mail: {employee.EMAIL}");
}
}
}
catch (Exception ex)
{
Console.WriteLine("Connection to Oracle failed.");
Console.WriteLine(ex.Message);
}
}
}
}
Build and run your application by pressing F5 or selecting Start from the menu.
Insert new records using NHibernate
In this example, we will insert a new test row into the EMPLOYEE table using NHibernate. First, the application opens a session with the Oracle database using a helper class. It then creates a new EMPLOYEE object with sample data, including an ID, name, email, hire date, and salary. The new employee is saved to the database within a transaction to ensure data integrity.
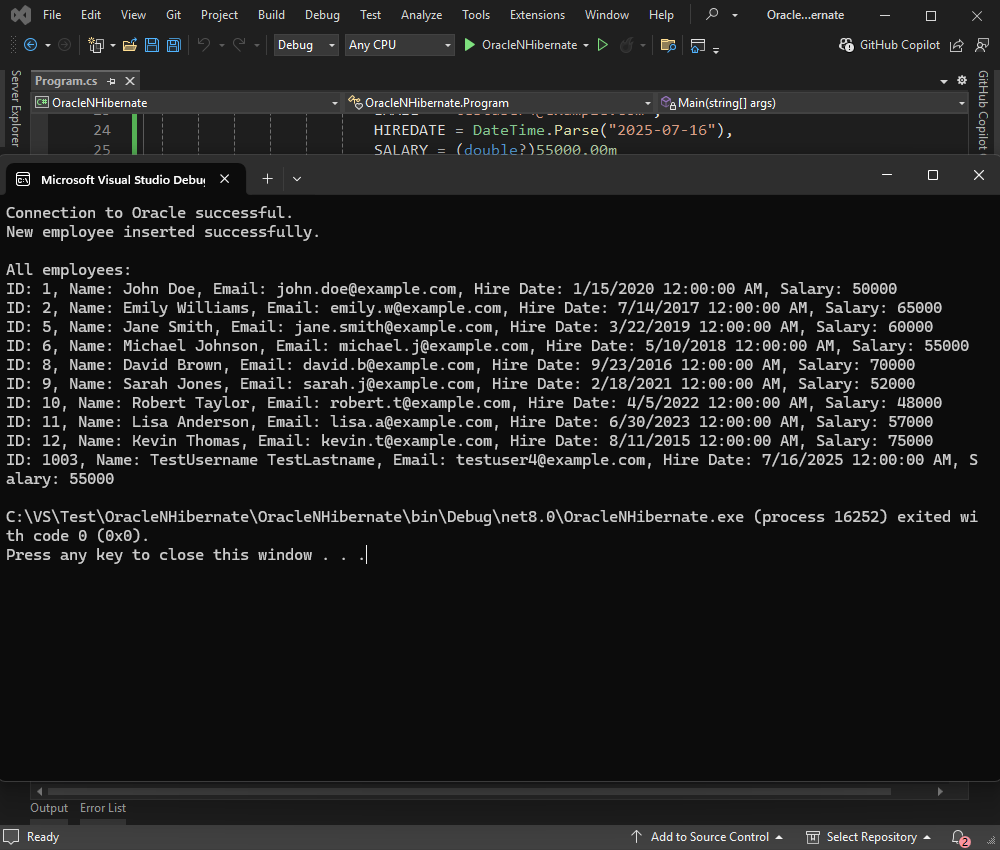
After the insertion, the application retrieves all rows from the EMPLOYEE table using a LINQ query and displays each employee's ID, name, email, hire date, and salary in the console.
This allows us to confirm that the new record has been successfully added. If there is an issue at any point - such as a connection failure or mapping error - an exception is caught, and an error
message is displayed. This example demonstrates a complete cycle of inserting and reading data with NHibernate in a simple, console-based application.
using NHibernate;
using System;
using System.Linq;
namespaceOracleNHibernate
{
classProgram
{
staticvoidMain(string[] args)
{
try
{
using (ISession session = NHibernateHelper.OpenSession())
{
Console.WriteLine("Connection to Oracle successful.");
// Create a new employeevar newEmployee = new EMPLOYEE
{
EMPLOYEEID = 1003,
FIRSTNAME = "TestUsername",
LASTNAME = "TestLastname",
EMAIL = "[email protected]",
HIREDATE = DateTime.Parse("2025-07-16"),
SALARY = (double?)55000.00m
};
// Save the new employeeusing (ITransaction transaction = session.BeginTransaction())
{
session.Save(newEmployee);
transaction.Commit();
}
Console.WriteLine("New employee inserted successfully.\n");
// Retrieve and display all employeesvar allEmployees = session.Query<EMPLOYEE>().ToList();
Console.WriteLine("All employees:");
foreach (var employee in allEmployees)
{
Console.WriteLine($"ID: {employee.EMPLOYEEID}, Name: {employee.FIRSTNAME}{employee.LASTNAME}, Email: {employee.EMAIL}, " +
$"Hire Date: {employee.HIREDATE}, Salary: {employee.SALARY}");
}
}
}
catch (Exception ex)
{
Console.WriteLine("Connection to Oracle failed.");
Console.WriteLine(ex.Message);
}
}
}
}
You will get the following result:
Update Oracle data using NHibernate
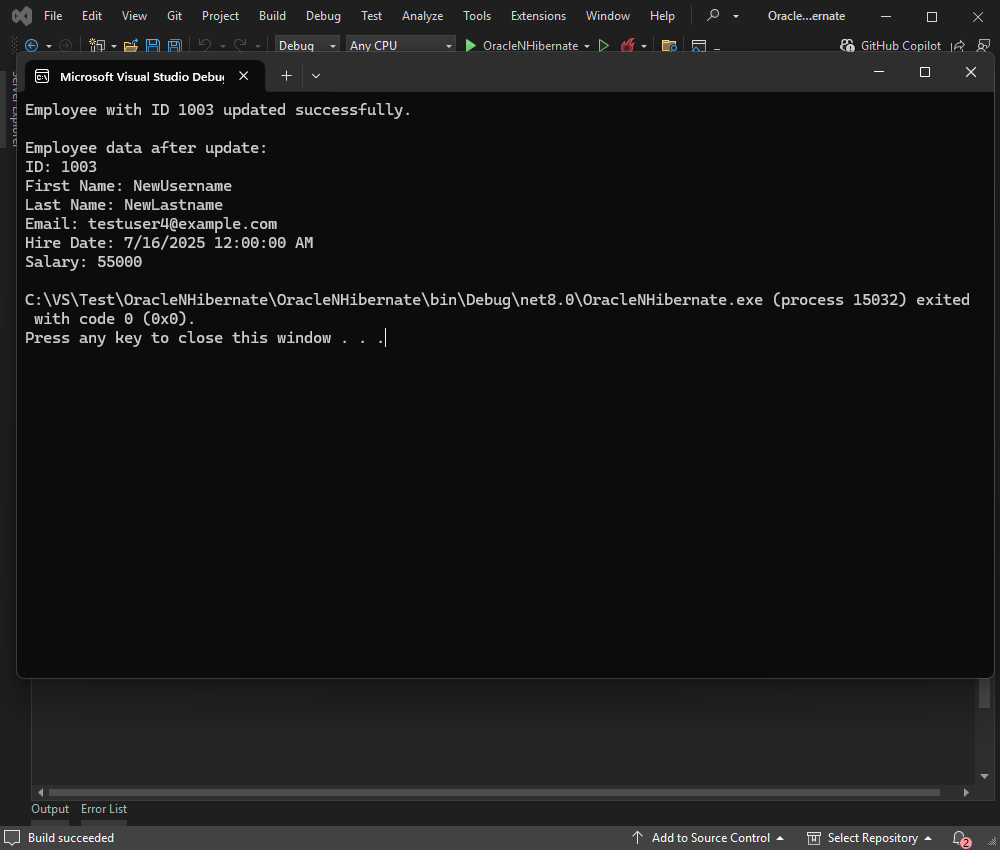
In this example, we update an existing employee’s first and last name in the Oracle database using NHibernate. The UpdateEmployeeName method opens a session, retrieves all employees, and searches for the one with the specified EMPLOYEEID. If found, it begins a transaction, updates the FIRSTNAME and LASTNAME fields, and commits the changes. After the update, it prints all the employee’s details to the console. If the employee isn’t found or an error occurs, appropriate messages are displayed. This demonstrates a simple NHibernate update operation with basic error handling.
You can use the following example with NHibernate:
using NHibernate;
namespaceOracleNHibernate
{
classProgram
{
staticvoidMain(string[] args)
{
// Example usage: update employee 1003's name
UpdateEmployeeName(1003, "NewUsername", "NewLastname");
}
publicstaticvoidUpdateEmployeeName(long employeeId, string newFirstName, string newLastName)
{
try
{
using (ISession session = NHibernateHelper.OpenSession())
{
// Retrieve all employees first (workaround for query issue)var allEmployees = session.Query<EMPLOYEE>().ToList();
var employee = allEmployees.FirstOrDefault(e => e.EMPLOYEEID == employeeId);
if (employee != null)
{
using (ITransaction transaction = session.BeginTransaction())
{
try
{
employee.FIRSTNAME = newFirstName;
employee.LASTNAME = newLastName;
session.Update(employee);
transaction.Commit();
Console.WriteLine($"Employee with ID {employeeId} updated successfully.\n");
}
catch (Exception ex)
{
transaction.Rollback();
Console.WriteLine($"Error updating employee: {ex.Message}");
return;
}
}
// Show all data columns of employee with ID 1003
Console.WriteLine("Employee data after update:");
Console.WriteLine($"ID: {employee.EMPLOYEEID}");
Console.WriteLine($"First Name: {employee.FIRSTNAME}");
Console.WriteLine($"Last Name: {employee.LASTNAME}");
Console.WriteLine($"Email: {employee.EMAIL}");
Console.WriteLine($"Hire Date: {employee.HIREDATE}");
Console.WriteLine($"Salary: {employee.SALARY}");
}
else
{
Console.WriteLine($"Employee with ID {employeeId} not found in the database.");
}
}
}
catch (Exception ex)
{
Console.WriteLine("Connection to Oracle failed.");
Console.WriteLine(ex.Message);
}
}
}
}
Let’s test our application:
Delete Oracle data using NHibernate
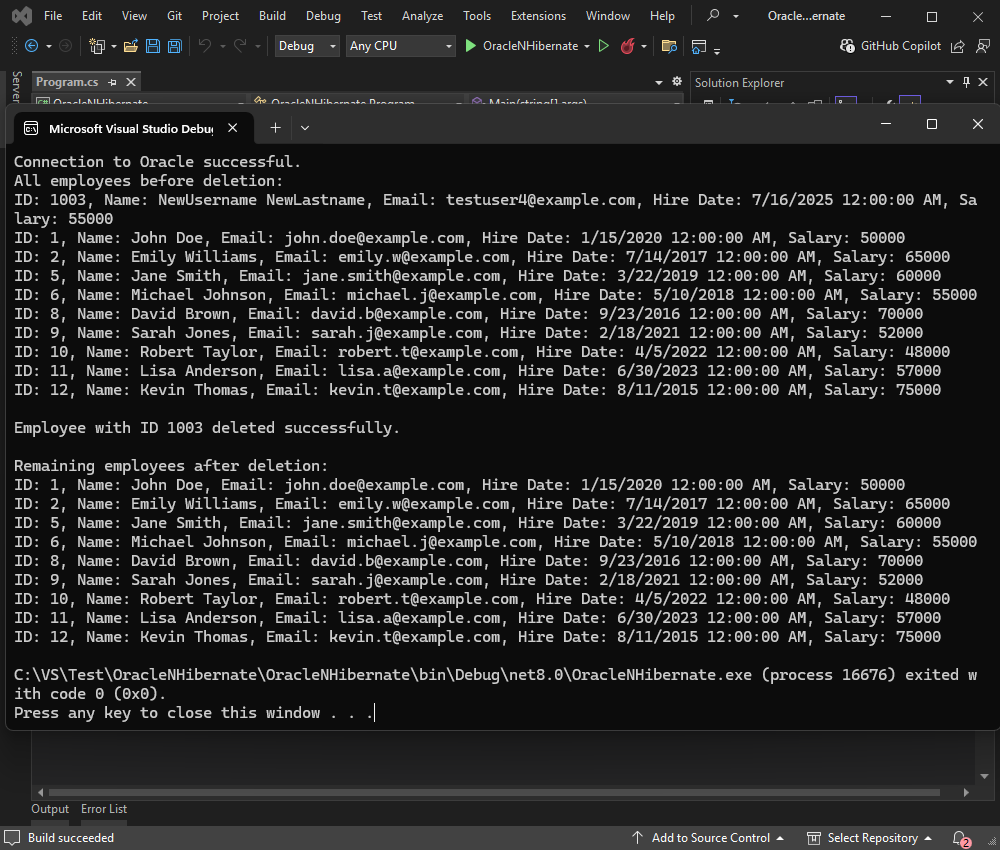
In this example, we delete a record from the EMPLOYEE table using NHibernate. The application begins by opening a session with the Oracle database and retrieving all employees. It first displays all existing records in the console for reference. Then it attempts to find and delete the employee with EMPLOYEEID 1003. If this employee exists, the record is deleted within a transaction, and the change is committed.
If the employee with ID 1003 is not found, the program deletes the first available employee as a fallback. In both cases, error handling is included to catch and roll back the transaction if needed. Finally, the application retrieves and displays the remaining employees in the database, or a message if no records are left.
using NHibernate;
namespaceOracleNHibernate
{
classProgram
{
staticvoidMain(string[] args)
{
try
{
using (ISession session = NHibernateHelper.OpenSession())
{
Console.WriteLine("Connection to Oracle successful.");
// First, retrieve and display all employeesvar allEmployees = session.Query<EMPLOYEE>().ToList();
Console.WriteLine("All employees before deletion:");
foreach (var employee in allEmployees)
{
Console.WriteLine($"ID: {employee.EMPLOYEEID}, Name: {employee.FIRSTNAME}{employee.LASTNAME}, Email: {employee.EMAIL}, " +
$"Hire Date: {employee.HIREDATE}, Salary: {employee.SALARY}");
}
// Try to delete employee with ID 1003 if it existsvar employeeToDelete = allEmployees.FirstOrDefault(e => e.EMPLOYEEID == 1003);
if (employeeToDelete != null)
{
using (ITransaction transaction = session.BeginTransaction())
{
try
{
session.Delete(employeeToDelete);
transaction.Commit();
Console.WriteLine($"\nEmployee with ID {employeeToDelete.EMPLOYEEID} deleted successfully.\n");
}
catch (Exception ex)
{
transaction.Rollback();
Console.WriteLine($"Error deleting employee: {ex.Message}");
}
}
}
else
{
Console.WriteLine("\nEmployee with ID 1003 not found in the database.");
// Delete the first employee if any exist (as fallback)if (allEmployees.Count > 0)
{
var firstEmployee = allEmployees.First();
using (ITransaction transaction = session.BeginTransaction())
{
try
{
session.Delete(firstEmployee);
transaction.Commit();
Console.WriteLine($"\nEmployee with ID {firstEmployee.EMPLOYEEID} deleted successfully instead.\n");
}
catch (Exception ex)
{
transaction.Rollback();
Console.WriteLine($"Error deleting employee: {ex.Message}");
}
}
}
}
// Display remaining employees after deletionvar remainingEmployees = session.Query<EMPLOYEE>().ToList();
Console.WriteLine("Remaining employees after deletion:");
if (remainingEmployees.Count > 0)
{
foreach (var employee in remainingEmployees)
{
Console.WriteLine($"ID: {employee.EMPLOYEEID}, Name: {employee.FIRSTNAME}{employee.LASTNAME}, Email: {employee.EMAIL}, " +
$"Hire Date: {employee.HIREDATE}, Salary: {employee.SALARY}");
}
}
else
{
Console.WriteLine("No employees remaining in the database.");
}
}
}
catch (Exception ex)
{
Console.WriteLine("Connection to Oracle failed.");
Console.WriteLine(ex.Message);
}
}
}
}
This example demonstrates how to safely perform delete operations with fallback logic and clear output using NHibernate.
Conclusion
In this tutorial, we explored how integrating NHibernate with Oracle with the help of dotConnect for Oracle simplifies data operations in .NET applications. The advanced capabilities of dotConnect for Oracle, combined with the lightweight efficiency of NHibernate, offer a fast and flexible way to manage database interactions in Oracle-based applications. With these tools, you can confidently develop scalable, maintainable, and high-performance .NET solutions that seamlessly connect to Oracle databases.
FAQ
How do you install and activate dotConnect for Oracle in a .NET project?
Install dotConnect for Oracle via the EXE installer or by adding the Devart.Data.Oracle NuGet package to your project, then obtain your personal activation key from your Devart Customer Portal and include it in the connection string via the License Key parameter for a working connection.
How do you create a connection to Oracle using dotConnect in C#?
Define a connection string that includes host, user ID, password, database, and the License Key value, then create an OracleConnection instance with this string and call Open() for it inside a try-catch block to test and handle connection errors.
How do you enable encryption for secure Oracle connections with dotConnect?
Use Oracle Native Network Encryption by configuring encryption in the sqlnet.ora file on both client and server sides. No special parameters are required in the connection string.
Can you connect to Oracle using Entity Framework Core and dotConnect?
Yes, you can either use Entity Developer to visually create an EF Core model from the database or run Scaffold-DbContext with a dotConnect connection string (including License Key) to generate the DbContext and entity classes.
Is it possible to connect to Oracle using Visual Studio Server Explorer with dotConnect?
Yes, add a new Data Connection in Server Explorer, select dotConnect for Oracle as the provider, enter your credentials, test the connection, and browse Oracle data directly in Visual Studio.
I'm a technical content writer who loves turning complex topics — think SQL, connectors, and backend chaos–into content that actually makes sense (and maybe even makes you smile). I write for devs, data folks, and curious minds who want less fluff and more clarity. When I'm not wrangling words, you'll find me dancing salsa, or hopping between cities.