
You can install the driver by using the Windows installer.
After you receive the license key, add it to your connection strings to connect to the data source.
.NET MAUI (Multi-platform App UI) is a framework developed by Microsoft for building native mobile and desktop applications using C# and .NET. It allows developers to create apps that run on Android, iOS, Windows, and macOS. One of its biggest advantages is the ability to use a single codebase letting the developers share code, tests, and program logic across multiple platforms.
A key aspect of app development is ensuring a reliable connection to data sources and direct data management within the application. Data connectivity solutions, such as Devart's dotConnect products, help us resolve these challenges efficiently.
In this article, we'll explore how to connect a .NET MAUI application to a Salesforce data source using ADO.NET and perform read, insert, and delete operations.

Ensures effortless connection to Salesforce, enabling users to access data easily and intuitively.

Supports familiar SQL statements, requiring no special knowledge of a complex API or SOQL.

Uses well-known ADO.NET classes, enabling an easy start and creating a convenient working environment.

Fully supports EF Core, Dapper, NHibernate, LinqConnect, and other technologies for efficient data management.

Conforms to the latest ADO.NET standards and innovations for seamless integration with .NET applications.

Includes priority support, detailed documentation, and regular updates for continuous improvement.
You can start using dotConnect for Salesforce immediately with a 30-day free trial. Choose one of the following installation options:
You can install the driver by using the Windows installer.
After you receive the license key, add it to your connection strings to connect to the data source.
To connect to Salesforce and access the data, you need the security token. Sign in to your Salesforce account, go to your profile > Settings. Navigate to Reset My Security Token and request it. A new token will be sent to your email. We'll use it for API access when we establish connection to Salesforce.
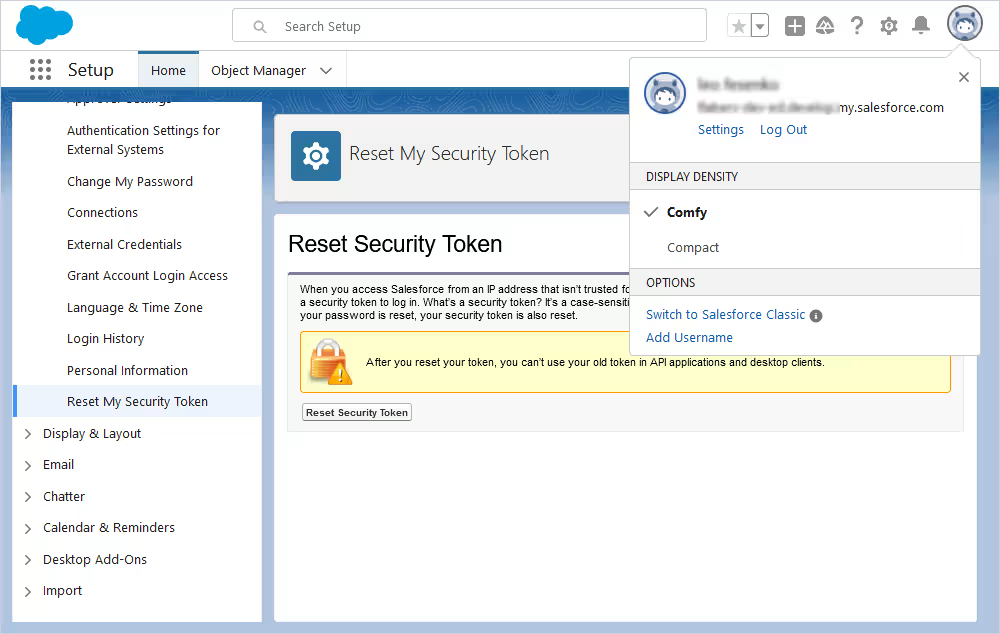
This article includes a sample of the code that you can use to connect to Salesforce using dotConnect within a .NET MAUI project.
Replace the placeholders with your valid Salesforce credentials: Host, UserID, Password, and Security Token.
private readonly string _connectionString;

public SalesforceService() {
  _connectionString = "Authentication Type=UserNamePassword;" +
    "Host=https://develop.my.salesforce.com;" +
    "[email protected];" +
    "Password=******;" +
    "Security Token=***********;" +
    "License Key=***********;";
}

public async Task<bool> TestConnectionAsync() {
  try {
    using(var connection = new SalesforceConnection(_connectionString)) {
      connection.Open();
      return true;
    }
  } catch {
    return false;
  }
}| Name | Description |
|---|---|
| Authentication type | The authentication method for connecting to Salesforce, such as UserNamePassword, AccessRefreshToken, AccessRefreshTokenInteractive, SessionId, etc. |
| Host | The Salesforce.com or Database.com login URL, such as login.salesforce.com, login.database.com, test.salesforce.com, etc. |
| User ID -or- User | The Salesforce login account. |
| Password | The password for the account. |
| Refresh token | The Salesforce OAuth 2.0 refresh token used for the OAuth Refresh Token authentication. |
| Security token | User ID used to authenticate with MySQL. |
| License key | The license key. |
We are going to use our demo SalesforceMaui project to illustrate the READ, INSERT, and DELETE operations.
To read and display data from your Salesforce account in an MAUI app, use the code below in the SalesforceService.cs class. In this code, the following ADO.NET classes are used:
public async Task<List<LeadModel>> GetLeadDataAsync() {
  var leadData = new List<LeadModel>();

  try {
    using(var connection = new SalesforceConnection(_connectionString)) {
      connection.Open();

      string query = "SELECT Id, FirstName, LastName, Company, Title, Phone, Email, Status FROM Lead LIMIT 15";
      using(var command = new SalesforceCommand(query, connection)) {
        using(var reader = command.ExecuteReader()) {
          while (reader.Read()) {
            leadData.Add(new LeadModel {
                Id = reader["Id"].ToString(),
                FullName = $"{reader["FirstName"]} {reader["LastName"]}",
                DetailInfo = $"Company: {reader["Company"]}, Title: {reader["Title"]}, Phone: {reader["Phone"]}, Email: {reader["Email"]}, Status: {reader["Status"]}"
            });
          }
        }
      }
    }
  } catch (Exception ex) {
    Console.WriteLine($"Error retrieving data: {ex.Message}");
  }

  return leadData;
}
The results are displayed in the table:
<Label Text="Leads Table" FontAttributes="Bold" Margin="0,10,0,5" />
<CollectionView x:Name="DataCollectionView" ItemsSource="{Binding LeadData}" VerticalOptions="FillAndExpand">
<CollectionView.ItemTemplate>
    <DataTemplate>
     <Grid Padding="5" ColumnDefinitions="*,*,Auto">
         <!-- Full Name -->
         <Label Grid.Column="0" Text="{Binding FullName}" FontSize="16" />

         <!-- Detail Info -->
         <Label Grid.Column="1" Text="{Binding DetailInfo}" FontSize="12" TextColor="Gray" />

         <!-- Delete Button -->
         <Button Grid.Column="2" Text="Delete" TextColor="White" BackgroundColor="Red"
            Command="{Binding Path=BindingContext.DeleteCommand, Source={x:Reference DataCollectionView}}"
            CommandParameter="{Binding Id}" />
        </Grid>
    </DataTemplate>
</CollectionView.ItemTemplate>
</CollectionView>
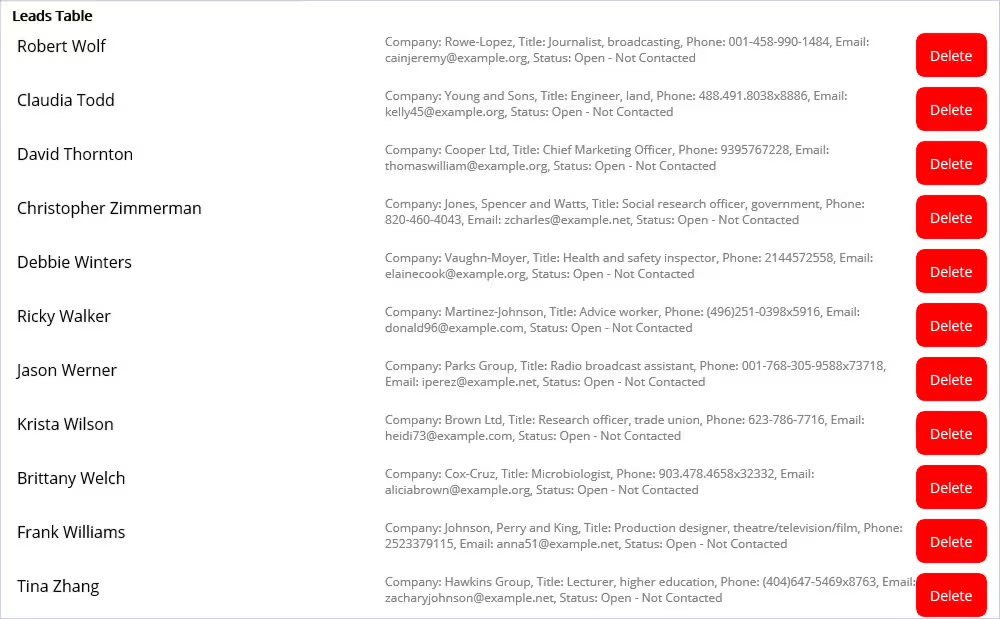
To add data to Salesforce tables from within the MAUI app, use the code below with the ADO.NET classes:
public async Task<bool>
AddLeadAsync(string firstName, string lastName, string company, string title, string phone, string email, string status) {
  try {
    using(var connection = new SalesforceConnection(_connectionString)) {
      connection.Open();

      string query = "INSERT INTO Lead (FirstName, LastName, Company, Title, Phone, Email, Status) VALUES (@FirstName, @LastName, @Company, @Title, @Phone, @Email, @Status)";
      using(var command = new SalesforceCommand(query, connection)) {
        command.Parameters.AddWithValue("FirstName", firstName ?? string.Empty);
        command.Parameters.AddWithValue("LastName", lastName ?? string.Empty);
        command.Parameters.AddWithValue("Company", company ?? string.Empty);
        command.Parameters.AddWithValue("Title", title ?? string.Empty);
        command.Parameters.AddWithValue("Phone", phone ?? string.Empty);
        command.Parameters.AddWithValue("Email", email ?? string.Empty);
        command.Parameters.AddWithValue("Status", status ?? string.Empty);

        command.ExecuteNonQuery();
      }
    }
    return true;
  } catch (Exception ex) {
    Console.WriteLine($"Error adding lead: {ex.Message}");
    return false;
  }
}
The table to display the results is:
<VerticalStackLayout Padding="10" Spacing="10">
	<Label Text="Add New Lead" FontAttributes="Bold" FontSize="20" HorizontalOptions="Center" />

	<Grid ColumnDefinitions="*,3*" RowDefinitions="Auto,Auto,Auto,Auto,Auto,Auto,Auto" RowSpacing="15" Padding="0,10,0,10">
    	<!-- First Name -->
    	<Label Text="First Name:" VerticalTextAlignment="Center" />
    	<Entry x:Name="FirstNameEntry" Placeholder="First Name" Grid.Column="1" />

    	<!-- Last Name -->
    	<Label Text="Last Name:" VerticalTextAlignment="Center" Grid.Row="1" />
    	<Entry x:Name="LastNameEntry" Placeholder="Last Name" Grid.Row="1" Grid.Column="1" />

    	<!-- Company -->
    	<Label Text="Company:" VerticalTextAlignment="Center" Grid.Row="2" />
    	<Entry x:Name="CompanyEntry" Placeholder="Company" Grid.Row="2" Grid.Column="1" />

    	<!-- Title -->
    	<Label Text="Title:" VerticalTextAlignment="Center" Grid.Row="3" />
    	<Entry x:Name="TitleEntry" Placeholder="Title" Grid.Row="3" Grid.Column="1" />

    	<!-- Phone -->
    	<Label Text="Phone:" VerticalTextAlignment="Center" Grid.Row="4" />
    	<Entry x:Name="PhoneEntry" Placeholder="Phone" Grid.Row="4" Grid.Column="1" />

    	<!-- Email -->
    	<Label Text="Email:" VerticalTextAlignment="Center" Grid.Row="5" />
    	<Entry x:Name="EmailEntry" Placeholder="Email" Grid.Row="5" Grid.Column="1" />

    	<!-- Status -->
    	<Label Text="Status:" VerticalTextAlignment="Center" Grid.Row="6" />
    	<Entry x:Name="StatusEntry" Placeholder="Status" Grid.Row="6" Grid.Column="1" />
	</Grid>
</VerticalStackLayout>

<Button Text="Add Lead" Clicked="OnAddLeadClicked" />
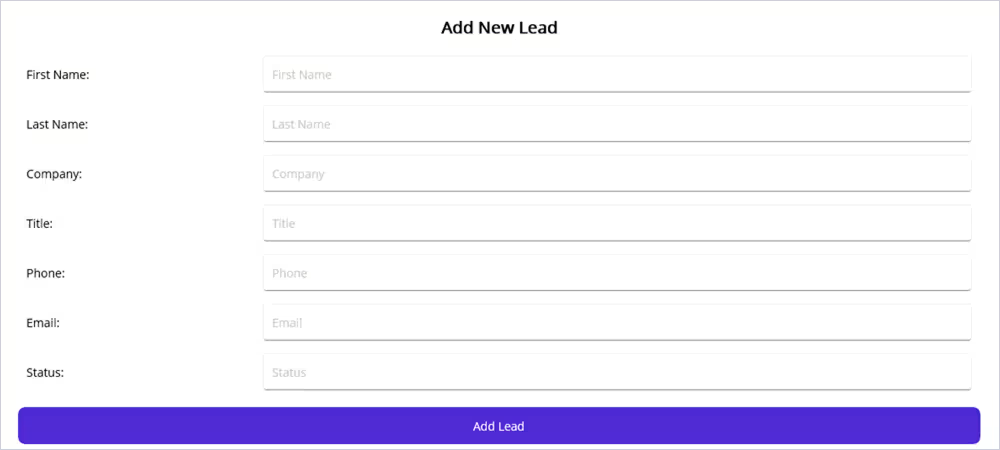
To delete records from the Salesforce tables, use the code below with the following ADO.NET classes:
public async Task<bool> DeleteLeadAsync(string id) {
  try {
    using(var connection = new SalesforceConnection(_connectionString)) {
      connection.Open();

      string query = "DELETE FROM Lead WHERE Id = @Id";
      using(var command = new SalesforceCommand(query, connection)) {
        command.Parameters.AddWithValue("Id", id);

        command.ExecuteNonQuery();
      }
    }
    return true;
  } catch (Exception ex) {
    Console.WriteLine($"Error deleting lead: {ex.Message}");
    return false;
  }
}
}
The Delete button in the Leads table that we presented earlier in this article is created with the following code:
<Button Grid.Column="2" Text="Delete" TextColor="White" BackgroundColor="Red" Command="{Binding Path=BindingContext.DeleteCommand, Source={x:Reference DataCollectionView}}" CommandParameter="{Binding Id}" />.NET MAUI is a popular framework for cross-platform application development. In this process it is crucial to ensure efficient connectivity to data sources. dotConnect products provide that required secure, direct connection and allow direct data manipulation from within the application.
If your MAUI app relies on Salesforce, dotConnect for Salesforce grants a stable connection and enables you to manage Salesforce tables without additional clients or learning new technologies.
You can test dotConnect for Salesforce under real workloads with a 30-day free trial. Download, install, and start building your applications!
License Key parameter for a working connection.
License Key value, then create a SalesforceConnection instance with this string and call Open() for it inside a try-catch block to test and handle connection errors.
Scaffold-DbContext with a dotConnect connection string (including License Key) to generate the DbContext and entity classes.

I'm a technical content writer who loves turning complex topics — think SQL, connectors, and backend chaos–into content that actually makes sense (and maybe even makes you smile). I write for devs, data folks, and curious minds who want less fluff and more clarity. When I'm not wrangling words, you'll find me dancing salsa, or hopping between cities.

