You can install the driver by using the Windows installer.
After you receive the license key, add it to your connection strings to connect to the data source.
Database connectivity is fundamental for application development, as applications rely on secure and reliable access to data. A common challenge developers face is simplifying the connection between applications and data sources for data retrieval and manipulation. One effective solution is the dotConnect product line by Devart, which offers powerful data providers for all popular data sources, including relational databases and cloud platforms.
In this article, we'll explore how to establish a secure connection and retrieve or modify Zoho CRM data in a C# application using dotConnect for Zoho CRM.

dotConnect enables straightforward connectivity between .NET applications and Zoho CRM, allowing developers to access CRM modules and records without working directly with Zoho's REST APIs.

Using familiar ADO.NET components, dotConnect for Zoho CRM allows developers to work with data through standard .NET data access patterns such as connections, commands, and data readers.

dotConnect works with EF Core, Dapper, NHibernate, and LinqConnect, enabling flexible object-relational mapping and efficient interaction with Zoho CRM data in .NET applications.

Access to Zoho CRM is authorized through a browser-based login flow. After successful authentication, dotConnect automatically retrieves and manages access and refresh tokens for secure connections.

Devart implements the standard ADO.NET provider model in dotConnect solutions, ensuring consistent behavior and compatibility with existing .NET frameworks and development tools.

Devart provides professional technical assistance, comprehensive documentation, and ongoing product enhancements, helping developers maintain stable and reliable integrations with Zoho CRM.
You can start using dotConnect for Zoho CRM immediately with a 30-day free trial. Choose one of the following installation options:
You can install the driver by using the Windows installer.
After you receive the license key, add it to your connection strings to connect to the data source.
After creating the console application, use the code below to ensure the connection to Zoho CRM is successful. dotConnect for Zoho CRM supports the OAuthInteractive authentication type, which handles the OAuth flow automatically—when the connection is opened for the first time, a browser window will launch to complete the authorization. No manual tokens or client credentials are required.
using Devart.Data.Zoho;

namespace ZohoCrmConsoleApp
{
    class Program
    {
        static void Main(string[] args)
        {
            string connectionString = "" +
    "Authentication Type=OAuthInteractive;" +
    "License key=**********";

            try
            {
                using (ZohoConnection connection = new ZohoConnection(connectionString))
                {
                    connection.Open();
                    Console.WriteLine("Connection successful.");
                }
            }
            catch (Exception ex)
            {
                Console.WriteLine("An error occurred: " + ex.Message);
            }
        }

    }
}
When connected, the application opens a browser window to complete the OAuth authorization on the first run. Once authorized, you can immediately begin fetching and managing your Zoho CRM data.
| Name | Description |
|---|---|
| Authentication Type | The authentication method: Refresh Token or OAuthInteractive |
| API Version | The version of the Zoho CRM API; note that API v1 has already reached the end-of-life phase |
| Domain | The Zoho CRM domain to connect to: crm.zoho.com or crm.zoho.eu or crm.zoho.com.cn or crm.zoho.in or crm.zoho.com.au |
| Client Id | The string that uniquely identifies a Zoho CRM company |
| Client Secret | A secret code mapped to a Zoho CRM client application; this parameter is used for connecting via API v2, and is filled automatically when you perform a web login |
| Refresh Token | The Zoho CRM OAuth refresh token used for connecting via API v2 |
| License Key | The license key for dotConnect for Zoho CRM |
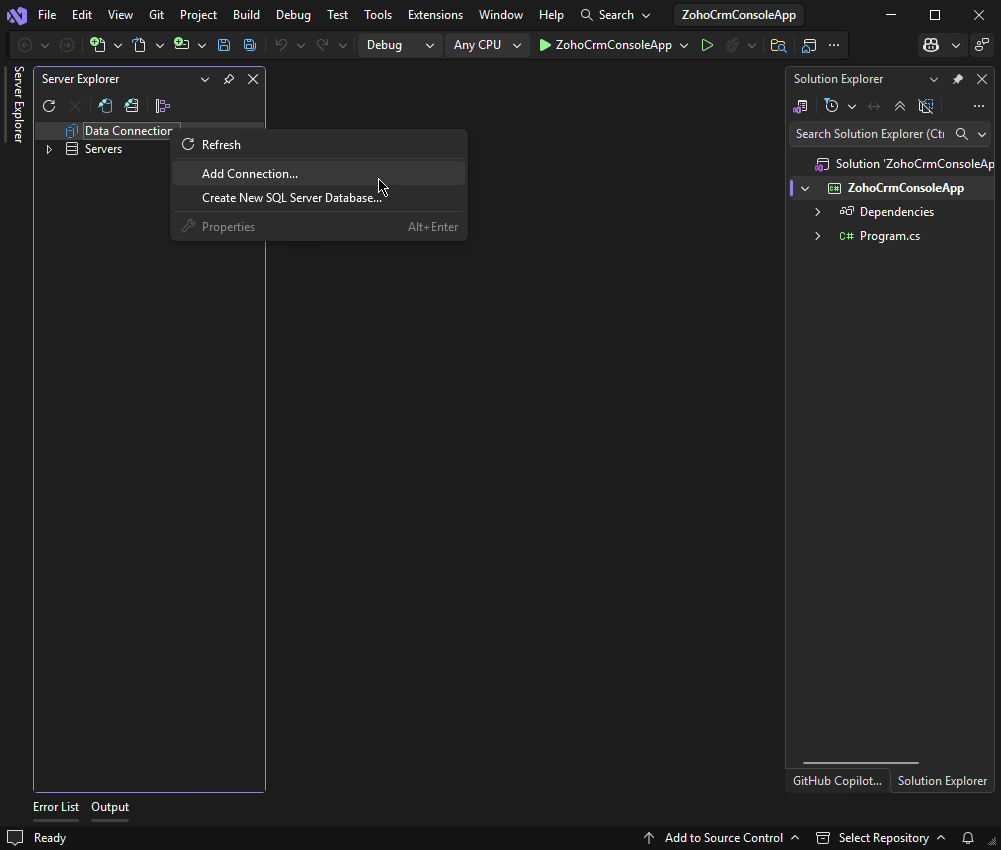
Another option available for connecting to Zoho CRM is via Server Explorer in Visual Studio. Right-click Data Connections and select Add Connection from the context menu.
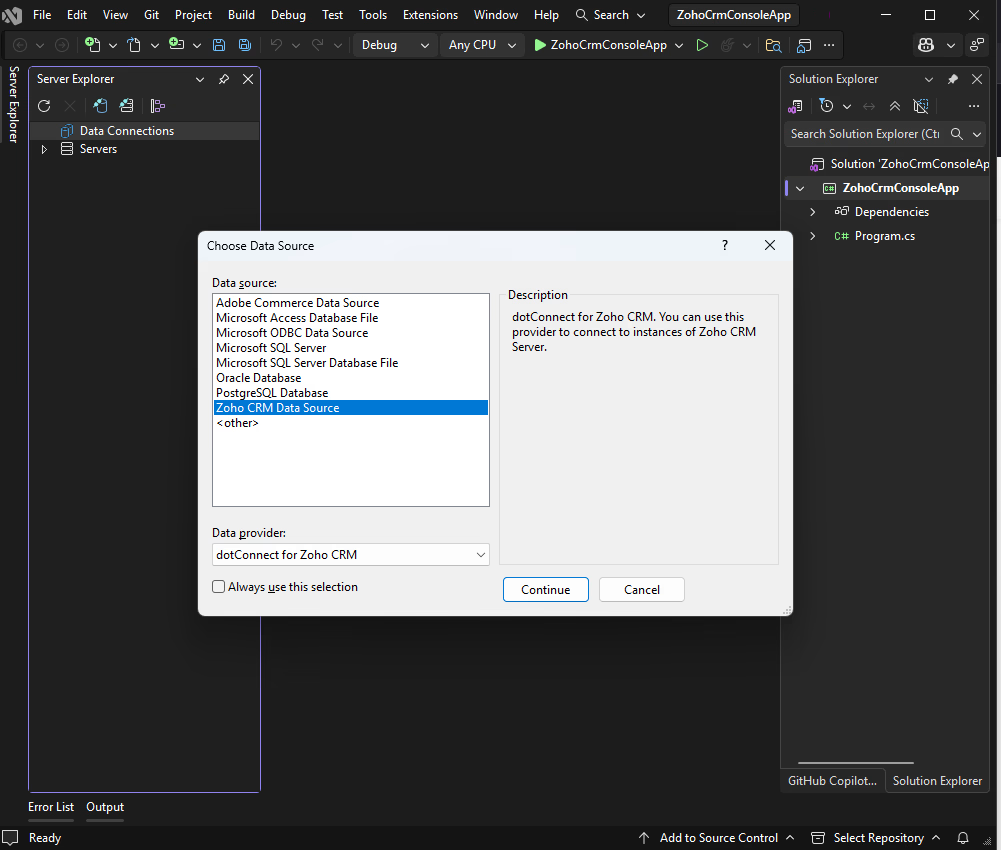
The Change Data Source dialog opens. Select dotConnect for Zoho CRM from the list of installed data providers.
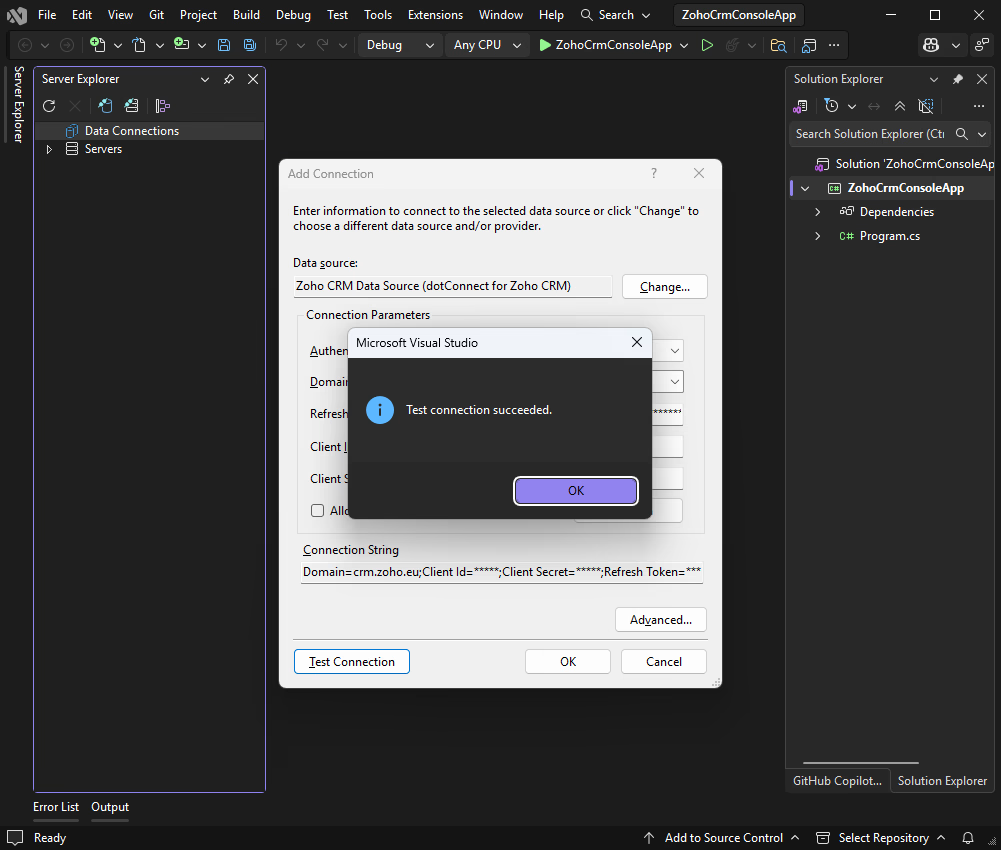
Fill in the necessary connection properties in the Add Connection dialog. Select either OAuth or OAuthInteractive as the authentication type, then choose your Zoho CRM domain from the Domain dropdown—for example, crm.zoho.com for the global region, or the appropriate regional domain such as crm.zoho.eu for Europe or crm.zoho.uk for the UK. Click Sign In to launch the Zoho CRM authorization page, where you can log in and grant access to retrieve your tokens. Once authorization is complete, click Test Connection to verify the settings.
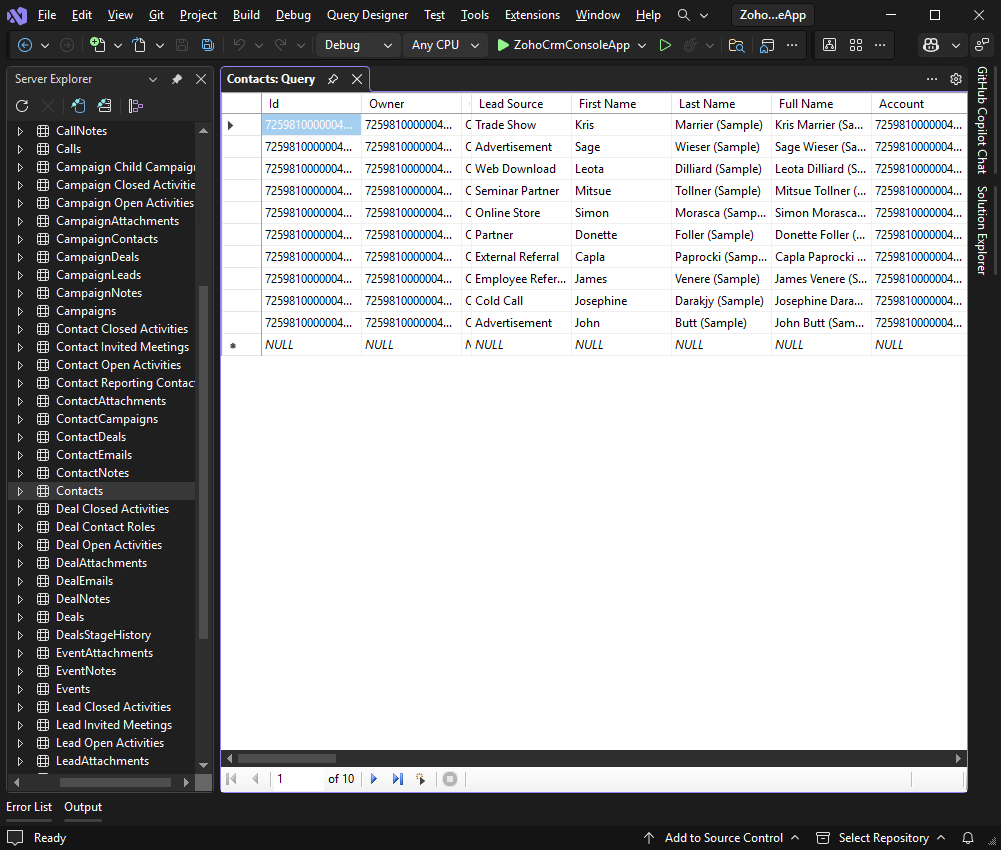
Once authorized, expand the newly created data connection in Server Explorer. You can view the data source structure, including all available Zoho CRM modules and their fields. To display data from a particular module, right-click it and select Retrieve Data from Table. This opens a new query window with a SELECT statement.
Entity Developer allows you to visually design and generate EF Core models, making database application development faster, easier, and more efficient. If you don't have it already installed, close your Visual Studio instance, download Entity Developer, and install it following the on-screen instructions.
After that, follow the detailed illustrated guide to create your database model using Entity Developer. When connecting, select either OAuth or OAuthInteractive as the authentication type and choose your Zoho CRM domain from the available options. Click Sign In to open the Zoho CRM authorization page, where you can log in and grant access to retrieve your tokens. Once authorization is complete, the model you created will open and you can start working with it immediately.
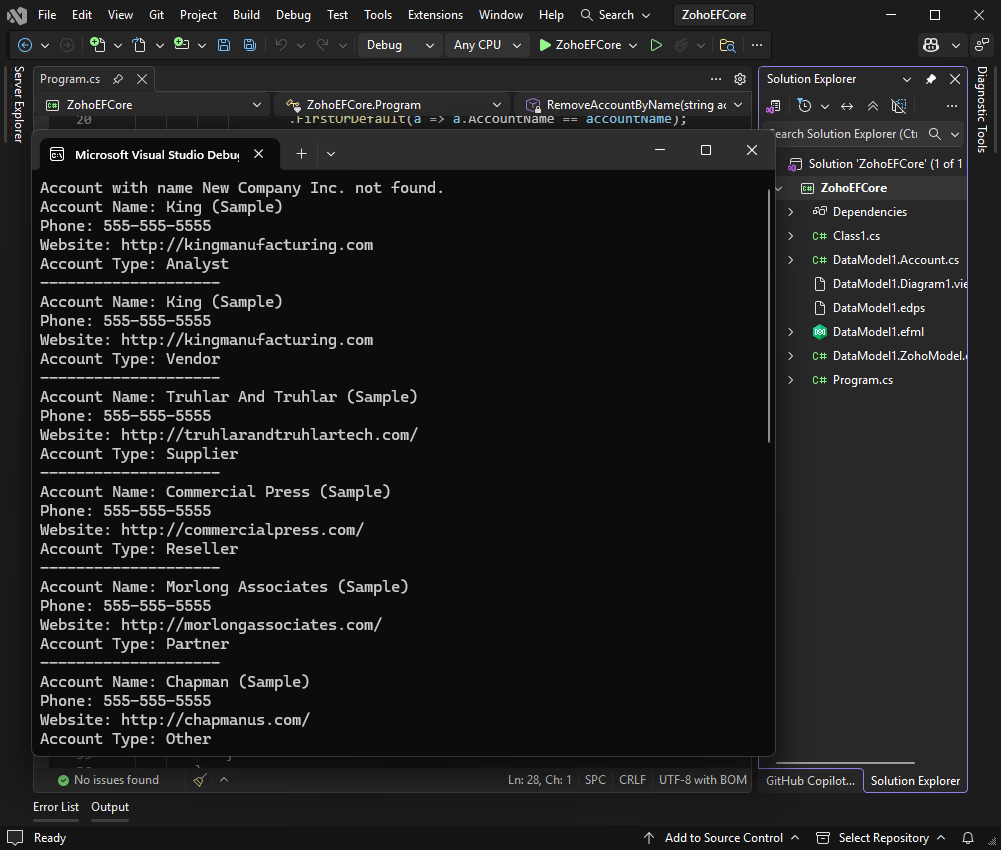
You can also see the generated DbContext files in Visual Studio under the model. To read the Zoho CRM data using EF Core, execute the code below.
using System;
using System.Linq;

namespace ZohoEFCore
{
    class Program
    {
        static void Main(string[] args)
        {
            RemoveAccountByName("New Company Inc.");
            DisplayAccounts();
        }

        static void RemoveAccountByName(string accountName)
        {
            using (var context = new ZohoModel())
            {
                // Fetch the account with the specified name
                var account = context.Accounts
                    .FirstOrDefault(a => a.AccountName == accountName);

                if (account != null)
                {
                    // Remove the account from the context
                    context.Accounts.Remove(account);

                    // Save changes to the database
                    context.SaveChanges();

                    Console.WriteLine($"Account with name {accountName} removed successfully.");
                }
                else
                {
                    Console.WriteLine($"Account with name {accountName} not found.");
                }
            }
        }

        static void DisplayAccounts()
        {
            using (var context = new ZohoModel())
            {
                var accounts = context.Accounts
                    .Select(a => new { a.AccountName, a.Phone, a.Website, a.AccountType })
                    .ToList();

                foreach (var account in accounts)
                {
                    Console.WriteLine($"Account Name: {account.AccountName}");
                    Console.WriteLine($"Phone: {account.Phone}");
                    Console.WriteLine($"Website: {account.Website}");
                    Console.WriteLine($"Account Type: {account.AccountType}");
                    Console.WriteLine(new string('-', 20));
                }
            }
        }
    }
}
You can view the result in your console application.
One more connection method you can use to access your Zoho CRM data is via Entity Framework Core (EF Core) and the Scaffold-DbContext command. This will generate the required EF Core model classes and DbContext based on the existing Zoho CRM schema.
First, install the required NuGet packages via the Solution Explorer in Visual Studio:
After that, open the Package Manager Console via Tools > NuGet Package Manager > Package Manager Console and run the following command to scaffold the DbContext and entity classes from your Zoho CRM account. The OAuthInteractive flow will open a browser window automatically to complete authorization.
Scaffold-DbContext "Authentication Type=OAuthInteractive;License Key=**********;" Devart.Data.Zoho.Entity.EFCore -OutputDir ModelsThe -OutputDir Models parameter specifies the output directory to store the generated model classes.
After running the scaffold command, EF Core will generate the DbContext class and entity classes in the specified output directory. Review the generated code and check how it matches your Zoho CRM schema.
This tutorial has demonstrated several methods for connecting to Zoho CRM and accessing its data. You can choose the approach that best fits your project requirements and development scenarios when building applications that use Zoho CRM as part of their backend.
dotConnect for Zoho CRM provides a fast and straightforward way to establish a connection using the OAuthInteractive authentication type, which eliminates the need for manual credential management. Entity Developer allows you to visually design data models and take full advantage of popular ORM frameworks with ease.
Both dotConnect for Zoho CRM and Entity Developer offer fully functional free trials, allowing you to integrate them into your workflow and evaluate their capabilities firsthand.
Authentication Type=OAuthInteractive. When ZohoConnection opens, a browser window appears for you to sign in to your Zoho account and grant access. After authorization, dotConnect automatically retrieves and manages the access and refresh tokens.

I'm a technical content writer who loves turning complex topics — think SQL, connectors, and backend chaos–into content that actually makes sense (and maybe even makes you smile). I write for devs, data folks, and curious minds who want less fluff and more clarity. When I'm not wrangling words, you'll find me dancing salsa, or hopping between cities.