
You can install the driver by using the Windows installer.
After you receive the license key, add it to your connection strings to connect to the data source.
This guide walks you through the process of integrating your ASP.NET Core Blazor application with Zoho CRM using dotConnect for Zoho CRM — a powerful ADO.NET provider from Devart. Here, you'll learn how to set up OAuth authentication, connect to the CRM API, and perform basic data operations (read, insert, delete) directly from your Blazor frontend or backend logic.
dotConnect enables straightforward connectivity between .NET applications and Zoho CRM, allowing developers to access CRM modules and records without working directly with Zoho's REST APIs.
Using familiar ADO.NET components, dotConnect for Zoho CRM allows developers to work with data through standard .NET data access patterns such as connections, commands, and data readers.
dotConnect works with EF Core, Dapper, NHibernate, and LinqConnect, enabling flexible object-relational mapping and efficient interaction with Zoho CRM data in .NET applications.
Access to Zoho CRM is authorized through a browser-based login flow. After successful authentication, dotConnect automatically retrieves and manages access and refresh tokens for secure connections.
Devart implements the standard ADO.NET provider model in dotConnect solutions, ensuring consistent behavior and compatibility with existing .NET frameworks and development tools.
Devart provides professional technical assistance, comprehensive documentation, and ongoing product enhancements, helping developers maintain stable and reliable integrations with Zoho CRM.
You can start using dotConnect for Zoho CRM immediately with a 30-day free trial. Choose one of the following installation options:
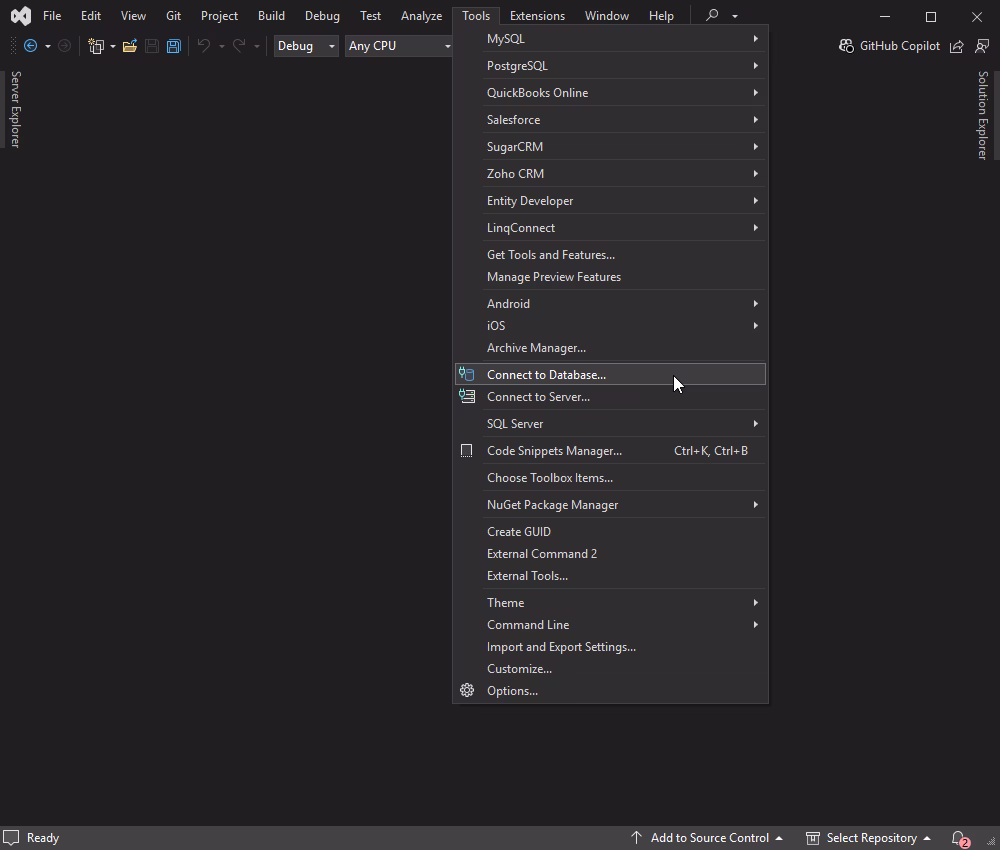
1. To connect to Zoho CRM using the built-in Data Explorer, navigate to Tools > Connect to Database.
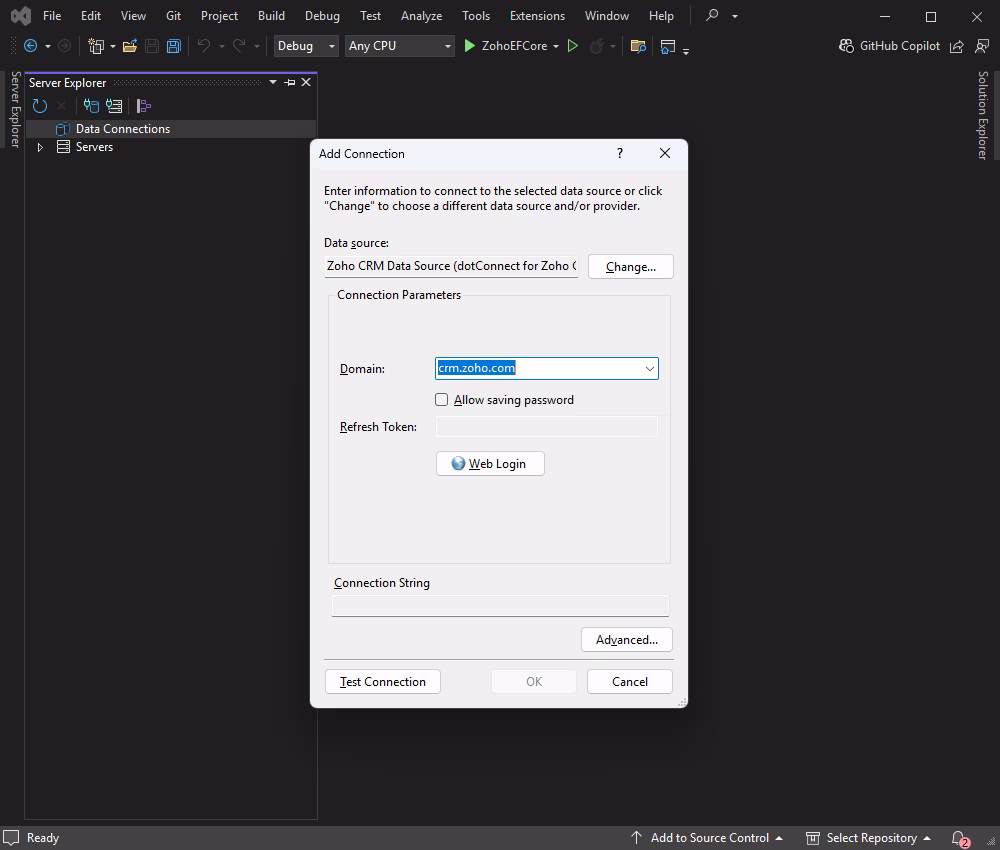
2. Then, select the Zoho CRM data source, enter a Zoho domain, and click Web Login.
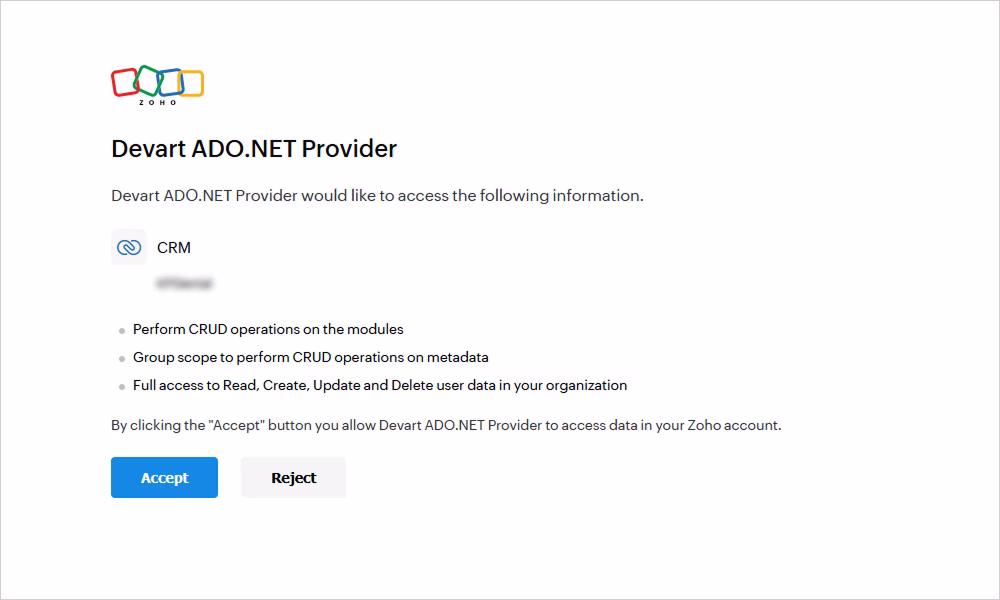
3. Log in to your Zoho account and grant access to your Zoho CRM organization.
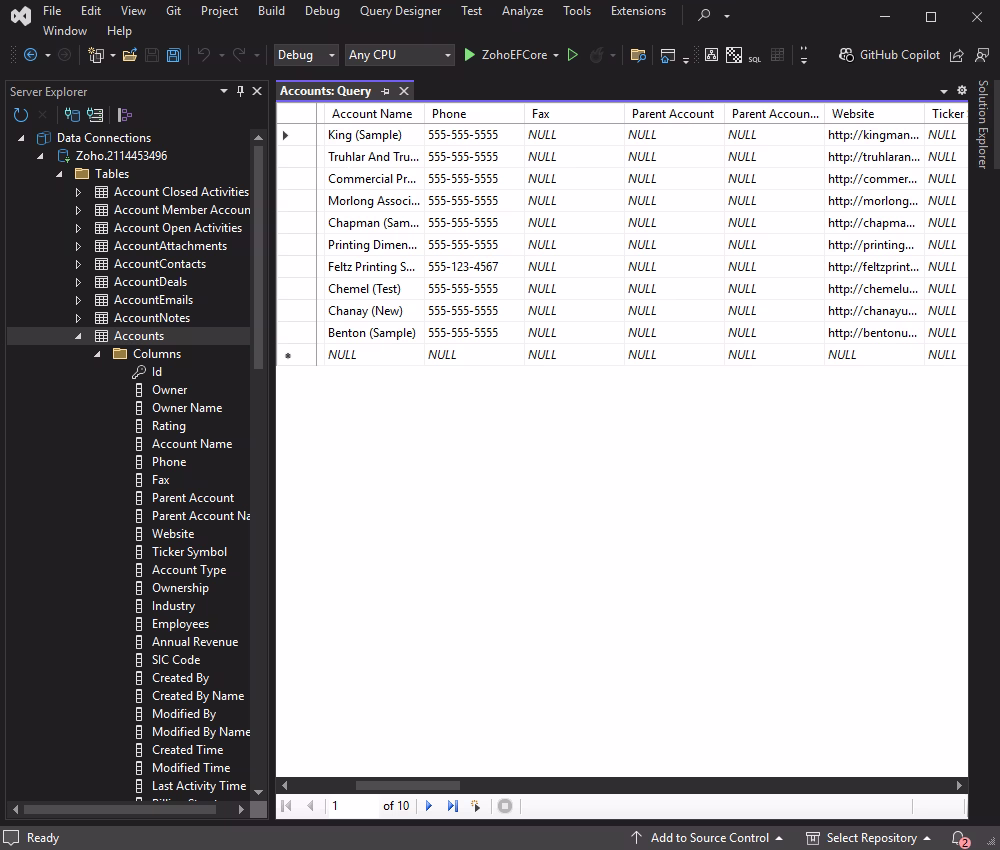
4. After that, select the tables and fields you want to work with, and retrieve the data.
Now, let's see how to retrieve and display data from Zoho CRM.
Create a new class file named AppConfig.cs in your project to store the connection string and other configuration settings:
namespace ZohoBlazor
{
    public class AppConfig
    {
        public string LicenseKey { get; }


            public
            AppConfig()

        {
            LicenseKey = "your-license-key";
        }


            public
            string
            GetConnectionString()

        {
            return

                    $"Authentication Type=OAuthInteractive;License Key={LicenseKey}"
                ;
        }
    }
}
Create ZohoCrmService.cs to manage the connection and data retrieval from Zoho CRM.
using System;
using System.Data;
using Devart.Data.Zoho;

namespace ZohoBlazor
{
    public class ZohoCrmService
    {
        private readonly AppConfig _config;


            public
            ZohoCrmService(AppConfig config)

        {
            _config = config;
        }


            public
            bool
            CheckConnection()

        {
            try
            {
                using (var connection =
                    new ZohoConnection(_config.GetConnectionString()))
                {
                    connection.Open();
                    return true;
                }
            }
            catch (Exception)
            {
                return false;
            }
        }


            public DataTable
            GetAccounts()

        {
            using (var connection =
                new ZohoConnection(_config.GetConnectionString()))
            {
                connection.Open();

                var command =
                    new ZohoCommand(
                        "SELECT \"Account Name\", Phone, Website, \"Account Type\" FROM Accounts",
                        connection
                    );

                var adapter = new ZohoDataAdapter(command);
                var dataTable = new DataTable();

                adapter.Fill(dataTable);
                return dataTable;
            }
        }
    }
}
The CheckConnection method checks whether a connection to Zoho CRM can be established using the provided configuration.
The GetAccounts method retrieves data from the Account table in Zoho CRM.
The method initiates the connection to Zoho CRM and executes an SQL command to select specific fields from the table.
Also, it uses ZohoDataAdapter to fill DataTable with the results of the query and returns DataTable.
Register ZohoCrmService.cs and AppConfig.cs in the Program.cs file.
// Register AppConfig and ZohoCrmService
builder.Services.AddSingleton<AppConfig>();
builder.Services.AddSingleton<ZohoCrmService>();
Create the Accounts Razor component
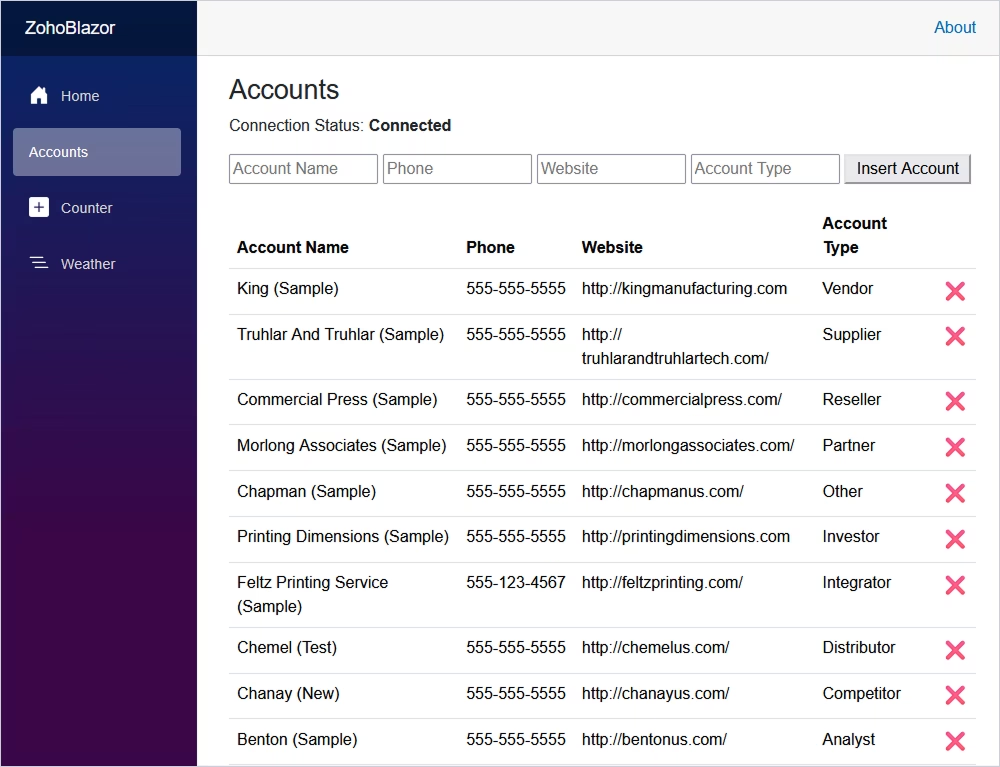
Create a new Blazor component named Accounts.razor to display data from the Accounts table.
@page "/accounts"
@using System.Data
@inject ZohoCrmService ZohoCrmService

<h3>Accounts</h3>

@if (isConnected)
{
    <p>
        Connection Status: <strong>Connected</strong>
    </p>
}
else
{
    <p>
        Connection Status: <strong>Disconnected</strong>
    </p>
}

@if (accounts != null)
{
    <table class="table">
        <thead>
            <tr>
                <th>Account Name</th>
                <th>Phone</th>
                <th>Website</th>
                <th>Account Type</th>
            </tr>
        </thead>

        <tbody>
            @foreach (DataRow row in accounts.Rows)
            {
                <tr>
                    <td>@row["Account Name"]</td>
                    <td>@row["Phone"]</td>
                    <td>@row["Website"]</td>
                    <td>@row["Account Type"]</td>
                </tr>
            }
        </tbody>
    </table>
}

@code
{
    private bool isConnected = false;
    private DataTable accounts;

    protected override void OnInitialized()
    {
        isConnected = ZohoCrmService.CheckConnection();

        if (isConnected)
        {
            accounts = ZohoCrmService.GetAccounts();
        }
    }
}
Add a navigation link to the Accounts component in the NavMenu.razor component.
<div class="nav-item px-3">

    <NavLink

            class="nav-link"
            href="accounts"

    >

        <span

                class="oi oi-list-rich"
                aria-hidden="true"

        >
        </span>

        Accounts

    </NavLink>

</div>
Run the application and navigate to the Accounts page to see the connection status and the data from the Accounts table.
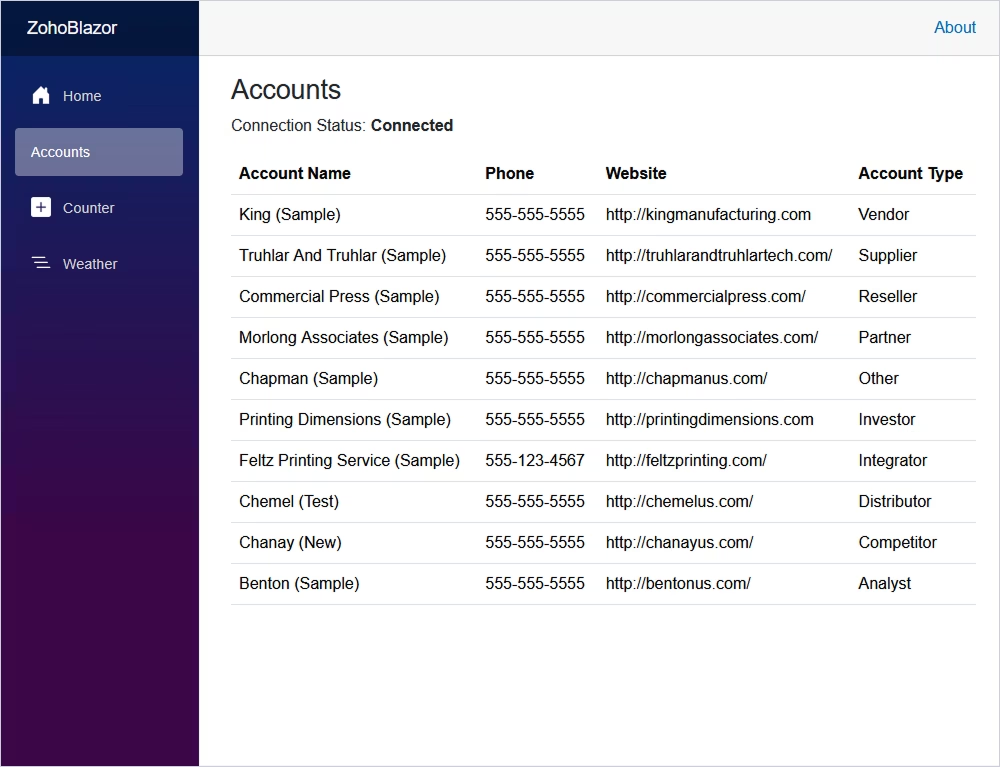
This example provides a basic setup for connecting to Zoho CRM and displaying data from the table in the Blazor application. Make sure to replace the placeholder values in AppConfig.cs with your Zoho CRM credentials.
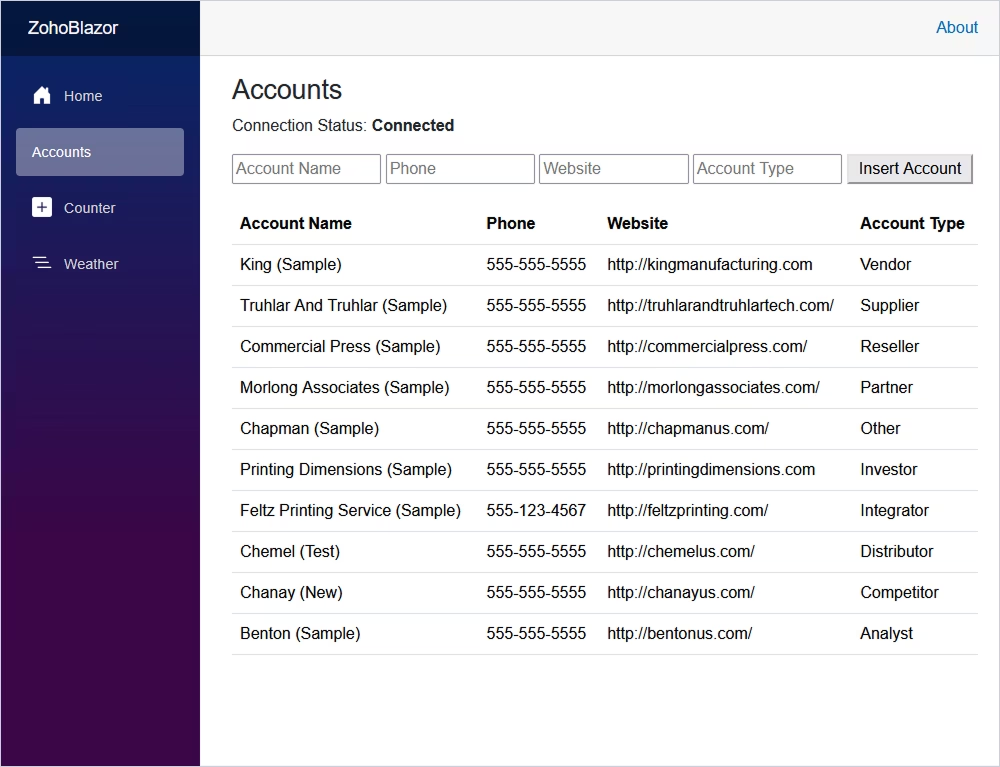
To further enhance your Blazor application, we'll create a form that adds a new account to Zoho CRM. We'll also create a custom endpoint to handle the form submission. Here's how to do it.
First, let's add a new form to the Accounts.razor component. This form will allow users to input details for a new account and submit them.
<form
    id="insertAccountForm"
    onsubmit="event.preventDefault(); window.insertAccount();"
>
    <input
        type="text"
        id="accountName"
        placeholder="Account Name"
        required
    />

    <input
        type="text"
        id="phone"
        placeholder="Phone"
        required
    />

    <input
        type="text"
        id="website"
        placeholder="Website"
        required
    />

    <input
        type="text"
        id="accountType"
        placeholder="Account Type"
        required
    />

    <button type="submit">
        Insert Account
    </button>
</form>To use JavaScript's alert function from Blazor, you need to inject the IJSRuntime service into your component. Paste this code into the @code section of Accounts.razor.
IJSRuntime JsRuntimeThen, in the Solution Explorer, create the Account.cs class.
namespace ZohoBlazor
{
    public class Account
    {
        public string Name { get; set; }
        public string Phone { get; set; }
        public string Website { get; set; }
        public string Type { get; set; }
    }
}
And add the InsertAccount method to ZohoCrmService.cs.
public bool InsertAccount(Account account)
{
    try
    {
        using (var connection = new ZohoConnection(_config.GetConnectionString()))
        {
            connection.Open();

            var command = new ZohoCommand(
                "INSERT INTO Accounts (\"Account Name\", Phone, Website, \"Account Type\") VALUES (:name, :phone, :website, :type)",
                connection
            );

            command.Parameters.AddWithValue("name", account.Name);
            command.Parameters.AddWithValue("phone", account.Phone);
            command.Parameters.AddWithValue("website", account.Website);
            command.Parameters.AddWithValue("type", account.Type);

            int rowsAffected = command.ExecuteNonQuery();
            return rowsAffected > 0;
        }
    }
    catch (Exception ex)
    {
        Console.WriteLine($"Error inserting account: {ex.Message}");
        return false;
    }
}Next, let's modify the Program.cs file to add a custom endpoint that handles the POST request for adding a new account.
// Custom endpoint for adding an account
app.MapPost("/accounts/insert", async (HttpContext context, ZohoCrmService zohoCrmService) =>
{
    if (
        context.Request.Query.TryGetValue("AccountName", out var accountName) &&
        context.Request.Query.TryGetValue("Phone", out var phone) &&
        context.Request.Query.TryGetValue("Website", out var website) &&
        context.Request.Query.TryGetValue("AccountType", out var accountType))
    {
        var account = new Account
        {
            Name = accountName,
            Phone = phone,
            Website = website,
            Type = accountType
        };

        bool success = zohoCrmService.InsertAccount(account);

        string message = success
            ? "Account inserted successfully."
            : "Failed to insert account. Account may already exist.";

        await context.Response.WriteAsync(message);
    }
    else
    {
        await context.Response.WriteAsync("Invalid request parameters.");
    }
});
In the MainLayout.razor file, place the JavaScript function inside the article section.
This ensures that the script is loaded and available for all components that use this layout.
<script>

window.insertAccount = async function ()
{
    const accountName = document.getElementById('accountName')?.value;
    const phone = document.getElementById('phone')?.value;
    const website = document.getElementById('website')?.value;
    const accountType = document.getElementById('accountType')?.value;

    const response = await fetch(
        `/accounts/insert?AccountName=${encodeURIComponent(accountName)}&Phone=${encodeURIComponent(phone)}&Website=${encodeURIComponent(website)}&AccountType=${encodeURIComponent(accountType)}`,
        {
            method: 'POST'
        }
    );

    const message = await response.text();

    alert(message);

    if (message.includes("successfully"))
    {
        window.location.href = "/accounts";
    }
};

</script>
When you add the script to MainLayout.razor, it loads once and works across all components that use the layout.
This ensures that the insertAccount function is defined and accessible when the form is submitted.
The form in Accounts.razor calls the window.insertAccount function when submitted. This function is now globally available because it is defined in the layout file.
Let's try to add a new test account.
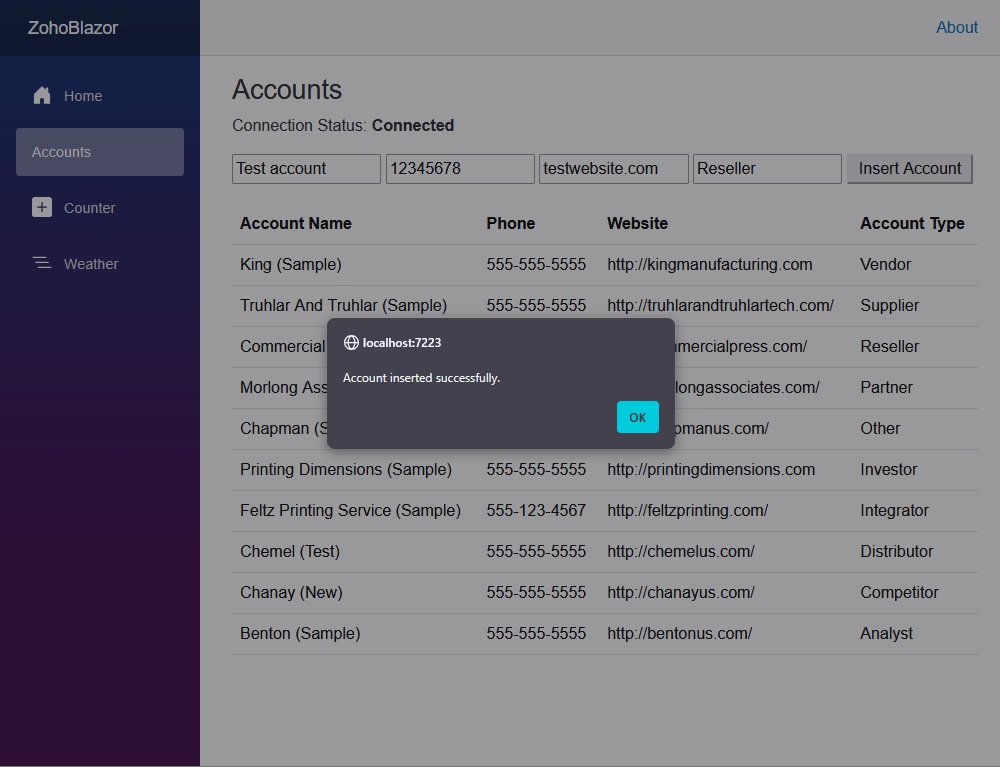
Click OK to reload the page and see the result.

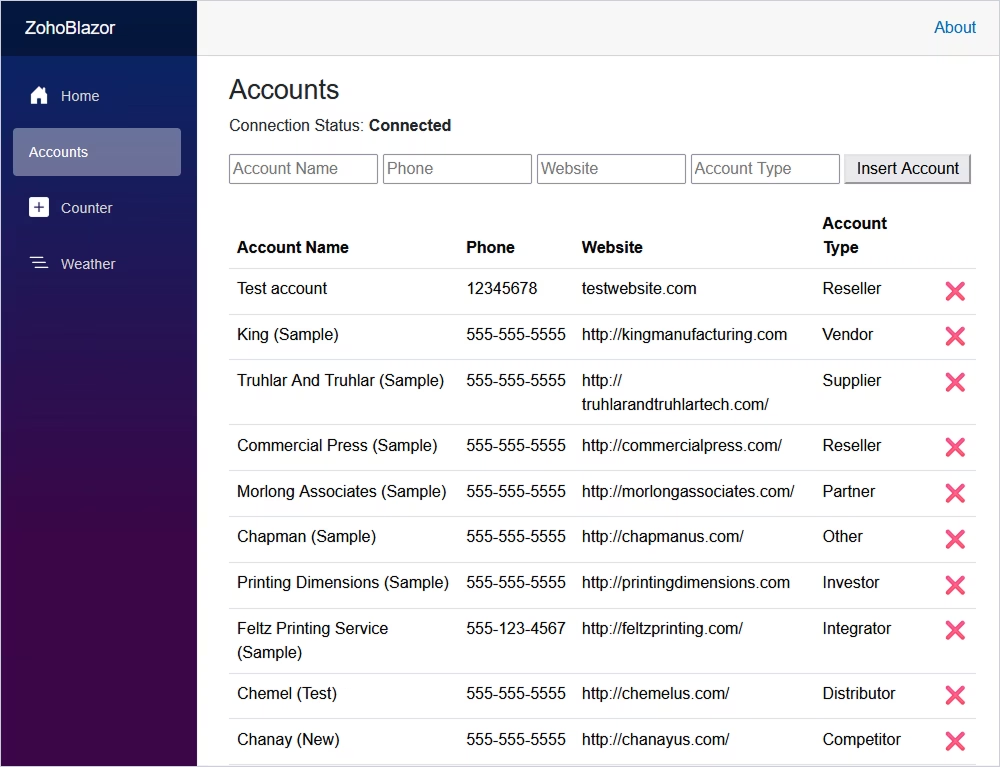
To add the Delete button next to each row in the table and implement the functionality for removing a row from Zoho CRM, you can follow these steps.
First, add the method to ZohoCrmService.cs that deletes an account based on the account name.
public bool DeleteAccount(string accountName)
{
    try
    {
        using (var connection = new ZohoConnection(_config.GetConnectionString()))
        {
            connection.Open();

            var command = new ZohoCommand(
                "DELETE FROM Accounts WHERE \"Account Name\" = :name",
                connection
            );

            command.Parameters.AddWithValue("name", accountName);

            int rowsAffected = command.ExecuteNonQuery();

            return rowsAffected > 0;
        }
    }
    catch (Exception ex)
    {
        Console.WriteLine(ex.Message);
        return false;
    }
}In the Program.cs file, add a custom endpoint to remove an account based on its name.
// Custom endpoint for deleting an account
app.MapDelete("/accounts/delete", async (HttpContext context, ZohoCrmService zohoCrmService) =>
{
    if (context.Request.Query.TryGetValue("AccountName", out var accountName))
    {
        bool success = zohoCrmService.DeleteAccount(accountName);

        string message = success
            ? "Account deleted successfully."
            : "Failed to delete account.";

        await context.Response.WriteAsync(message);
    }
    else
    {
        await context.Response.WriteAsync("Invalid request parameters.");
    }
});Modify the Accounts.razor component to implement a delete button next to each row in the table. This button will call a JavaScript function to handle the deletion.
<td>
    <a
        href="#"
        onclick="event.preventDefault(); window.deleteAccount('@row["Account Name"]')"
        style="text-decoration: none; color: inherit;"
    >

        <span
            style="cursor: pointer; font-size: 1.2em;"
        >
            ❌
        </span>

    </a>
</td>Add a JavaScript function to handle account deletion. This function will be called when the delete button is clicked. You can place it in the <script> section of MainLayout.razor.
window.deleteAccount = async function(accountName)
{
    const response = await fetch(
        `/accounts/delete?AccountName=${encodeURIComponent(accountName)}`,
        {
            method: 'DELETE'
        }
    );

    const message = await response.text();

    alert(message);

    if (message.includes("successfully"))
    {
        window.location.href = "/accounts";
    }
};
Run the application.
Try to delete the test account.
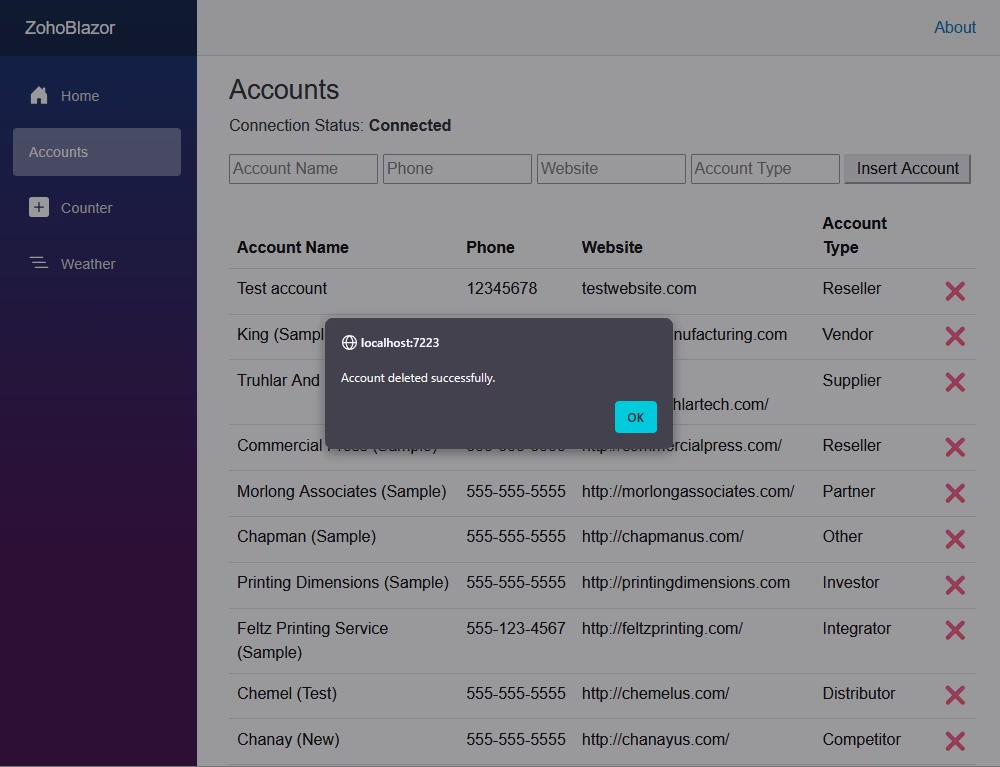
Click OK to check that the account has been deleted.
This setup allows you to remove accounts from Zoho CRM and see the updated list of accounts. The alert indicates the success or failure of the operation.
With dotConnect for Zoho CRM, you can quickly connect a .NET Blazor application to Zoho CRM and perform data operations using familiar ADO.NET interfaces. This approach eliminates the need for custom HTTP request handling or manual token management.
Authentication Type=OAuthInteractive

I'm a technical content writer who loves turning complex topics — think SQL, connectors, and backend chaos–into content that actually makes sense (and maybe even makes you smile). I write for devs, data folks, and curious minds who want less fluff and more clarity. When I'm not wrangling words, you'll find me dancing salsa, or hopping between cities.