
You can install the driver by using the Windows installer.
After you receive the license key, add it to your connection strings to connect to the data source.
This guide walks you through using Entity Framework Core to manage data operations in .NET applications. With the help of dotConnect for Zoho CRM, you'll learn how to generate EF Core models using the visual ORM tool, Entity Developer. We'll also build a console application and demonstrate how to implement CRUD operations efficiently using a well-structured connection class.
dotConnect enables straightforward connectivity between .NET applications and Zoho CRM, allowing developers to access CRM modules and records without working directly with Zoho's REST APIs.
Using familiar ADO.NET components, dotConnect for Zoho CRM allows developers to work with data through standard .NET data access patterns such as connections, commands, and data readers.
dotConnect works with EF Core, Dapper, NHibernate, and LinqConnect, enabling flexible object-relational mapping and efficient interaction with Zoho CRM data in .NET applications.
Access to Zoho CRM is authorized through a browser-based login flow. After successful authentication, dotConnect automatically retrieves and manages access and refresh tokens for secure connections.
Devart implements the standard ADO.NET provider model in dotConnect solutions, ensuring consistent behavior and compatibility with existing .NET frameworks and development tools.
Devart provides professional technical assistance, comprehensive documentation, and ongoing product enhancements, helping developers maintain stable and reliable integrations with Zoho CRM.
You can start using dotConnect for Zoho CRM immediately with a 30-day free trial. Choose one of the following installation options:
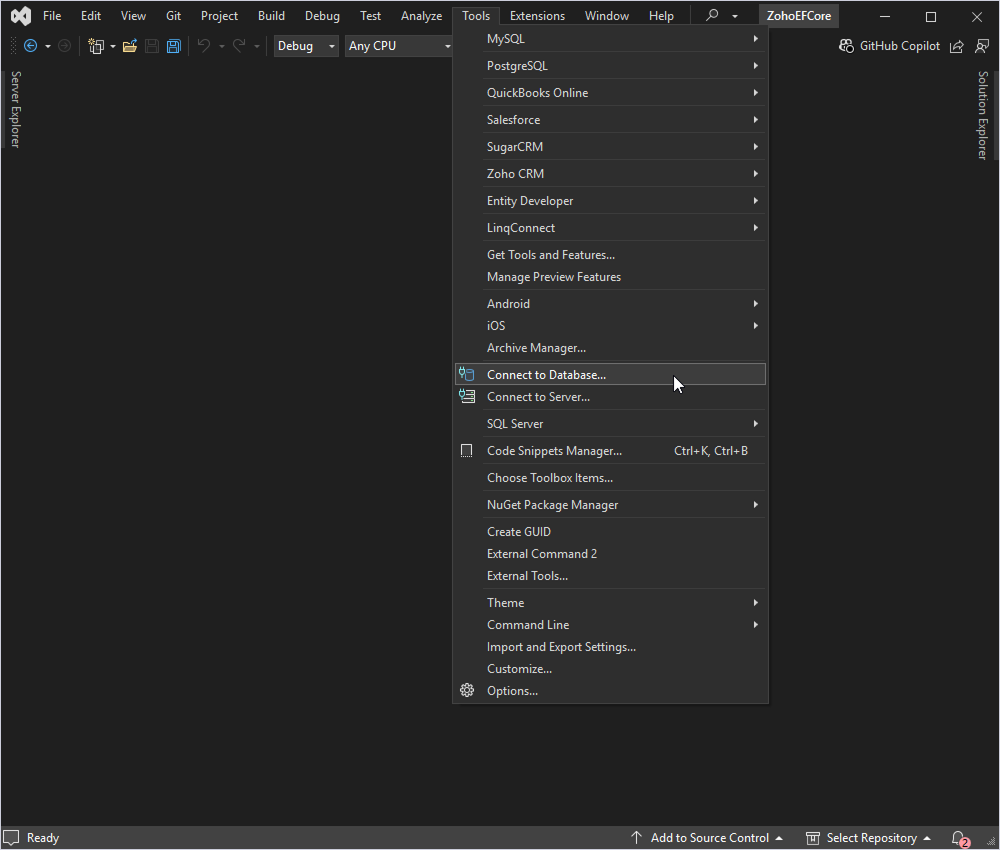
To connect to Zoho CRM using the built-in Data Explorer, click Tools and select Connect to Database.
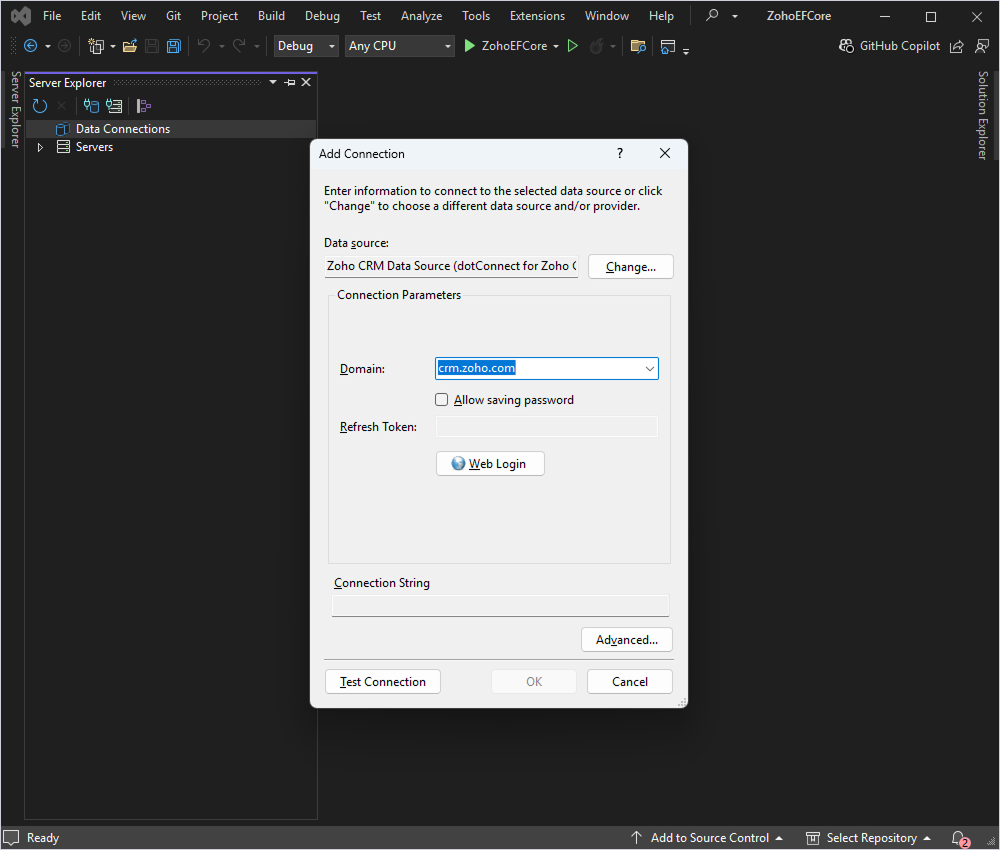
Then, select the Zoho CRM data source, enter your Zoho domain, and click Web Login.
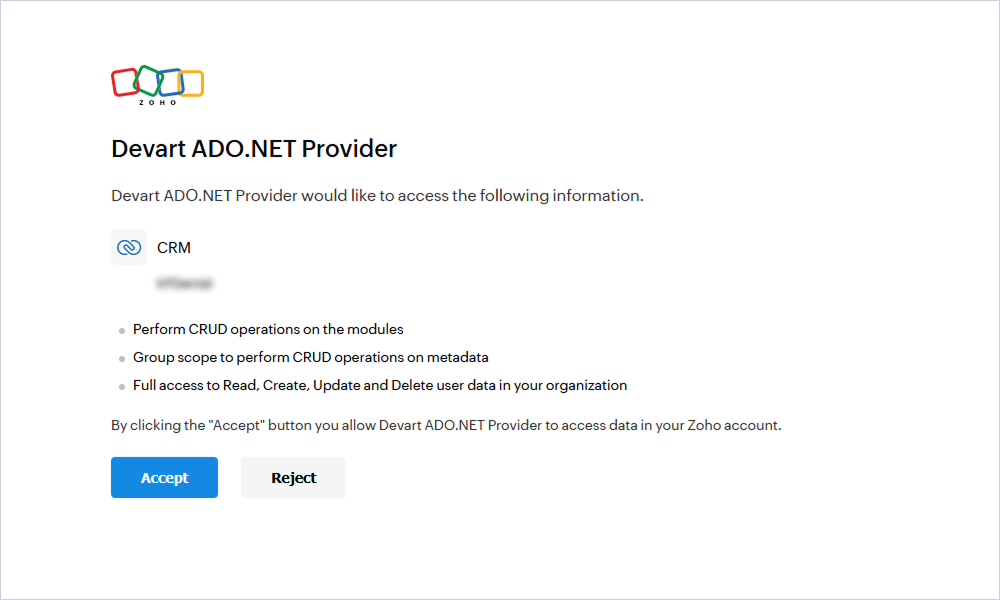
Log in to your Zoho account and grant access to the Zoho CRM company.
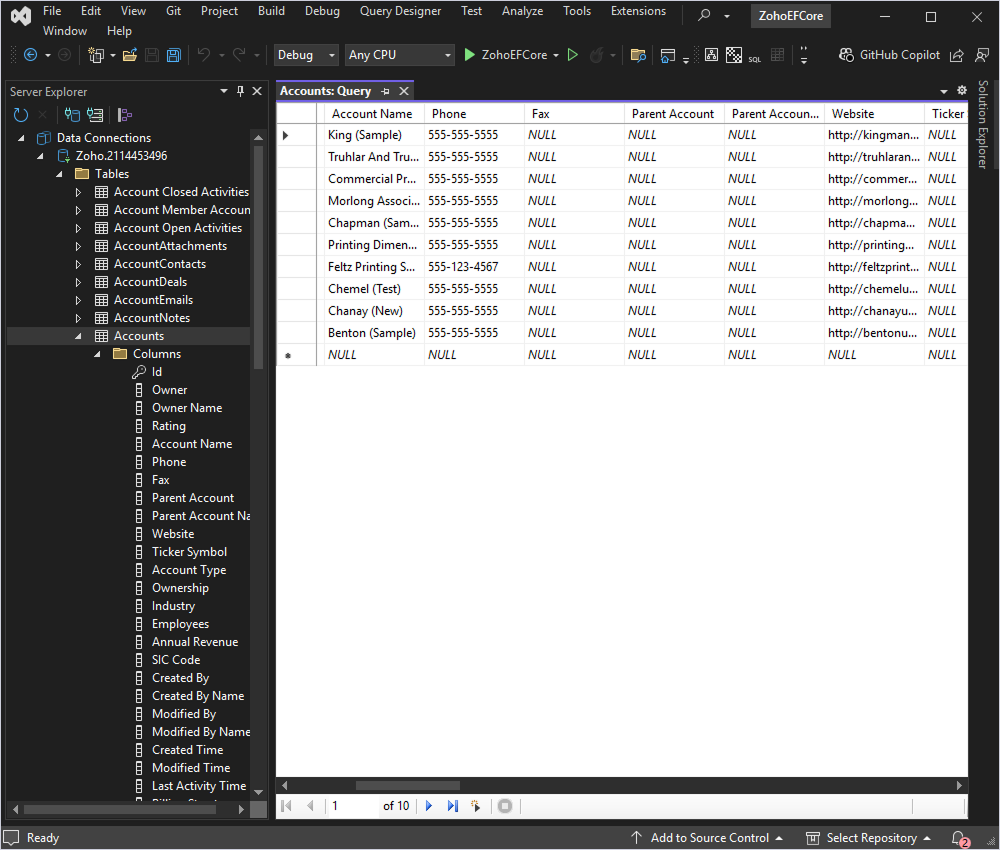
After that, select the tables and fields you want to work with and retrieve the data.
The Professional and Developer editions of dotConnect for Zoho CRM come equipped with Entity Developer, a robust ORM model designer and code generator that supports both Entity Framework and EF Core. This tool simplifies the process of generating a model from a data source or creating a data source from an existing model.
Follow the detailed illustrated guide to create your database model using Entity Developer. When this process is complete, it opens the model you created, ready for use.
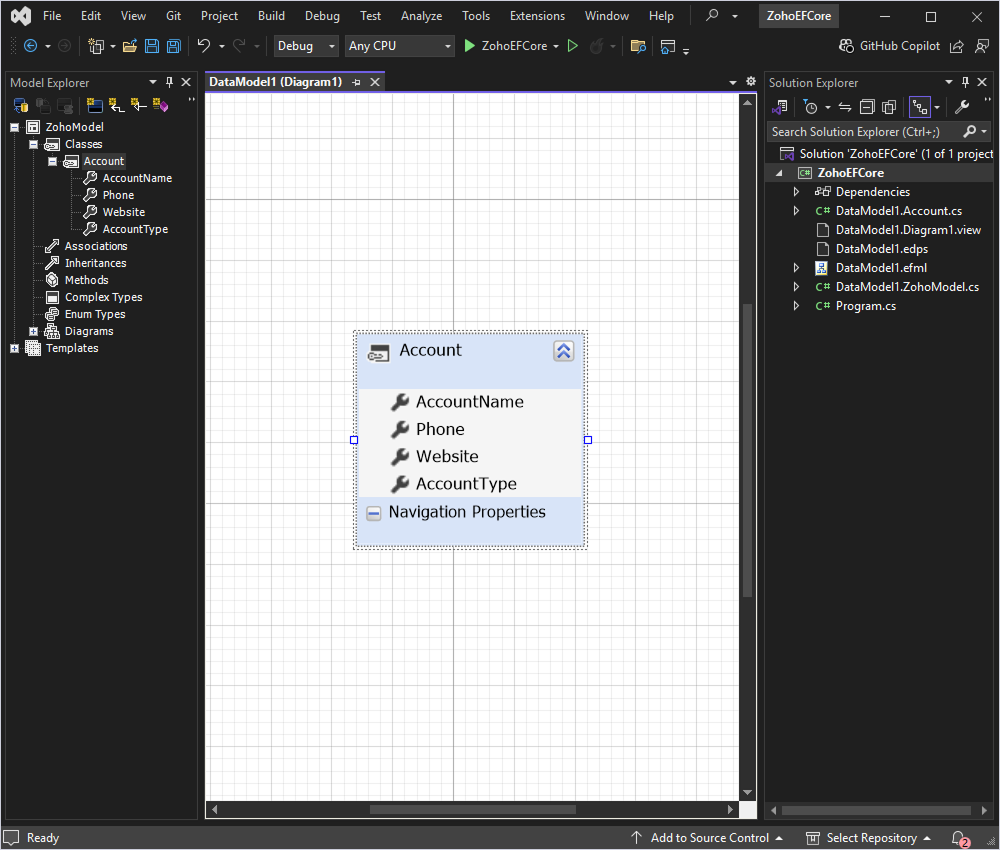
Entity Developer generates classes for the selected tables, representing data entities. It also creates a ZohoModel class descendant to manage the connection to Zoho CRM and handle the data flow. This class contains properties and methods corresponding to your Zoho CRM objects, allowing you to retrieve and modify data easily.
The generated code can be found in:
With the model set up, you are now ready to interact with Zoho CRM data using Entity Framework Core in your .NET application.
optionsBuilder.UseZoho(@"Domain=crm.zoho.com;API Version=v2;Client Id=*****;Client Secret=*****;Refresh Token=*****;License Key=*****");
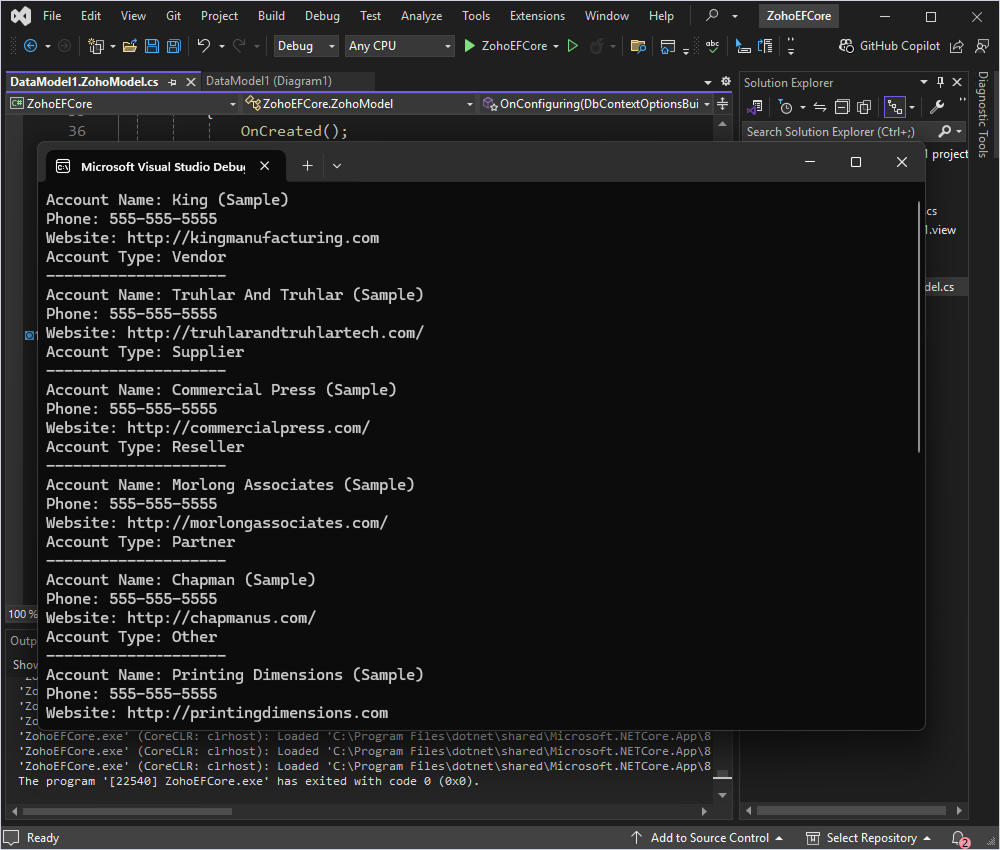
In the Program.cs file, write the code to retrieve and display information from the Account table.
static void DisplayAccounts()
{
    using (var context = new ZohoModel())
    {
        var accounts = context.Accounts
            .Select(a => new { a.AccountName, a.Phone, a.Website, a.AccountType })
            .ToList();

        foreach (var account in accounts)
        {
            Console.WriteLine($"Account Name: {account.AccountName}");
            Console.WriteLine($"Phone: {account.Phone}");
            Console.WriteLine($"Website: {account.Website}");
            Console.WriteLine($"Account Type: {account.AccountType}");
            Console.WriteLine(new string('-', 20));
        }
    }
}
The console should display the AccountName, Phone, Website, and AccountType fields from the Account table in Zoho CRM.
This example demonstrates how to insert a new account into the Zoho CRM database using Entity Framework Core.
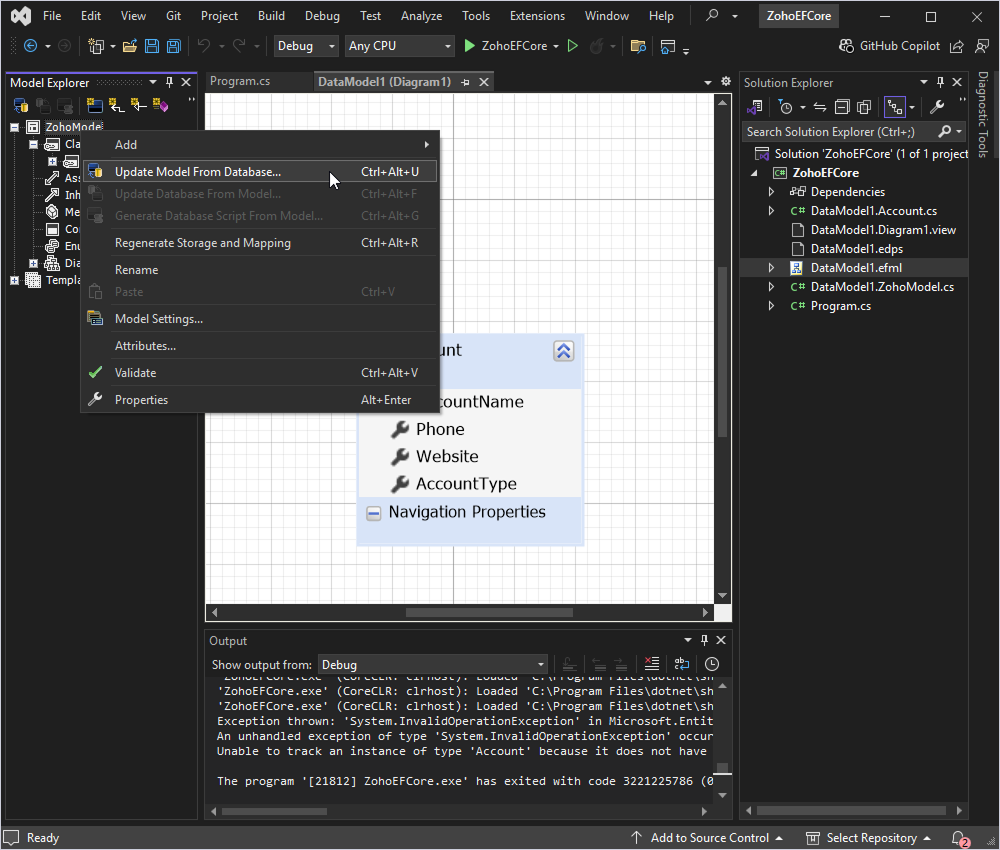
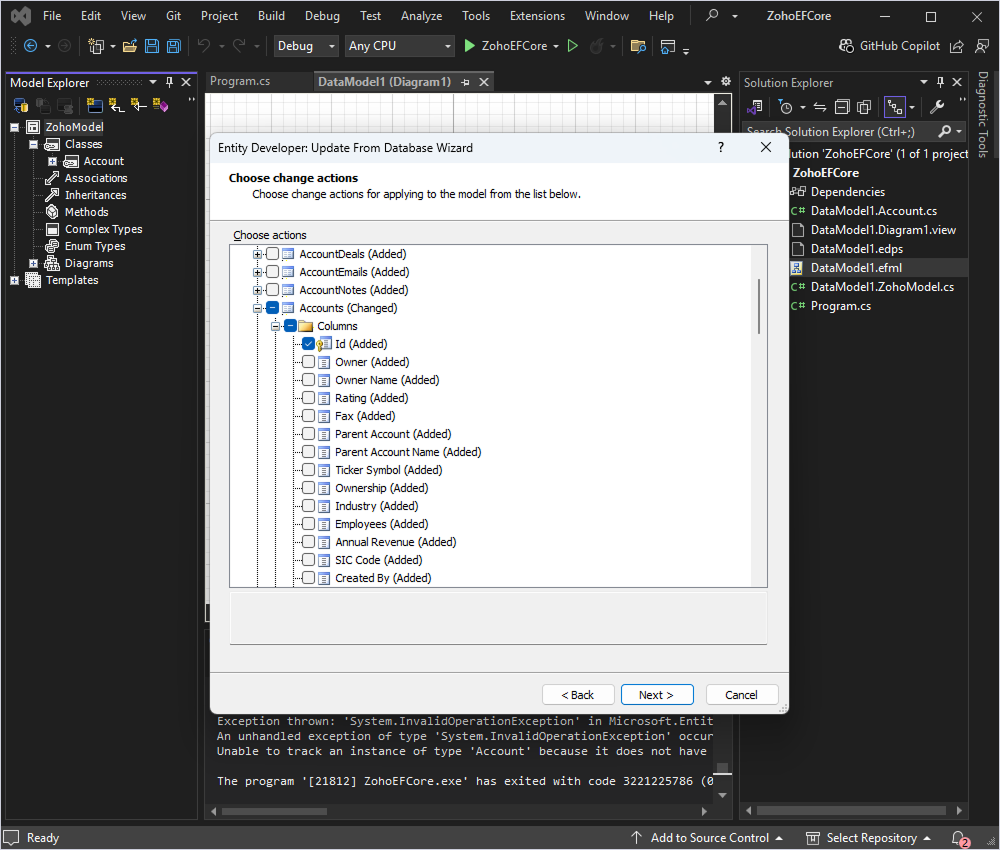
First, ensure that your Account class includes an Id field. To do this, right-click your model in Model Explorer and select Update Model from Database.
Next, select the newly added Id column and update the data model.
After updating, verify the properties of the Id field. Ensure that:
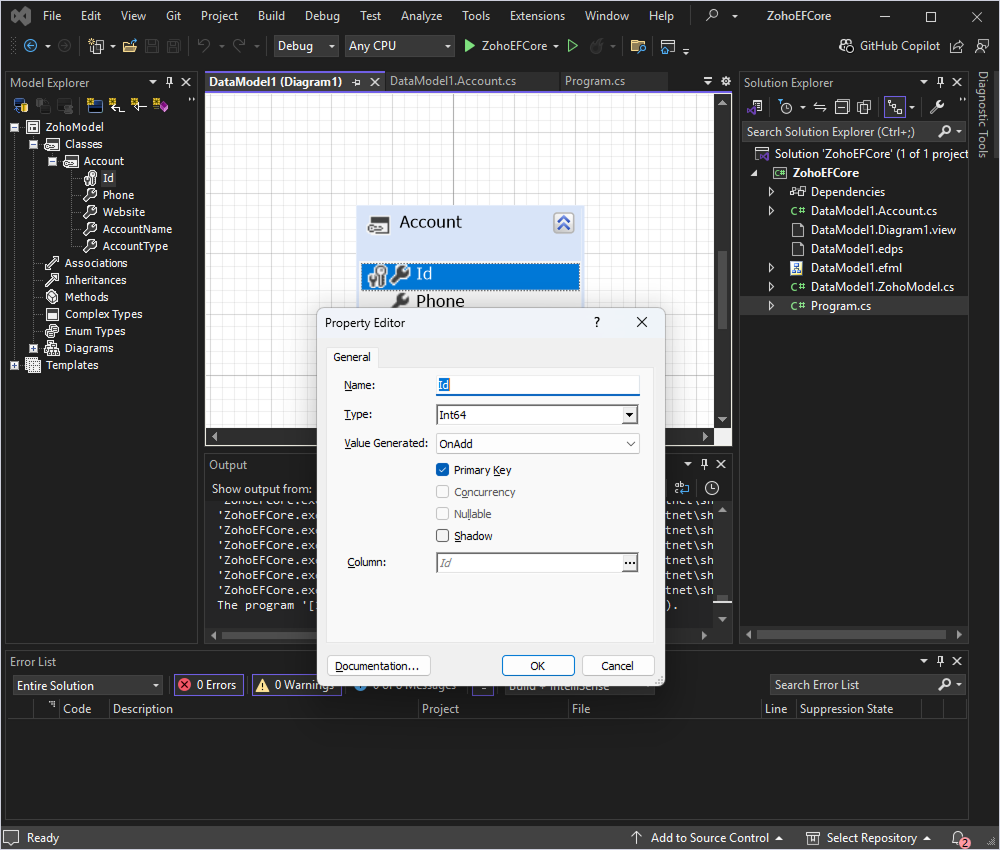
Once these settings are configured, the model is ready for inserting new records into Zoho CRM.
Create a method in your Program class to add a new account to the Account table.
static void AddNewAccount()
{
	using (var context = new ZohoModel())
	{
    	var newAccount = new Account
    	{
        	AccountName = "New Company Inc.",
        	Phone = "123-456-7890",
        	Website = "http://www.newcompany.com",
        	AccountType = "Customer"
    	};

    	context.Accounts.Add(newAccount);
    	context.SaveChanges();

    	Console.WriteLine("New account added successfully.");
	}
}
Build and run your application.

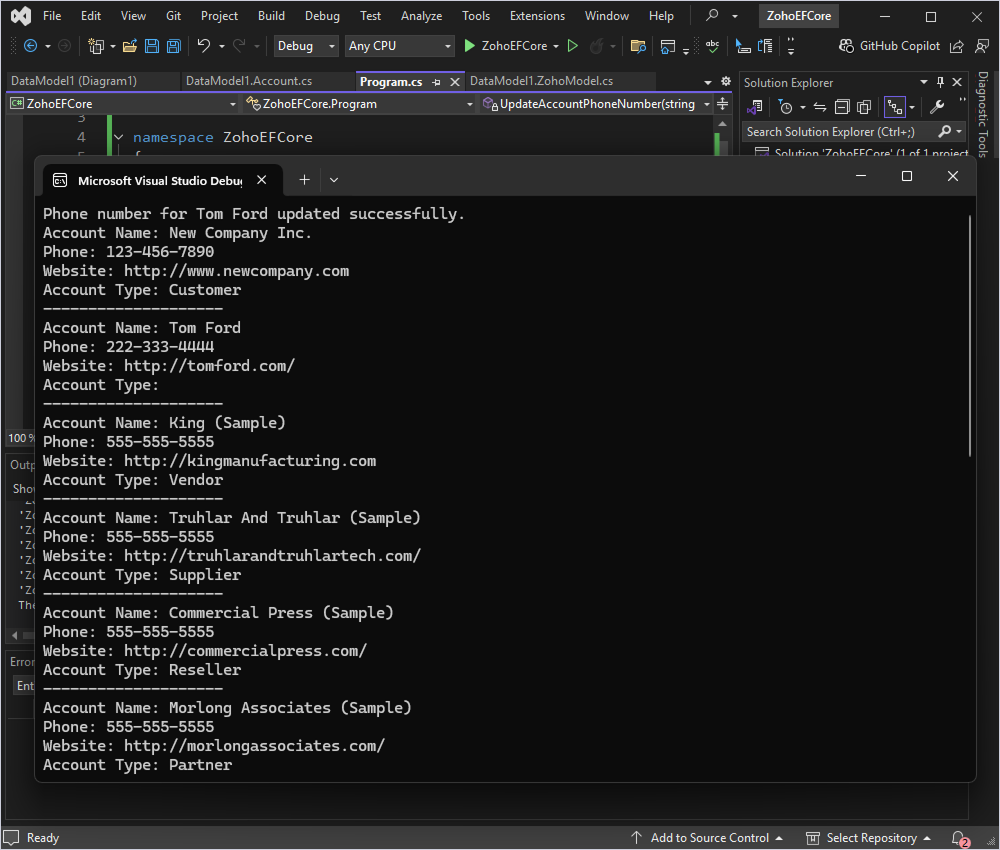
Now, let's update the phone number for an account with the name "Tom Ford" in Zoho CRM. This example assumes that the AccountName is unique or that you have a way to uniquely identify the account you want to update.
We retrieve the account named "Tom Ford" from the database and update the Phone property with a new phone number.
Here's how you can implement this in your Program class:
static void Main(string[] args)
{
	UpdateAccountPhoneNumber("Tom Ford", "222-333-4444");
	DisplayAccounts();
}

static void UpdateAccountPhoneNumber(string accountName, string newPhoneNumber)
{
	using (var context = new ZohoModel())
	{
    	// Fetch the account with the specified name
    	var account = context.Accounts
        	.FirstOrDefault(a => a.AccountName == accountName);

    	if (account != null)
    	{
        	// Update the phone number
        	account.Phone = newPhoneNumber;

        	// Save changes to the database
        	context.SaveChanges();

        	Console.WriteLine($"Phone number for {accountName} updated successfully.");
    	}
    	else
    	{
        	Console.WriteLine($"Account with name {accountName} not found.");
    	}
	}
}
Here is the result.
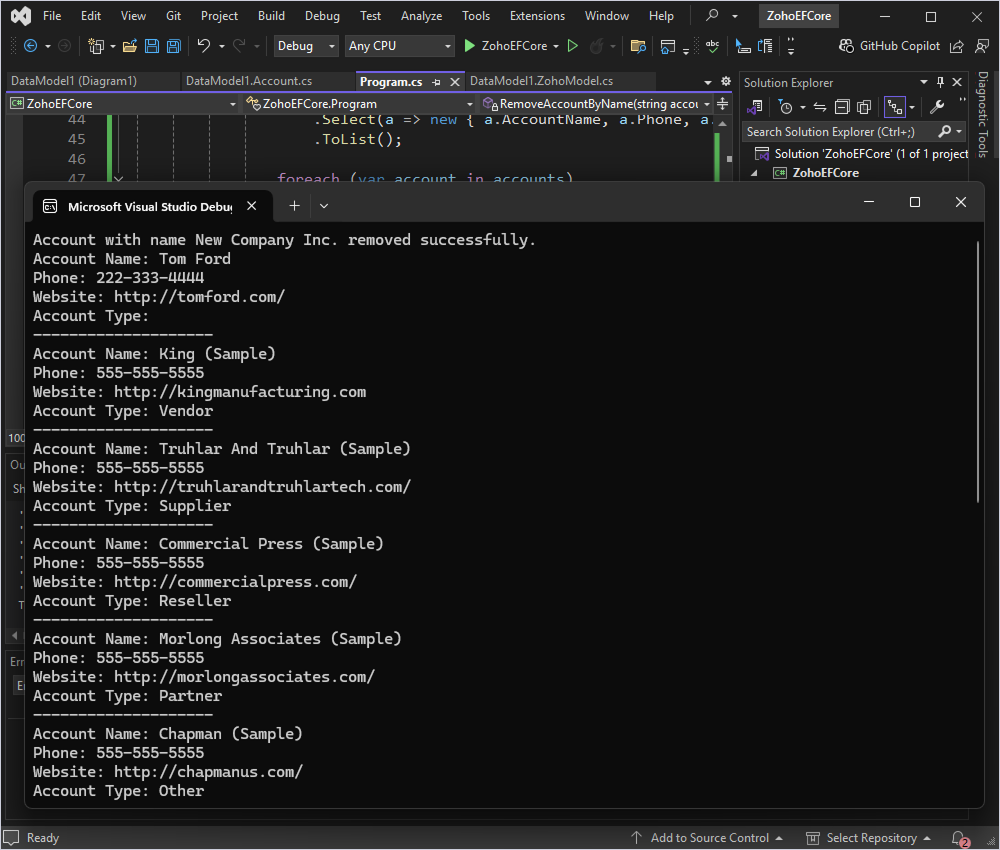
This example demonstrates how to fetch the account by name and then delete it from the database.
First, retrieve the account with the name "New Company Inc." from the database. Once you have the account, remove it from DbContext and save the changes.
This is how you can implement this in your Program class:
static void Main(string[] args)
{
	RemoveAccountByName("New Company Inc.");
	DisplayAccounts();
}

static void RemoveAccountByName(string accountName)
{
	using (var context = new ZohoModel())
	{
    	// Fetch the account with the specified name
    	var account = context.Accounts
        	.FirstOrDefault(a => a.AccountName == accountName);

    	if (account != null)
    	{
        	// Remove the account from the context
        	context.Accounts.Remove(account);

        	// Save changes to the database
        	context.SaveChanges();

        	Console.WriteLine($"Account with name {accountName} removed successfully.");
    	}
    	else
    	{
        	Console.WriteLine($"Account with name {accountName} not found.");
    	}
	}
}
Here is what we get.
In this tutorial, we explored how the integration of Entity Framework Core with Zoho CRM using dotConnect for Zoho CRM simplifies data management in .NET applications. By combining the advanced capabilities of dotConnect for Zoho CRM with the power of Entity Framework Core, you can efficiently handle database operations in Zoho-powered applications. With these tools, you can develop scalable, maintainable, and robust .NET solutions that seamlessly interact with Zoho CRM data.
Authentication Type=OAuthInteractive. When ZohoConnection opens, a browser window appears for you to sign in to your Zoho account and grant access. After authorization, dotConnect automatically retrieves and manages the access and refresh tokens.

I'm a technical content writer who loves turning complex topics — think SQL, connectors, and backend chaos–into content that actually makes sense (and maybe even makes you smile). I write for devs, data folks, and curious minds who want less fluff and more clarity. When I'm not wrangling words, you'll find me dancing salsa, or hopping between cities.