How to Run a SQL Script or File in MySQL & MariaDB
In database development, it is important to test the database with different data scenarios to ensure its functionality, performance, and reliability. Data import enables the population of test data sets for developers to simulate real-world conditions and identify potential issues before deploying the database into production.
In this tutorial, we'll delve into how to export and import MySQL data using a dump file that we'll create. We'll also learn how to execute SQL file in MySQL via the command line or using dbForge Studio for MySQL.
How to create a MySQL script file using the command line
One of the ways to generate a data export .sql file with a set of SQL statements is to use the command-line mysqldump utility. You can then use this file to create tables and objects and insert data copied from the database. mysqldump allows you to dump specific tables, full databases, or entire servers with all databases and their objects. Further you can use that file to transfer databases to another server.
The syntax of the command is as follows:
mysqldump -u [user name] -p [password] -h [host name] [options] [database_name] [tablename] > [dumpfilename.sql]Parameters:
- -u or --user=[username] - the MySQL username to connect to the database.
- -p - the MySQL user's password.
- -h or --host=[hostname] - the hostname or IP address of the MySQL server to connect to. If the MySQL server is running on the same machine where you're executing the command, you can omit this option.
- options - optional parameters to customize the dump process.
- [database_name] - the name of the MySQL database to dump.
- [tablename] - the specific table within that database. Omit the option if you want to migrate the entire database.
- <> - the setting to back up the database (>) or restore it (<).
- [dumpfilename.sql] - the path to the dump file with SQL commands for creating a database/table and inserting data.
Let us generate an export script for specific tables: city, country, and customer from the sakila database using mysqldump.
Open the Command Prompt and navigate to the MySQL server installation directory using the cd command. For example, for MySQL 9.4, the default path to the installation folder is C:\Program Files\MySQL\MySQL Server 9.4\bin.
After that, execute the following mysqldump command to create the data export file (make sure to replace the placeholders with your actual credentials):
mysqldump --host=[hostname] --user=[username] --port=3306 -p [database] [table1] [table2] [table3] > D:\export_data.sql
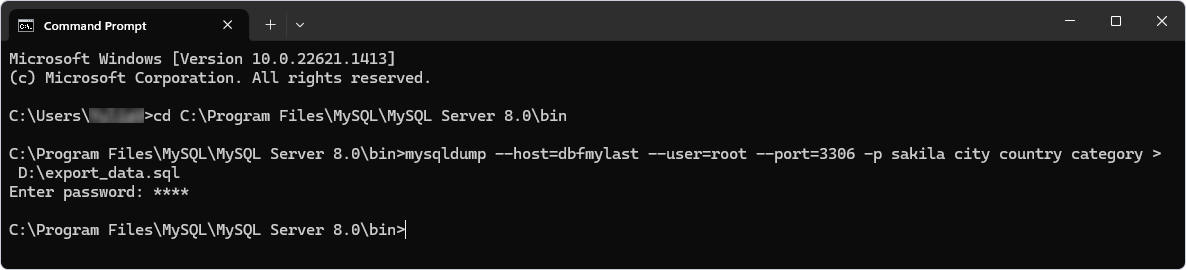
You will find the file with exported data in the specified folder.
Create a .sql dump file in an IDE for MySQL and MariaDB
Another approach to creating a .sql dump file with the MySQL database backup suggests using a feature-rich and versatile GUI IDE for MySQL and MariaDB databases.
The main advantages of the Studio:
- Broad compatibility: MySQL server, MariaDB server, Percona PAM Authentication for MySQL, and Amazon RDS for MariaDB.
- AI Assistant: An AI-powered tool designed to generate, analyze, optimize, explain, and troubleshoot SQL code.
- Advanced Source Control tool to version-control databases and manage database changes.
- Comprehensive toolset for intelligent SQL coding, including code autocompletion, flexible formatting, code snippets, simplified code navigation, quick object information, and instant syntax validation.
- Query Profiler and SQL Debugger that are designed to help identify and optimize performance bottlenecks in SQL queries.
- Visual Query Builder for building complex SQL queries without manual SQL coding.
- Data export and import tools with all popular data formats supported.
- Schema Compare for comparing and synchronizing database schemas across different environments.
- Data Generator for quick and easy population of tables with high-quality test data.
Let us create a dump file now.
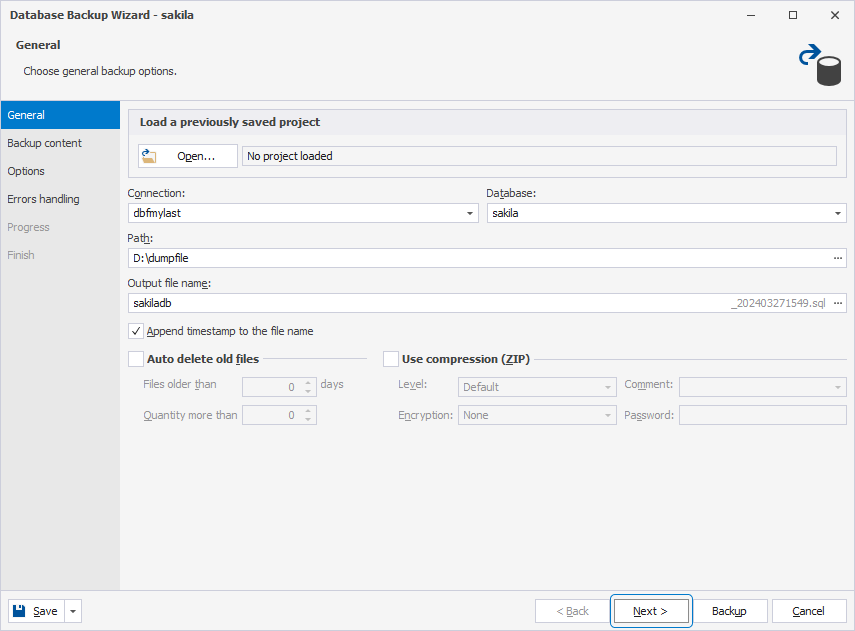
Open the Studio and connect to the database for which you want to create a .sql dump file. Then right-click that database and select Tasks > Backup Database. Alternatively, you can navigate to Database > Tasks > Backup Database on the ribbon.
The Database Backup Wizard opens. On the General page, select the database to export data from, specify the path to the output backup file, and give that file a name. Optionally, you can add a timestamp to the filename. Click Next.
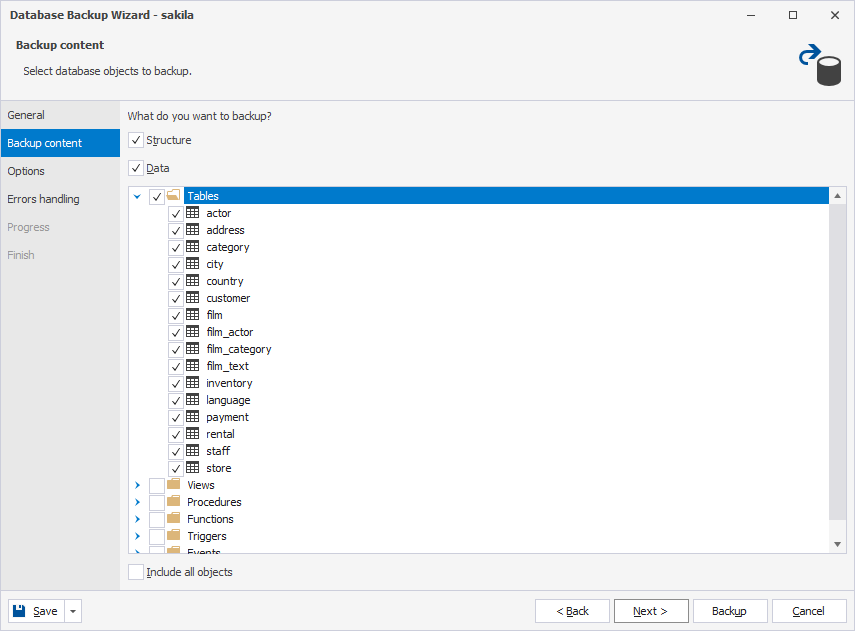
On the Backup content page, select the database objects to back up and click Next.
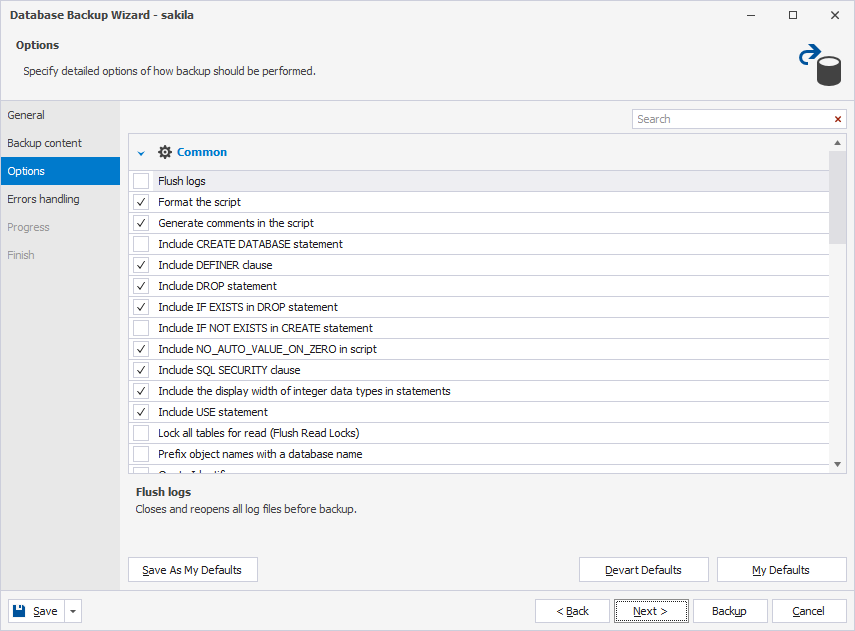
On the Options page, specify your preferences for the backup process.
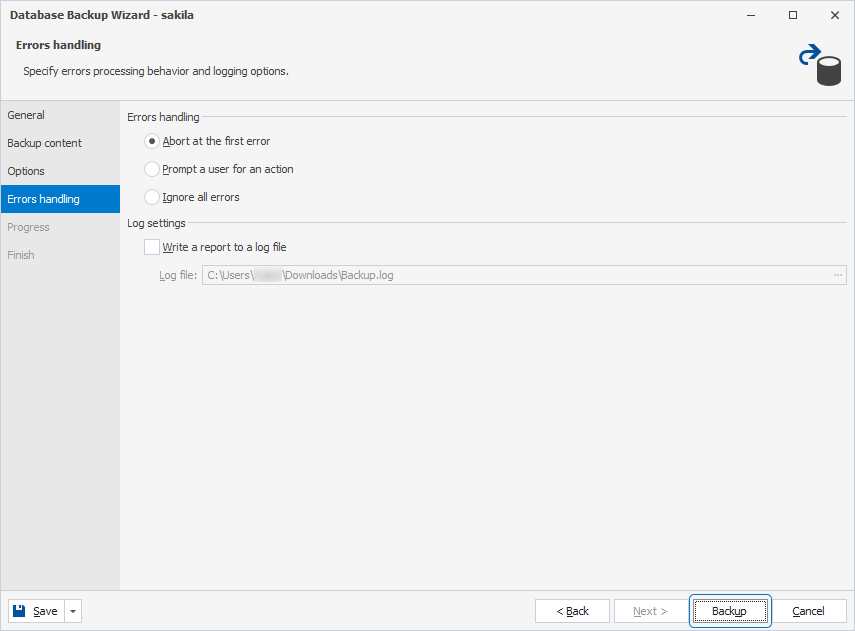
On the Errors handling page, configure the behavior and logging settings. Once done, click Backup to generate a .sql script.
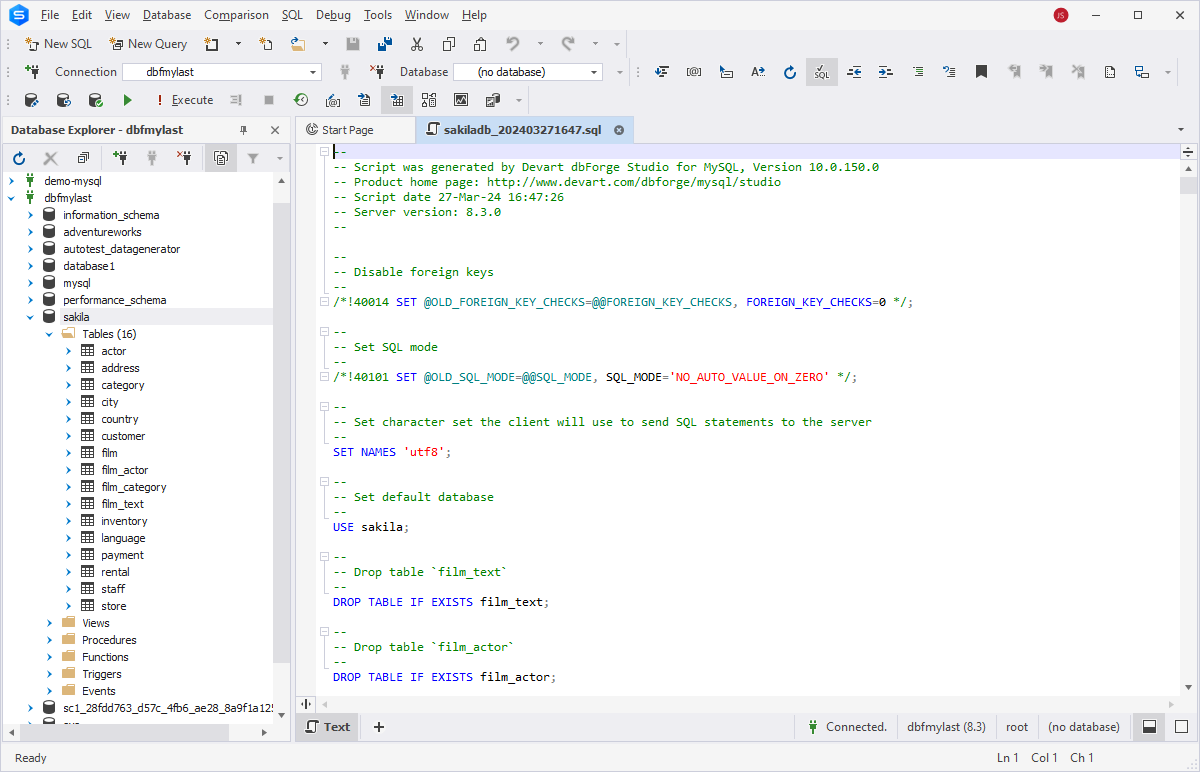
Close the Wizard. You can choose to view the script in the internal editor immediately.
Run a MySQL script file from terminal
Now, let us see how to use the .sql file in MySQL: we created the file with the necessary commands to perform the specific task, and we need to execute it now.
First, to import a .sql script file the Command-Line, execute the following mysql command:
Parameters:
- -u [user name] - the MySQL username for connecting to the specific MySQL server.
- -p - the MySQL user's password.
- [target_database_name] - the name of the MySQL database to import the data.
- < is a parameter that refers to the process of a database restoration.
- [dumpfilename.sql] - the path to the file with the SQL commands to recreate the database structure and insert data.
To get started, create an empty database on the server. That database will contain the restored backup data. In our demo case, we create the sakila database on the demo-mysql MySQL server.
To restore the database from the file, open the Command Prompt and navigate to the MySQL Server installation folder using the cd command (e.g., C:\Program Files\MySQL\MySQL Server 9.4\bin).
Replace the placeholders with your actual data in the mysql command and execute it:
Enter the password.

Execute a SQL file from the MySQL command line
We need to verify whether all database objects and data are present in the database after restoring the backup file.
Connect to the required database using the mysql command (replace the demo parameters with your server connection details):
Check the database objects in the target database using the SHOW TABLES; command:
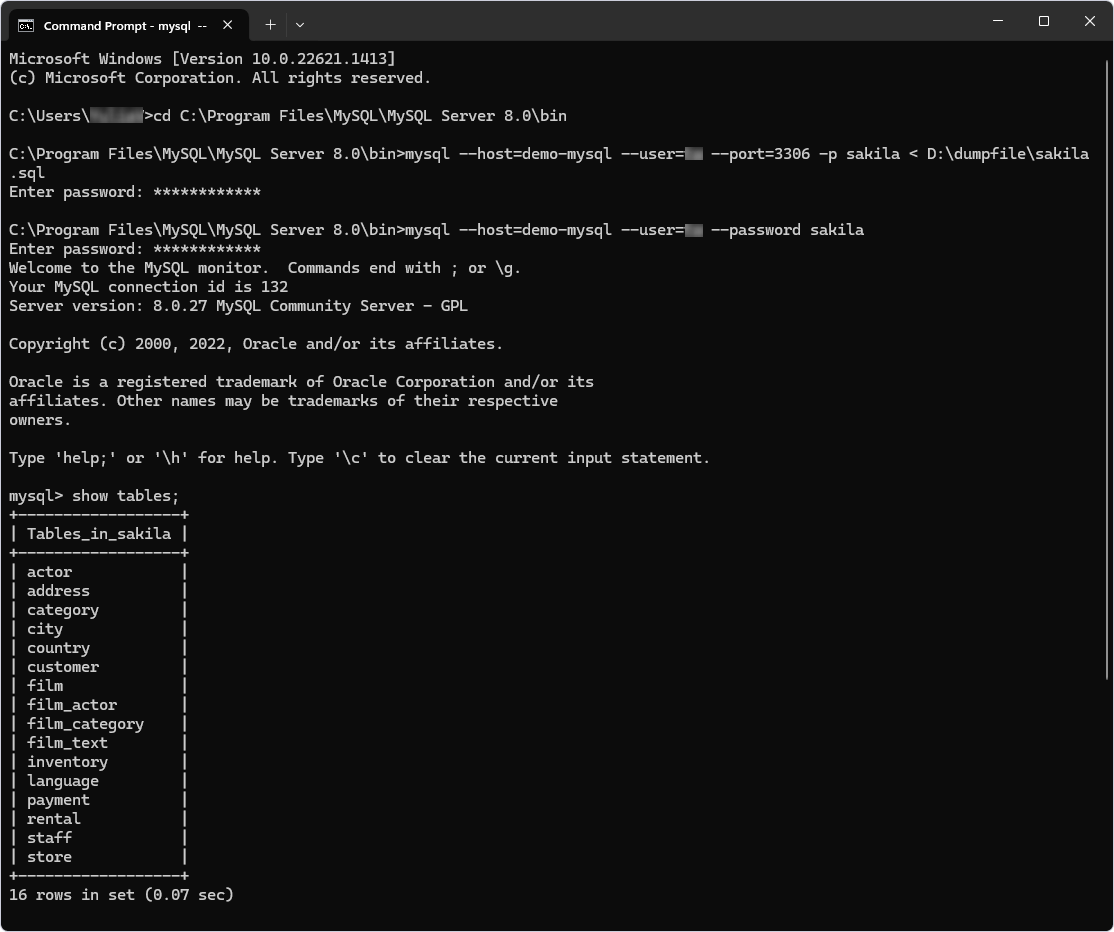
As you can see, the command returns the list of all the tables from the sakila database.
Benefits of running SQL files via terminal
Although graphical user interfaces (GUIs) are widely used, the command line remains the default choice for users who need precise control and automation over computer systems or servers.
When you execute MySQL script from command line, you get several key advantages:
- Speed: Command-line clients are typically lighter and faster than GUI tools, which can be critical for performance.
- Direct system access: CLI utilities interact directly with the operating system or APIs, offering more control.
- Automation: CLI commands can be easily combined into shell scripts for repeatable, automated, or batch tasks.
- DevOps integration: Most modern DevOps tools and servers rely on CLI-based workflows rather than GUIs.
- Remote execution: SSH and similar protocols allow running commands remotely without local desktop tools.
In summary, the speed, flexibility, and automation capabilities make command-line terminals ideal for remote, repeatable, and non-interactive tasks, which are core elements of modern CI/CD and DevOps workflows.
When to use dbForge Studio instead of CLI
Despite the many advantages of command-line tools and their essential role in fields like DevOps, GUI tools often prove more convenient and user-friendly in many situations, especially for beginners.
GUI tools allow users to configure and perform tasks without writing code, making them accessible to those with less or no proper SQL knowledge. Where you would previously execute SQL file in MySQL command line, you might use intuitive, step-by-step visual wizards that simplify setup and make it faster and more accurate even for experienced professionals.
Moreover, GUI tools offer clear error logging and visual notifications about failures or potential issues, along with detailed log files for troubleshooting.
Another significant benefit is the ability to preview results before execution. dbForge Studio for MySQL lets users see the expected outcome in advance, significantly reducing the risk of errors.
dbForge Studio for MySQL is an excellent choice for beginners, users performing routine tasks, or those looking to automate recurring processes. It can generate executable scripts for various operations, saving users from the effort of writing scripts manually. You can reuse these scripts to automate tasks efficiently.
In essence, dbForge Studio for MySQL combines the best of both worlds: the flexibility of command-line tools and the simplicity of a graphical interface.
CLI vs dbForge Studio for MySQL for running SQL files
We have created a comparison table to highlight the key differences between working in the command line and using dbForge Studio for MySQL, so you can determine which approach is best suited for each scenario.
| Feature | Command Line (mysql CLI) | dbForge Studio for MySQL |
| Ease of use | ❌ Requires CLI knowledge | ✅ Beginner-friendly GUI |
| File encoding support | ❌ Manual handling needed | ✅ Encoding auto-detected |
| Large script execution | ✅ Large Script Wizard | |
| Error debugging | ❌ Manual logs | ✅ Built-in error display |
| Scheduling/Automation | ✅ via cron/batch | ✅ via CLI + Scheduler |
| Restore to a new DB | ⚠️ Manual steps | ✅ 1-click restore wizard |
| Export templates | ❌ no UI context | ✅ Available |
| Data preview | ❌ CLI is non-interactive | ✅ Preview before import |
Run a SQL script using the GUI tool for MySQL
Let us explore the task of restoring a database using dbForge Studio for MySQL.
Open the Studio and create an empty database to import data into it: this is straightforward when you work with a GUI Database Explorer.
Right-click the necessary connection and select New Database. In the editor, define the database name (sakila_new in our test case), set charset and collation options, and click Apply changes.
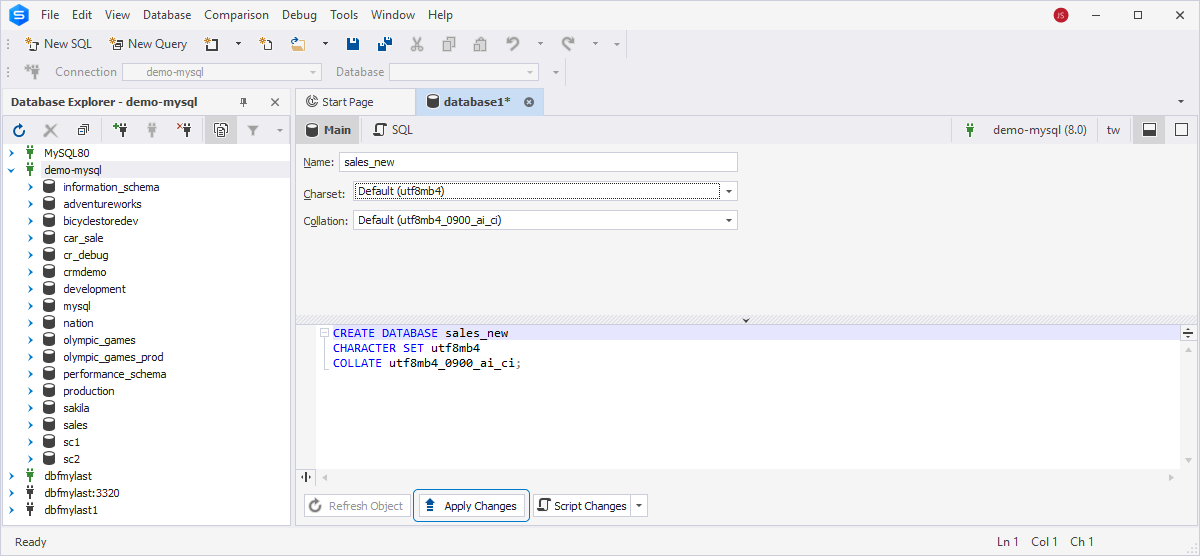
Then refresh the connection to see a new empty database in the Database Explorer list.
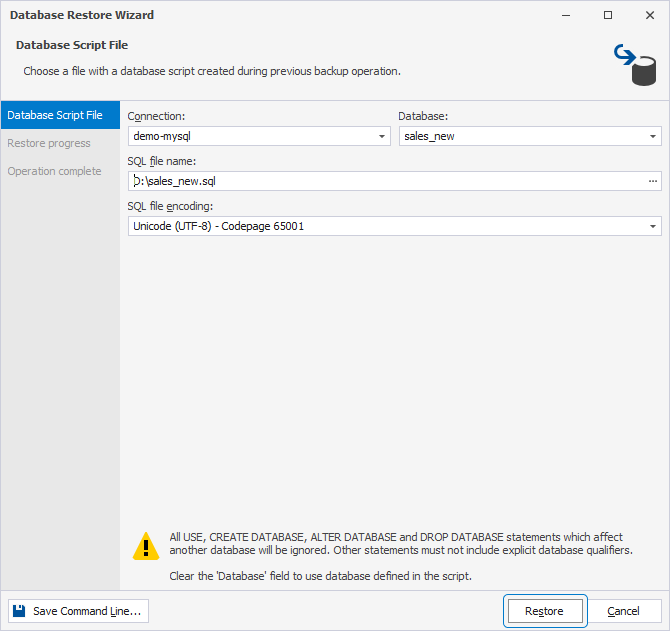
Next, right-click the server connection where you want to restore the database, and select Tasks > Restore Database. Alternatively, choose Database > Tasks > Restore Database on the ribbon.
On the Database Script File page of the Database Restore Wizard, browse to the file with the data. If the database name from the script differs from the name of the database you created, specify the correct name in the Database field. Optionally, you can specify the SQL file encoding. Click Restore.
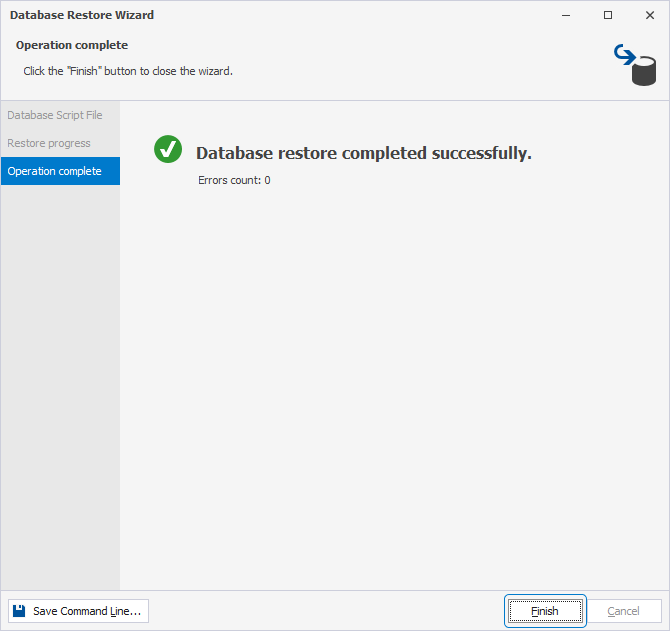
The Studio will notify you about the successful completion of the restore operations. Click Finish to close the wizard.
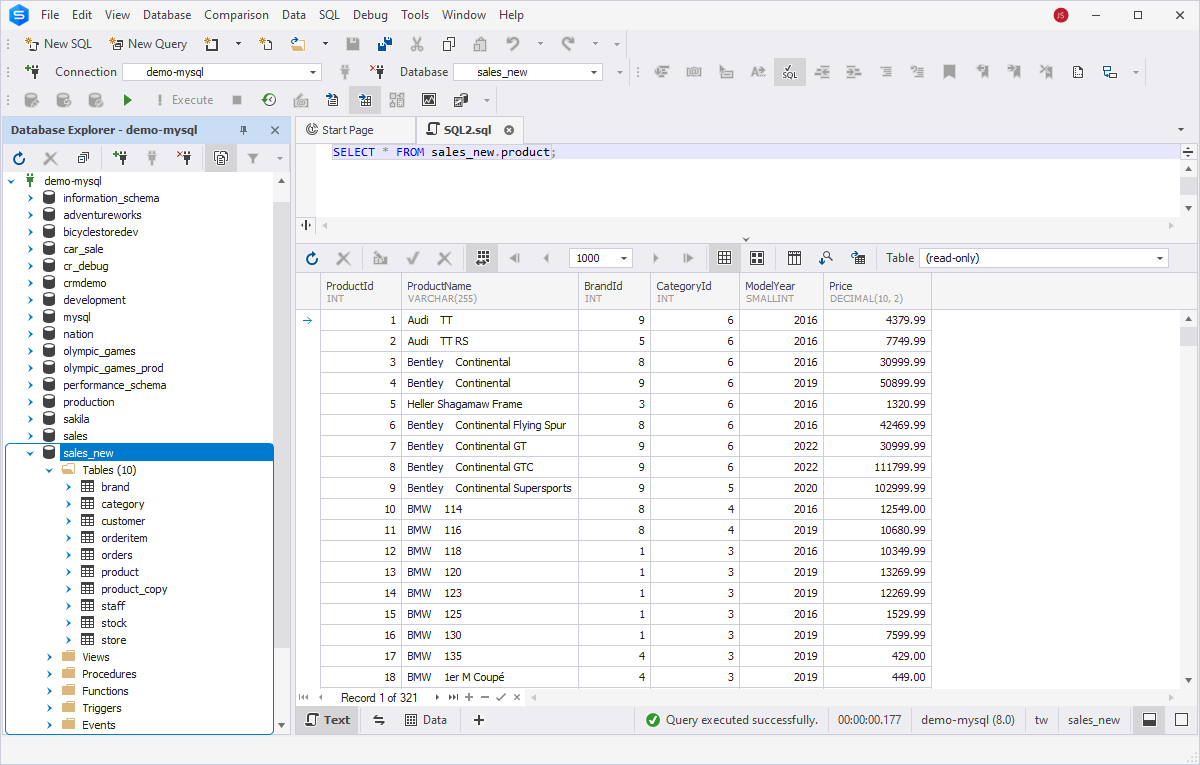
Expand the sakila_new database node in Database Explorer and view the objects. You can retrieve data from any table to check the data import results.
More advantages of dbForge Studio for MySQL for export and import
When it comes to importing and exporting data, it's worth noting the additional capabilities that dbForge Studio for MySQL offers, beyond the ability to easily configure tasks in a visual mode.
- Support for all popular data formats: Tailor data export or import processes to meet specific requirements and ensure compatibility with other systems or applications.
- AI Assistant: Use AI powers to get SQL scripts generated on your demand, analyze SQL code, troubleshoot, and optimize them automatically.
- Export of specific tables, views, or query results: Export only relevant data subsets instead of entire databases, reducing export time and file size.
- Scheduling and automation of tasks: Configure and run repetitive operations, such as regular data backups, reporting, or synchronization, automatically on a schedule.
- Export of database structure or changed data: Export only a part of data, especially useful for large databases with frequent updates.
- Export templates: Create and customize templates with detailed process settings to simplify and speed up future export and import task configurations.
- Customizable error handling: Define how the program responds to errors and configure logging options for detailed information about each process and potential issues.
- Data migration via ODBC: Migrate data between servers or even across different database systems (e.g., import data from Oracle into MySQL or MariaDB directly).
- Flexible data import options: Import data into a new table with automatic table creation or into an existing table with various data insertion modes.
- Column mapping: Ensure accurate import configurations and maximum efficiency.
- Import of large databases: Use the Execute Large Script wizard to efficiently import extensive MySQL or MariaDB databases.
How to automate SQL file execution in MySQL
Automation lies at the heart of modern workflows, especially when it comes to routine tasks such as nightly data imports and exports, database backups, or synchronizing databases across environments. Although these jobs are typical, they still demand time and effort that database specialists could otherwise devote to more complex and vital tasks. Automating such repetitive tasks minimizes manual work, ensures consistency, and is essential in DevOps and CI/CD pipelines.
In the previous section, we discussed how dbForge Studio for MySQL can help you automate various
tasks. With the Studio, you can easily configure a task using its intuitive visual wizards, generate a corresponding
.bat script, and then use that script to automate regular workflows.
Let's now take a closer look at how to perform this process in detail.
Using batch files
We already explored how to make a database backup using the visual Database Backup Wizard in dbForge Studio for MySQL. We configured that job manually and performed the task in real time. We can also automate this job.
After ensuring that all settings are correct, you can save them as an executable batch script. Click Save > Save Command Line in the bottom left corner of the Wizard.

If you want to perform the data import, execute this file, and it will run the task instantly.
Using scheduled tasks
Automating regular tasks to run on a schedule is one of the key practices in modern database management. Let's assume we want to make daily database backups automatically. For that, we will utilize Windows Task Scheduler.
Open Windows Task Scheduler, navigate to the Task Scheduler Library, click Create Basic Task, and give that task a name.

- Specify the desired day and time to start the task in the Trigger section.
- In the Action section, set the program to start on the trigger (this is the only option available now).
- Browse to the
.batfile with the task settings. - View the task summary and click Finish to complete the task.

The Task Scheduler will run dbForge Studio for MySQL, which in turn will create regular backups according to the settings you configured. You can automate other recurring tasks in the same way.
Troubleshoot common issues when running SQL files
When running .sql scripts, whether through the command line, a GUI tool, or an automated process, you may occasionally encounter errors. Below, we explore the most common issues and their causes, along with tips for resolving them.
"Access denied" or authentication errors
This error usually occurs due to incorrect user credentials or insufficient privileges. To troubleshoot, verify the username and password, and check the user's permissions. If required, grant the necessary privileges to execute the task.
"Unknown database" or "database not found"
This issue arises when the database specified in the SQL file or connection command does not exist. First, confirm
that the SQL script references the correct database name and update it if needed. If the database is missing on the
server, create it manually or include a CREATE DATABASE command within the script.
File encoding or line ending issues
Encoding problems may occur if the file uses an unsupported character set or improper line endings. To resolve this, save the file in UTF-8 without BOM. If you create the SQL script using dbForge Studio for MySQL, verify the encoding during script creation and ensure it's UTF-8 with line endings suitable for your operating system.
Import fails due to large file size
If your SQL file exceeds MySQL's import size limits, the process may fail. To fix this, edit the my.cnf or my.ini file to increase the size and timeout limits, then restart MySQL. Alternatively, split the SQL file into smaller chunks.
Syntax errors in a SQL file
Syntax errors are common and often result from missing or extra punctuation, unescaped special characters, or incompatibility between MySQL versions, especially when a script relies on features not supported by your current version. To identify and fix these issues, use syntax validation tools. dbForge Studio for MySQL provides a built-in SQL Editor with syntax validation and an AI Assistant that can analyze, troubleshoot, and even automatically correct your scripts.
Finally, always back up your database before applying any changes. This precaution ensures that you can quickly restore the database to its previous stable state if any issues occur.
Conclusion
Data export and import are fundamental tasks in database development, testing, and management. Although these operations are common, they can be time-consuming, and professional tools that simplify them are highly valuable. In brief, to execute such tasks, you need to create and run a SQL file in MySQL, and this tutorial explained how to do this with different approaches.
dbForge Studio for MySQL offers both an intuitive graphical interface and command-line support, enabling you to perform routine operations such as data backup, recovery, and other standard tasks more efficiently and with greater ease. It also helps automate these processes, reducing manual effort and minimizing errors.
You can experience the full capabilities of dbForge Studio for MySQL in your daily workflow by taking advantage of the fully-functional free 30-day trial. Discover how it can boost your productivity, speed up task execution, and improve overall efficiency.
FAQ
Yes. MariaDB is fully compatible with MySQL, so you can run SQL file in MariaDB using the same command-line syntax as for MySQL. Just make sure that your SQL script does not contain version-specific syntax supported by only one system, as it might not allow you to execute SQL files in MariaDB.
You can use the command-line tool instead of GUI tools, as it’s more stable for large files. Another option
is to increase the file size limit in the configuration file (my.cnf or my.ini).
Make sure to restart MySQL or MariaDB after making such changes. For huge files, consider splitting the file
into smaller chunks using a file splitter tool.
The fix depends on the specific error type. Earlier in this tutorial, we described the most common errors that may occur during the SQL file import process. Identify the cause of the issue (e.g., incorrect credentials, missing permissions, syntax errors, or a nonexistent database or table) and apply the appropriate fix, such as granting permissions, validating the code, or ensuring the correct encoding.
You can use the SHOW TABLES command to view all tables in the database. Additionally, when using
dbForge Studio, you can visually compare databases using the Schema
Compare and Data Compare tools to ensure that all objects and data match.
dbForge Studio for MySQL lets you open and execute SQL files directly in the built-in SQL Editor with syntax highlighting and error detection. Its intuitive interface allows you to select a target database and execute commands without manual code typing. It also supports the safe execution of large scripts with transaction control (commit or rollback) and enables running scripts in batch mode.
To schedule SQL file execution, use Windows Task Scheduler. After creating the SQL file and
configuring the task (for example, deploying schema changes, importing data, or creating backups), save the
task settings as a .bat file using the Save > Save Command Line option.
Then, use that .bat file to create a scheduled task in the Task Scheduler.
During data import, dbForge Studio offers several import modes to help prevent conflicts. For instance, you can configure it to update existing records with new values, add only new entries, or completely repopulate the table. These options are available on the Modes page in Data Import Wizard.
There are both the free Express edition and the fully-functional free trial of dbForge Studio for MySQL. The Express edition offers basic functionality, while the trial lets you explore the complete feature set of the highest, Enterprise edition, for 30 days.