Step-by-Step Guide:
How to Set Up Source Control for GitLab

This article presents a detailed walkthrough on how to configure seamless version-controlling of SQL Server databases with GitLab using the dbForge Source Control add-in.

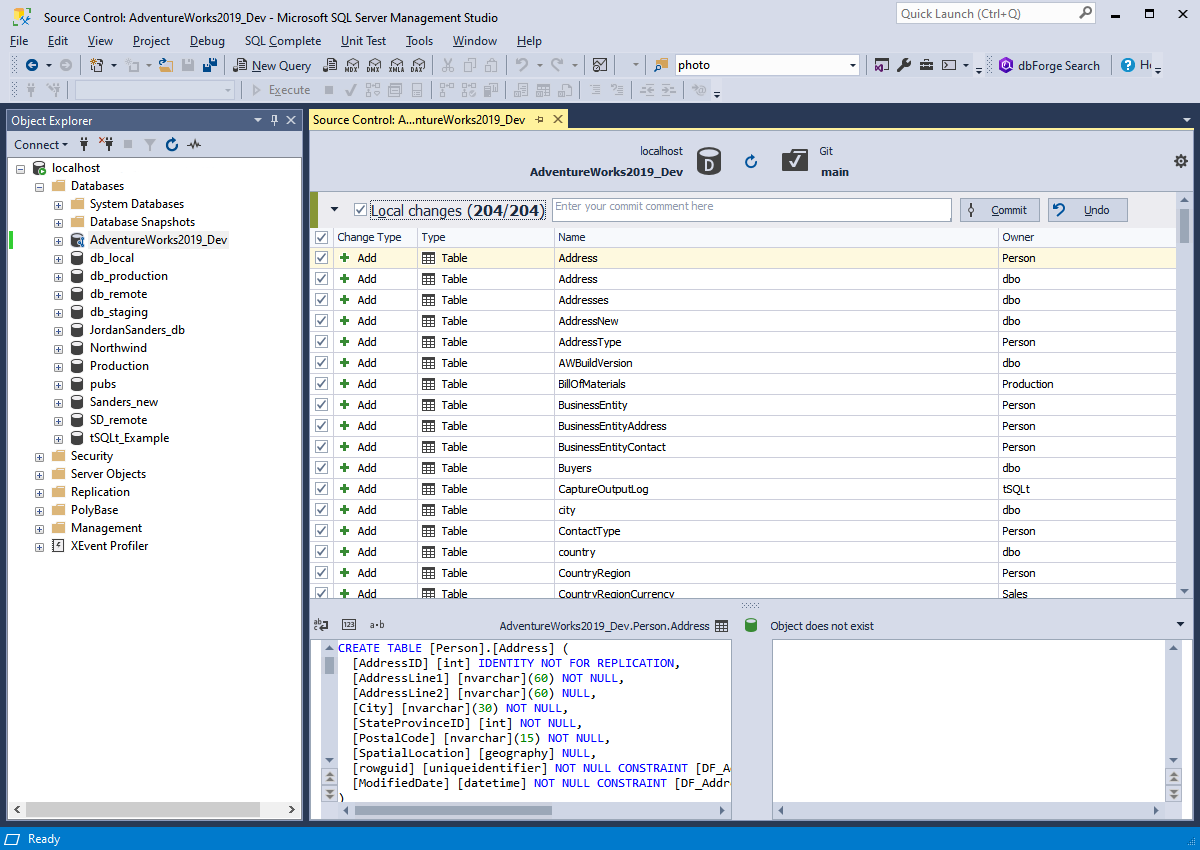
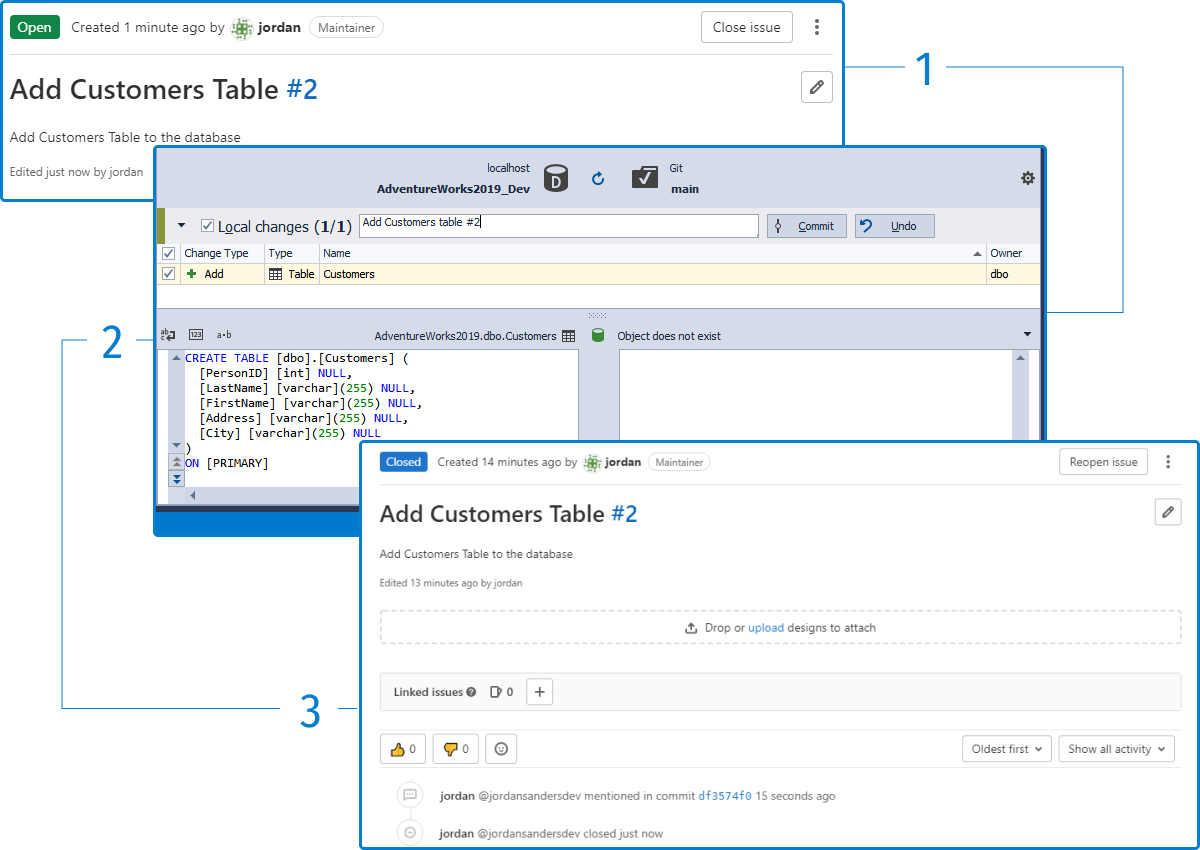
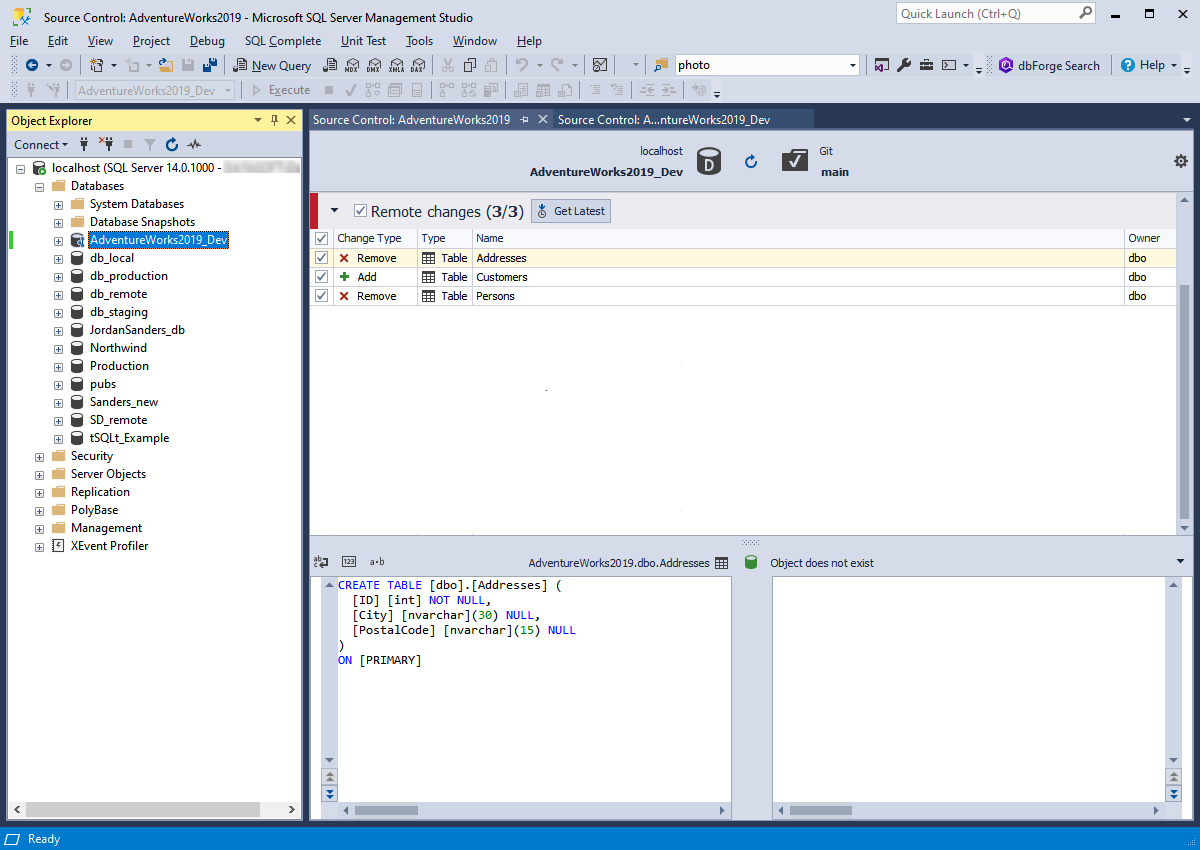
GitLab is an extremely popular source code management system gaining more and more interest recently. Version-controlling databases with GitLab allows reducing cycle time, lowering costs of delivery, and improving the developer experience. After implementing version control with GitLab by using dbForge Source Control, you will be able to easily:

  • Commit and rollback database changes
  • Pull the latest changes from a repository
  • View and resolve conflicts
  • Track, review and approve code changes
  • Link static data

Step 1. Link a database to Source Control

Prerequisites:
  • Git for Windows client installed on the machine
  • Git repository created locally or cloned from the remote repository
  • dbForge Source Control add-in for SSMS installed

To open the Link a Database to Source Control wizard, in Object Explorer, right-click a database you want to link to start version-controlling, point to Source Control, and then click Link Database to Source Control.

Note: dbForge Source Control supports Git for Windows client so you can work with all possible connection and authentication types, as this task is delegated to the Git client.

dbForge GitLab Version Control tool - Link a database to GitLab

Step 2. Select Git source control repository

The Link Database to Source Control wizard opens. On the Link tab of the wizard, specify a connection and a database you want to connect to the source control system. In the Source Control repository field, click + to open the Source Control Repository Properties window.

In it, select Git as a Source Control system and enter a path to the folder on your computer, which is a clone of your GitLab repository. Finally, select a database development mode and click Link. In this tutorial, we select the Dedicated model, under which each developer works with his own copy of the database.

Note: To link your database to a GitLab repository, you need to only specify a folder or a sub-folder in a local GitLab repository where dbForge Source Control for SQL Server will store SQL scripts.

dbForge Source Control - Select GitLab source control repository

Step 3: Make an initial commit

After you've successfully linked a database to Source Control, you will see the Source Control Manager window. In our tutorial, the remote repository is empty, so we need to commit our database files to it. To do this, click to select all files in the Local changes section of the window, type a commit comment, and click Commit.

In case the commit is successful, Source Control Manager won't be displaying changes in database objects, which means that our local database is totally identical to the database at the GitLab repository.

From now on the changes you make in your local database will be shown in the Local changes section of the Source Control Manager window. In case, you do not want to commit certain changes, select them, click Undo, and they will be rolled back.

dbForge Source Control - Initial Commit to GitLab

How to associate commits with GitLab issues

dbForge Source Control allows associating commits of local changes with GitLab issues. With the add-in, you can also close issues right from SQL Server Management Studio.

For a commit to be associated with a GitLab issue, you need to specify the issue number with the '#' symbol in the Comment box when committing local changes.

How to close GitLab issues automatically

To close an issue, you need to add a keyword before the issue number in the Comment box when committing local changes. For automatic issue closing, use any of the following keywords: Close, Fix, Resolve, Implement, or their derivatives.

Source Control tool - How to associate Commits with GitLab Issues

Step 4: Get remote changes

Merging remote database changes into your local repository is a common task in a Git-based collaboration workflow. The Remote changes section of the Source Control Manager displays the changes made by other developers to the remote repository. To fetch and integrate those remote changes and thus update your local database, you need to select changes and click Get Latest.

SQL scripts for the database objects that were changed are shown in the lower part of the Source Control Manager window.

Source Control - Get remote changes from GitLab

Step 5: Resolve conflicts

Source Control conflicts are caused by competing database changes. In dbForge Source Control, conflicts are shown in the Conflicts section of the Source Control Manager window. To resolve a conflict, you must choose which changes to integrate: remote or local.

How to resolve a GitLab conflict:
Select a conflict you want to resolve in the Conflicts section and click Get Local to overwrite remote changes with your local ones or Get Remote in case you want to overwrite your local changes with the remote ones.

In the lower part of the Source Control Manager window, the DDL diffs for the conflicts are displayed so that you could quickly grasp the reason for the conflict.

Source Control - Resolve GitLab conflicts

Conclusion

The dbForge Source Control tool allows version-controlling database schemas and data in GitLab, reverting changes, and maintaining the referential integrity of your SQL Server database. The add-in supports all popular source control systems. The procedure of linking a database to a VCS will take you just a couple of clicks. Download Source Control and start automating your SQL changes. The tool is absolutely free for a 30-day trial period.

Get Source Control as part of dbForge SQL Tools

SQL Tools is an extensive pack of advanced tools and SSMS add-ins