Dapper is a lightweight object-relational mapping (ORM) library designed for the Microsoft .NET platform that allows developers to easily interact with databases by executing SQL queries and mapping the results directly to C# objects. Dapper offers full control over SQL, making it an ideal choice for high-performance applications where speed and efficiency are critical.

Written in C#, Dapper is widely used for data access in C# projects due to its simplicity and performance. Its capabilities can be further extended by integrating solutions like dotConnect for MySQL.

This tutorial will explain how to use Dapper for data operations in .NET applications. We'll walk through creating a Dapper model, building a console application, and implementing basic CRUD (Create, Read, Update, Delete) operations.

Why dotConnect for MySQL?

ORM support provided

Advanced ORM support

Fully supports EF Core, Dapper, NHibernate, LinqConnect, and other technologies for efficient data management.

Full ADO.NET compliance

Full ADO.NET compliance

Conforms to the latest ADO.NET standards and innovations for seamless integration with .NET applications.

Support for MySQL-specific data types

MySQL-specific data types

Offers many MySQL-specific features and fully supports all unique data types for accurate and complete data representation.

Secure connection ensured

Secure connection options

Provides robust security with support for SSL/SSH connections, connecting via proxy servers, embedded servers, and HTTP tunneling.

Integration with popular IDEs

IDE integration

Features native integration with Visual Studio and complete design-time support for accelerated development.

Priority support provided

Priority support & frequent updates

Includes priority support, detailed documentation, and regular updates for continuous improvement.

Download and activate dotConnect for MySQL

You can start using dotConnect for MySQL immediately with a 30-day free trial. Choose one of the following installation options:

30-day free trial version

dotnet add package Devart.Data.MySql
Install-Package Devart.Data.MySql

You can install the driver by using the Windows installer.

After you receive the license key, add it to your connection strings to connect to the data source.

Start using dotConnect for MySQL in your project today with a free trial

Check MySQL database objects

To connect to MySQL using the built-in Data Explorer, go to Tools and select Connect to Database.

Select Connect to Database

Select MySQL as the data source, enter your server details and login credentials, then click Connect to establish the connection.

Enter MySQL credentials and test connections

After connecting, you can browse tables, run queries, and manage your data directly within the Data Explorer.

Browse MySQL actor table

Connect to the database and retrieve data

The application will connect to the MySQL database, execute the query, and display the results from the Customer table in the console.

Create Customers.cs (model class)

The Customers.cs class represents the Customers table and defines the properties that map to its corresponding database columns.

namespace DapperMySqlExample
{
    public class Customers
    {
        public int Customer_Id { get; set; }
        public string First_Name { get; set; }
        public string Last_Name { get; set; }
        public string Email { get; set; }
        public string Phone { get; set; }
        public string Address { get; set; }
    }
}

Create DatabaseConnection.cs (Connection String)

The DatabaseConnection.cs class stores the database connection details separately to improve organization, maintainability, and reusability.

namespace DapperMySqlExample
{
    public static class DatabaseConnection
    {
        public static string ConnectionString = "Host=127.0.0.1;UserId=TestUser;Password=TestPassword;Database=Sakila;License Key=**********";
    }
}

Add the following code to your Program.cs file.

using Dapper;
using Devart.Data.MySql;
using System.Data;

namespace DapperMySqlExample
{
    class Program
    {
        static void Main(string[] args)
        {
            using (IDbConnection db = new MySqlConnection(DatabaseConnection.ConnectionString))
            {
                try
                {
                    db.Open();
                    Console.WriteLine("Connection to MySQL successful!");

                    // Fetch and display customers
                    DisplayCustomers(db);
                }
                catch (Exception ex)
                {
                    Console.WriteLine($"Connection failed: {ex.Message}");
                }
            }
        }

        private static void DisplayCustomers(IDbConnection db)
        {
            Console.WriteLine("\nFetching first 10 customers...");

            string selectQuery = "SELECT customer_id AS Customer_Id, first_name AS First_Name, last_name AS Last_Name, email, phone, address FROM Customers ORDER BY customer_id LIMIT 10;";
            var customers = db.Query<Customers>(selectQuery);

            foreach (var customer in customers)
            {
                Console.WriteLine($"{customer.Customer_Id}: {customer.First_Name} {customer.Last_Name} - {customer.Email}, {customer.Phone}, {customer.Address}");
            }
        }
    }
}

Update the connection string

Replace the placeholders in the connection string with your actual MySQL database credentials. If you own a paid license of dotConnect for MySQL, include the license key in the connection strings.

Run the application

Build and run your application: select Start from the menu or click F5.

Run the application in Visual Studio

Connection strings

Property Meaning
Database Default database to be used after connecting.
Host Hostname or IP address of the MySQL server.
License Key Your license key. This is required only when using .NET Standard compatible assemblies.
Password Password for the user ID.
Port Port number on which the MySQL server is listening.
UserId User ID used to authenticate with MySQL.

Batch insert new records using Dapper

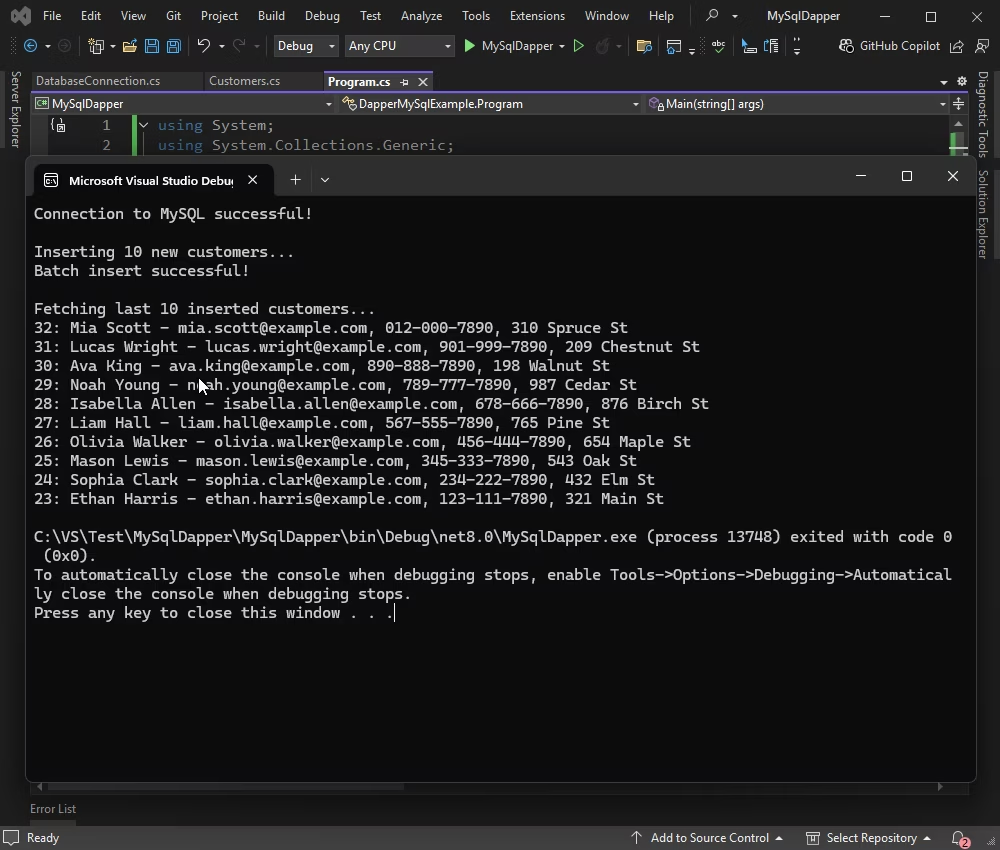
You can insert multiple records into the database within a single transaction to improve performance and ensure data consistency. Use the below code.

using Dapper;
using Devart.Data.MySql;
using System.Data;

namespace DapperMySqlExample
{
class Program
    {
static void Main(string[] args)
        {
using (IDbConnection db = new MySqlConnection(DatabaseConnection.ConnectionString))
            {
try
                {
                    db.Open();
                    Console.WriteLine("Connection to MySQL successful!");

// Batch insert new customers
                    InsertCustomers(db);

// Fetch and display the newly inserted customers
                    DisplayInsertedCustomers(db);
                }
catch (Exception ex)
                {
                    Console.WriteLine($"Connection failed: {ex.Message}");
                }
            }
        }

private static void InsertCustomers(IDbConnection db)
        {
            Console.WriteLine("\nInserting 10 new customers...");

var newCustomers = new List<Customers> {
new Customers {
                  First_Name = "Ethan", Last_Name = "Harris", Email = "[email protected]", Phone = "123-111-7890", Address = "321 Main St"
                },
new Customers {
                  First_Name = "Sophia", Last_Name = "Clark", Email = "[email protected]", Phone = "234-222-7890", Address = "432 Elm St"
                },
new Customers {
                  First_Name = "Mason", Last_Name = "Lewis", Email = "[email protected]", Phone = "345-333-7890", Address = "543 Oak St"
                },
new Customers {
                  First_Name = "Olivia", Last_Name = "Walker", Email = "[email protected]", Phone = "456-444-7890", Address = "654 Maple St"
                },
new Customers {
                  First_Name = "Liam", Last_Name = "Hall", Email = "[email protected]", Phone = "567-555-7890", Address = "765 Pine St"
                },
new Customers {
                  First_Name = "Isabella", Last_Name = "Allen", Email = "[email protected]", Phone = "678-666-7890", Address = "876 Birch St"
                },
new Customers {
                  First_Name = "Noah", Last_Name = "Young", Email = "[email protected]", Phone = "789-777-7890", Address = "987 Cedar St"
                },
new Customers {
                  First_Name = "Ava", Last_Name = "King", Email = "[email protected]", Phone = "890-888-7890", Address = "198 Walnut St"
                },
new Customers {
                  First_Name = "Lucas", Last_Name = "Wright", Email = "[email protected]", Phone = "901-999-7890", Address = "209 Chestnut St"
                },
new Customers {
                  First_Name = "Mia", Last_Name = "Scott", Email = "[email protected]", Phone = "012-000-7890", Address = "310 Spruce St"
                }
            };

string insertQuery = 
    @"
    INSERT INTO Customers(first_name, last_name, email, phone, address)
    VALUES(:First_Name,:Last_Name,:Email,:Phone,:Address);
    "
;

using (var transaction = db.BeginTransaction())
            {
try
                {
                    db.Execute(insertQuery, newCustomers, transaction);
                    transaction.Commit();
                    Console.WriteLine("Batch insert successful!");
                }
catch (Exception ex)
                {
                    transaction.Rollback();
                    Console.WriteLine($"Insert failed: {ex.Message}");
                }
            }
        }

private static void DisplayInsertedCustomers(IDbConnection db)
        {
            Console.WriteLine("\nFetching last 10 inserted customers...");

string selectQuery = "SELECT customer_id AS Customer_Id, first_name AS First_Name, last_name AS Last_Name, email, phone, address FROM Customers ORDER BY customer_id DESC LIMIT 10;";
var customers = db.Query<Customers>
            (selectQuery);

foreach (var customer in customers)
            {
                Console.WriteLine($"{customer.Customer_Id}: {customer.First_Name} {customer.Last_Name} - {customer.Email}, {customer.Phone}, {customer.Address}");
            }
        }
    }
}

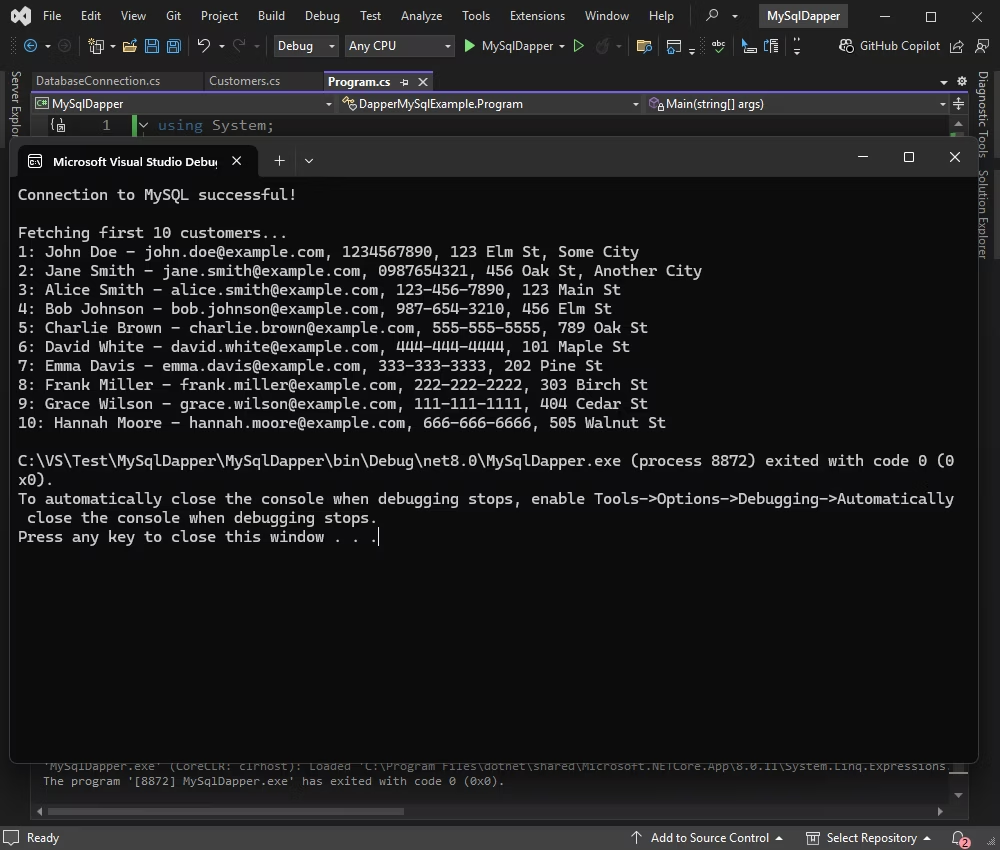
The results are displayed within the application.

The new record inserted successfully

Update MySQL data using Dapper

Next, we will update multiple customer records (IDs 23–32) in a single transaction using Dapper, and then retrieve and display the updated records in the console.


using Dapper;
using Devart.Data.MySql;
using System.Data;

namespace DapperMySqlExample
{
class Program
    {
static void Main(string[] args)
        {
using (IDbConnection db = new MySqlConnection(DatabaseConnection.ConnectionString))
            {
try
                {
                    db.Open();
                    Console.WriteLine("Connection to MySQL successful!");

// Batch update customers
                    UpdateCustomers(db);

// Fetch and display updated customers
                    DisplayUpdatedCustomers(db);
                }
catch (Exception ex)
                {
                    Console.WriteLine($"Connection failed: {ex.Message}");
                }
            }
        }

private static void UpdateCustomers(IDbConnection db)
        {
            Console.WriteLine("\nUpdating customers with IDs between 23 and 32...");

var updatedCustomers = new List<Customers>{
new Customers {
                  Customer_Id = 23, First_Name = "UpdatedA", Last_Name = "Smith", Phone = "999-111-1111", Address = "New Address A"
                },
new Customers {
                  Customer_Id = 24, First_Name = "UpdatedB", Last_Name = "Johnson", Phone = "999-222-2222", Address = "New Address B"
                },
new Customers {
                  Customer_Id = 25, First_Name = "UpdatedC", Last_Name = "Brown", Phone = "999-333-3333", Address = "New Address C"
                },
new Customers {
                  Customer_Id = 26, First_Name = "UpdatedD", Last_Name = "White", Phone = "999-444-4444", Address = "New Address D"
                },
new Customers {
                  Customer_Id = 27, First_Name = "UpdatedE", Last_Name = "Davis", Phone = "999-555-5555", Address = "New Address E"
                },
new Customers {
                  Customer_Id = 28, First_Name = "UpdatedF", Last_Name = "Miller", Phone = "999-666-6666", Address = "New Address F"
                },
new Customers {
                  Customer_Id = 29, First_Name = "UpdatedG", Last_Name = "Wilson", Phone = "999-777-7777", Address = "New Address G"
                },
new Customers {
                  Customer_Id = 30, First_Name = "UpdatedH", Last_Name = "Moore", Phone = "999-888-8888", Address = "New Address H"
                },
new Customers {
                  Customer_Id = 31, First_Name = "UpdatedI", Last_Name = "Taylor", Phone = "999-999-9999", Address = "New Address I"
                },
new Customers {
                  Customer_Id = 32, First_Name = "UpdatedJ", Last_Name = "Anderson", Phone = "999-000-0000", Address = "New Address J"
                }
            };

string updateQuery = 
    @"
    UPDATE Customers
    SET first_name =:First_Name, last_name =:Last_Name, phone =:Phone, address =:Address
    WHERE customer_id =:Customer_Id;
    "
;

using (var transaction = db.BeginTransaction())
            {
try
                {
                    db.Execute(updateQuery, updatedCustomers, transaction);
                    transaction.Commit();
                    Console.WriteLine("Batch update successful!");
                }
catch (Exception ex)
                {
                    transaction.Rollback();
                    Console.WriteLine($"Update failed: {ex.Message}");
                }
            }
        }

private static void DisplayUpdatedCustomers(IDbConnection db)
        {
            Console.WriteLine("\nFetching updated customers (IDs 23-32)...");

string selectQuery = "SELECT customer_id AS Customer_Id, first_name AS First_Name, last_name AS Last_Name, phone, address FROM Customers WHERE customer_id BETWEEN 23 AND 32;";
var customers = db.Query<Customers>
            (selectQuery);

foreach (var customer in customers)
            {
                Console.WriteLine($"{customer.Customer_Id}: {customer.First_Name} {customer.Last_Name} - {customer.Phone}, {customer.Address}");
            }
        }
    }
}

We can see the output in our application.

Successful output of the record update in the application

Delete MySQL data using Dapper

Finally, assume we need to delete certain records from the database. In the example below, we will delete all customer records where the customer_id is between 23 and 32. The implementation is as follows:

using Dapper;
using Devart.Data.MySql;
using System.Data;

namespace DapperMySqlExample
{
    class Program
    {
        static void Main(string[] args)
        {
            using (IDbConnection db = new MySqlConnection(DatabaseConnection.ConnectionString))
            {
                try
                {
                    db.Open();
                    Console.WriteLine("Connection to MySQL successful!");

                    DeleteCustomers(db);
                }
                catch (Exception ex)
                {
                    Console.WriteLine($"Connection failed: {ex.Message}");
                }
            }
        }

        private static void DeleteCustomers(IDbConnection db)
        {
            Console.WriteLine("\nDeleting customers with IDs between 5 and 12...");

            string deleteQuery =
                "DELETE FROM Customers WHERE customer_id BETWEEN 5 AND 12;";

            using (var transaction = db.BeginTransaction())
            {
                try
                {
                    int rowsDeleted =
                        db.Execute(deleteQuery, transaction: transaction);

                    transaction.Commit();

                    Console.WriteLine(
                        $"Batch delete successful! {rowsDeleted} customers deleted.");
                }
                catch (Exception ex)
                {
                    transaction.Rollback();
                    Console.WriteLine(
                        $"Delete failed: {ex.Message}");
                }
            }
        }
    }
}

The output in the application proves that the operation is successful.

Successful output of the record deletion in the application

Video tutorial: How to connect to MySQL and MariaDB using Dapper ORM

Conclusion

This tutorial explored the advantages of integrating Dapper with MySQL for building .NET applications. By using dotConnect for MySQL, we could also significantly improve CRUD data operations. The advanced features of dotConnect, combined with Dapper's lightweight efficiency, offer a fast and flexible way to manage database interactions in MySQL-based applications. With these tools, you can confidently develop scalable, maintainable, and high-performance .NET solutions with MySQL connectivity.

Try Devart dotConnect for MySQL in your own projects to experience its effectiveness under real-world workloads. Download a free trial and enjoy reliable database connectivity, performance optimization, and robust security for your .NET development.

FAQ

How do you install and activate dotConnect for MySQL in a .NET project?
Install dotConnect for MySQL via the EXE installer or by adding the Devart.Data.MySql NuGet package to your project, then obtain your personal activation key from your Devart Customer Portal and include it in the connection string via the License Key parameter for a working connection.
How do you create a connection to MySQL using dotConnect in C#?
Define a connection string that includes host, user ID, password, database, and the License Key value, then create a MySqlConnection instance with this string and call Open() for it inside a try-catch block to test and handle connection errors.
How do you enable SSL/TLS for secure MySQL connections with dotConnect?
Add Protocol=SSL and specify the SSL CA Cert, SSL Cert, and SSL Key file paths in the connection string, then open the MySqlConnection connection to establish an encrypted SSL/TLS connection.
Can you connect to MySQL using Entity Framework Core and dotConnect?
Yes, you can either use Entity Developer to visually create an EF Core model from the database or run Scaffold-DbContext with a dotConnect connection string (including License Key) to generate the DbContext and entity classes.
Is it possible to connect to MySQL using Visual Studio Server Explorer with dotConnect?
Yes, in Visual Studio Server Explorer, you add a new Data Connection, choose dotConnect for MySQL as the data provider, enter your MySQL server credentials, test the connection, and then browse and manage data directly from the IDE.

Dereck Mushingairi

I'm a technical content writer who loves turning complex topics — think SQL, connectors, and backend chaos–into content that actually makes sense (and maybe even makes you smile). I write for devs, data folks, and curious minds who want less fluff and more clarity. When I'm not wrangling words, you'll find me dancing salsa, or hopping between cities.

Try the 30-day trial of the full product. No limits. No card required Start free trial