
You can install the driver by using the Windows installer.
After you receive the license key, add it to your connection strings to connect to the data source.
Integrating QuickBooks Online into your .NET MAUI application provides easy access to financial data, improving the efficiency of accounting tasks within your cross-platform app. This guide explains how to establish a secure connection between your .NET MAUI application and QuickBooks Online with the help of the dotConnect data provider, and how to perform basic data operations.
Ensures effortless connection to QuickBooks Online, allowing .NET applications to access accounting data such as customers, invoices, and payments without dealing with the complexity of the API.
Streamlines authentication via Interactive OAuth, where users sign in through a browser-based login flow. After authorization, dotConnect automatically gets and manages access and refresh tokens.
Uses well-known ADO.NET classes, enabling an easy start and creating a convenient working environment.
Fully supports EF Core, Dapper, NHibernate, LinqConnect, and other technologies for efficient QuickBooks Online data management.
Conforms to the latest ADO.NET standards and innovations for seamless integration with .NET applications.
Includes priority support, detailed documentation, and regular updates for continuous improvement.
You can start using dotConnect for QuickBooks immediately with a 30-day free trial. Choose one of the following installation options:
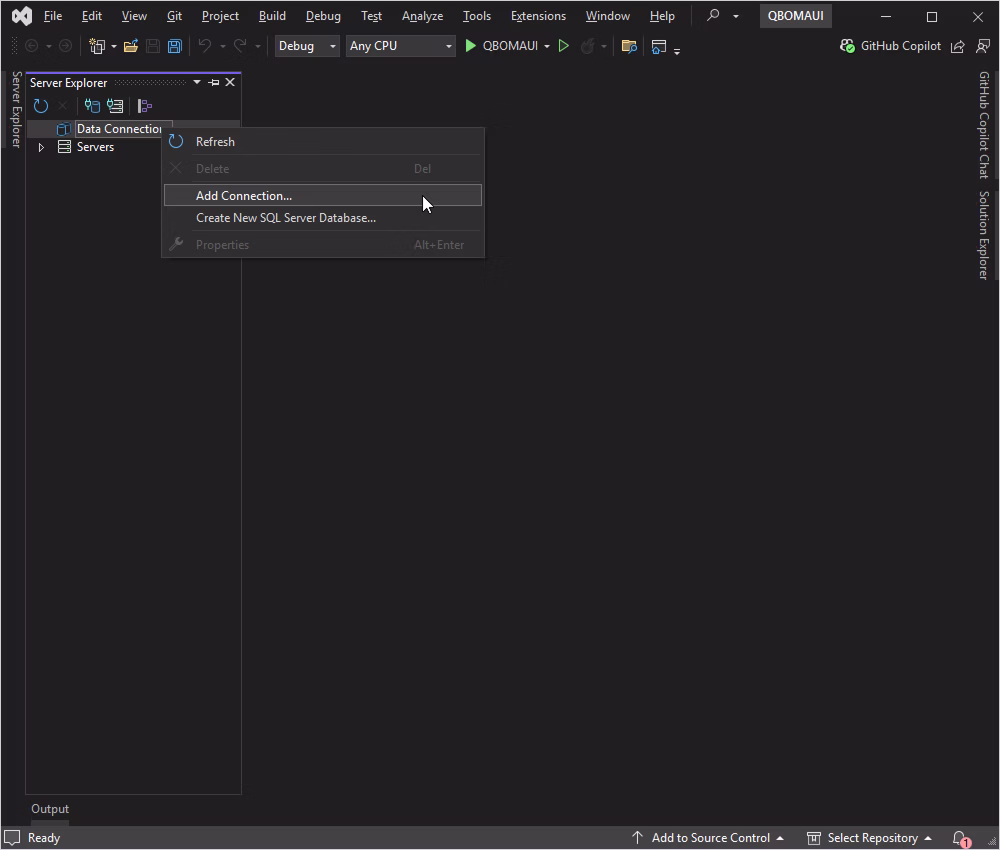
To connect to QuickBooks using the built-in Data Explorer, right-click Data connections and select Add connection.
Select QuickBooks Online as the data source, select Web Login to get credentials, and click Test Connection.
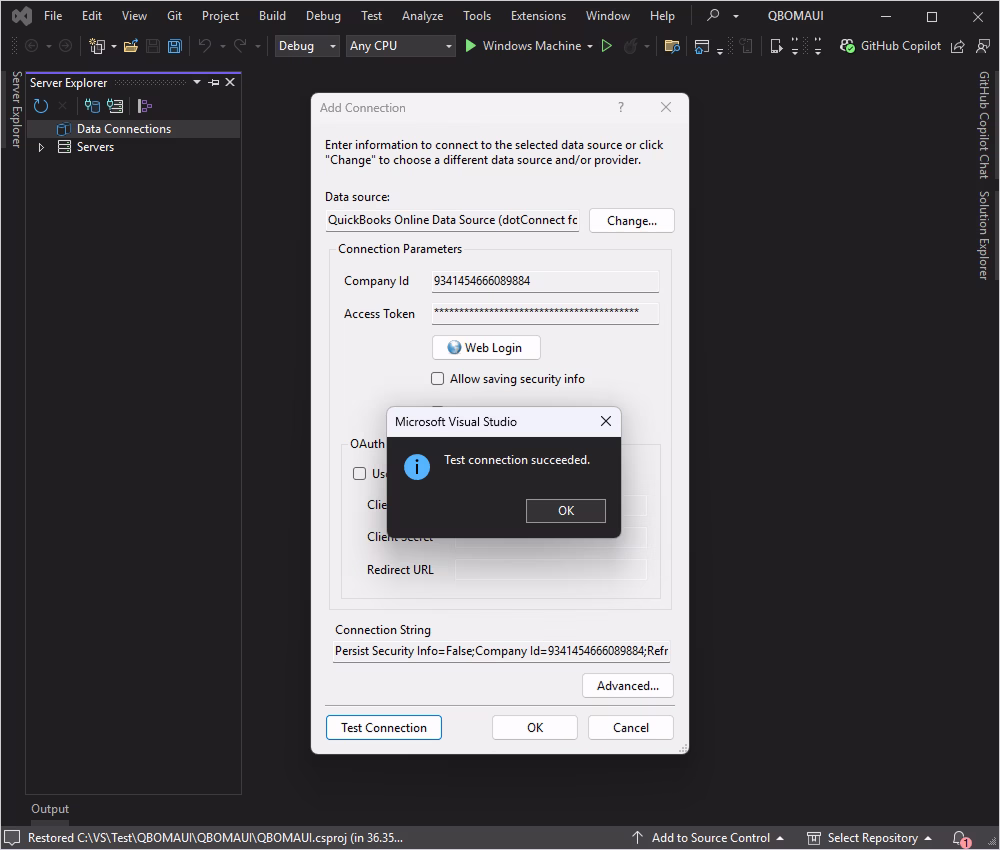
If the test connection is successful, click OK.
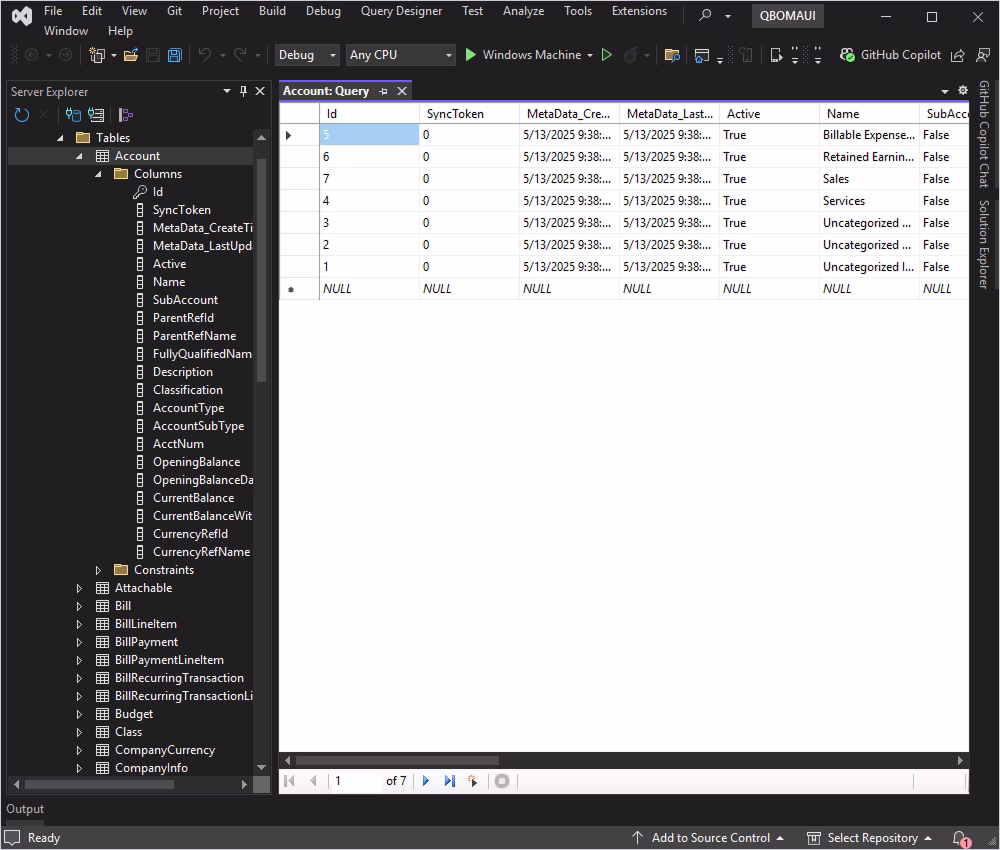
Once connected, you can browse tables, execute queries, and manage data directly in Data Explorer.
Now you have everything you need to establish a connection. We are going to connect to QuickBooks Online using the OAuthInteractive authentication type.
This method handles the OAuth flow automatically: when the connection is open for the first time, a browser window launches to complete the authorization. Once authorized, the session won't require manual credentials (such as Client ID, Client Secret, or Refresh Token). The only credential you need to provide is your License Key.
For simplicity, add the following static class to store your License Key.
public static class QuickBooksConfig
{
  public static string LicenseKey = "**********";
}
With OAuthInteractive, all OAuth credentials are handled automatically during the browser-based authorization flow. It does not require any other credentials or manual actions from you.
The following example retrieves and displays customer data from QuickBooks Online.
First, define a model class to represent the data you want to display. For example, let's create a Customer class:
public class Customer {
  public string Id {
    get;
    set;
  }
  public string DisplayName {
    get;
    set;
  }
  public string PrimaryPhone_FreeFormNumber {
    get;
    set;
  }
  public string PrimaryEmailAddr_Address {
    get;
    set;
  }
  public string BillAddr_City {
    get;
    set;
  }
  public string Balance {
    get;
    set;
  }
}Create a new class named QuickBooksService.cs. This class provides the connection to QuickBooks Online to retrieve customer data.
using System.Collections.Generic;
using Devart.Data.QuickBooks;

namespace QBOMAUI
{
  public class QuickBooksService
  {
    private readonly string _connectionString =
      "Authentication Type=OAuthInteractive;" +
      $"License Key={QuickBooksConfig.LicenseKey}";

    public (bool IsConnected, string ErrorMessage) CheckConnectionStatus()
    {
      try
      {
        using QuickBooksConnection conn = new(_connectionString);
        conn.Open();
        return (true, string.Empty);
      }
      catch (Exception ex)
      {
        return (false, ex.Message);
      }
    }

    public List<Customer> GetCustomers()
    {
      var customers = new List<Customer>();

      using QuickBooksConnection conn = new(_connectionString);
      conn.Open();

      using QuickBooksCommand cmd = new(
        "SELECT Id, DisplayName, PrimaryPhone_FreeFormNumber, " +
        "PrimaryEmailAddr_Address, BillAddr_City, Balance " +
        "FROM Customer ORDER BY Id DESC LIMIT 10", conn);

      using QuickBooksDataReader reader = cmd.ExecuteReader();

      while (reader.Read())
      {
        customers.Add(new Customer
        {
          Id                          = reader["Id"]?.ToString()                          ?? "N/A",
          DisplayName                 = reader["DisplayName"]?.ToString()                 ?? "N/A",
          PrimaryPhone_FreeFormNumber = reader["PrimaryPhone_FreeFormNumber"]?.ToString() ?? "N/A",
          PrimaryEmailAddr_Address    = reader["PrimaryEmailAddr_Address"]?.ToString()    ?? "N/A",
          BillAddr_City               = reader["BillAddr_City"]?.ToString()               ?? "N/A",
          Balance                     = reader["Balance"]?.ToString()                     ?? "N/A"
        });
      }

      return customers;
    }
  }
}This private readonly field stores the connection string using the OAuthInteractive authentication type and the License Key from QuickBooksConfig. Define it once, and it ensures that both methods always use a consistent connection string.
The method attempts to open the connection using the interactive OAuth flow. During the first run, a browser window opens automatically to complete the authorization. It returns a tuple indicating whether the connection was successful or an error message if it failed.
It opens the connection, executes a SQL query to retrieve the 10 most recent Customer records ordered by ID, and maps the results to a list of Customer objects.
Modify your MainPage.xaml.cs to use QuickBooksService. This class is the code-behind for the MainPage.xaml file. It handles the logic for displaying data and managing user interactions on the main page of the application.
using Microsoft.Maui.Controls;
using System.Collections.Generic;

namespace QBOMAUI
{
  public partial class MainPage : ContentPage
  {
    private readonly QuickBooksService _quickBooksService;

    public MainPage()
    {
      InitializeComponent();
      _quickBooksService = new QuickBooksService();
      CheckConnectionAndLoadData();
    }

    private async void CheckConnectionAndLoadData()
    {
      var (isConnected, errorMessage) = _quickBooksService.CheckConnectionStatus();

      if (isConnected)
      {
        ConnectionStatusLabel.Text      = "Connected to QuickBooks Online";
        ConnectionStatusLabel.TextColor = Colors.Green;
        CustomersCollectionView.ItemsSource = _quickBooksService.GetCustomers();
      }
      else
      {
        ConnectionStatusLabel.Text      = $"Connection failed: {errorMessage}";
        ConnectionStatusLabel.TextColor = Colors.Red;
        await DisplayAlert("Error", $"Failed to connect to QuickBooks Online: {errorMessage}", "OK");
      }
    }
  }
}
This code calls CheckConnectionStatus to verify the connection. If successful, it updates the UI to reflect the connection status and loads customer data into CollectionView. If the connection fails, it displays an error. During the first run, the interactive OAuth flow automatically opens a browser window to complete the authorization before loading the data.
Modify your MainPage.xaml to use CollectionView to display the customers. This file defines the user interface of the main page using XAML.
<ContentPage xmlns="http://schemas.microsoft.com/dotnet/2021/maui"
             xmlns:x="http://schemas.microsoft.com/winfx/2009/xaml"
             x:Class="QBOMAUI.MainPage">

  <StackLayout>
    <Label x:Name="ConnectionStatusLabel"
           Text="Checking connection..."
           TextColor="Gray"
           FontAttributes="Italic"
           Margin="0,10,0,15" />

    <Label Text="Customers Table" FontAttributes="Bold" Margin="0,0,0,5" />

    <!-- Header Row -->
    <Grid Padding="5" ColumnDefinitions="*,*,*,*,*" Margin="0,0,0,5">
      <Label Text="Display Name"      FontAttributes="Bold" Grid.Column="0" />
      <Label Text="Primary Phone"     FontAttributes="Bold" Grid.Column="1" />
      <Label Text="Primary Email"     FontAttributes="Bold" Grid.Column="2" />
      <Label Text="Bill Address City" FontAttributes="Bold" Grid.Column="3" />
      <Label Text="Balance"           FontAttributes="Bold" Grid.Column="4" />
    </Grid>

    <CollectionView x:Name="CustomersCollectionView"
                    ItemsSource="{Binding Customers}"
                    VerticalOptions="FillAndExpand">
      <CollectionView.ItemTemplate>
        <DataTemplate>
          <Grid Padding="5" ColumnDefinitions="*,*,*,*,*">
            <Label Grid.Column="0" Text="{Binding DisplayName}"                 FontSize="16" />
            <Label Grid.Column="1" Text="{Binding PrimaryPhone_FreeFormNumber}" FontSize="16" />
            <Label Grid.Column="2" Text="{Binding PrimaryEmailAddr_Address}"    FontSize="16" />
            <Label Grid.Column="3" Text="{Binding BillAddr_City}"               FontSize="16" />
            <Label Grid.Column="4" Text="{Binding Balance}"                     FontSize="16" />
          </Grid>
        </DataTemplate>
      </CollectionView.ItemTemplate>
    </CollectionView>
  </StackLayout>
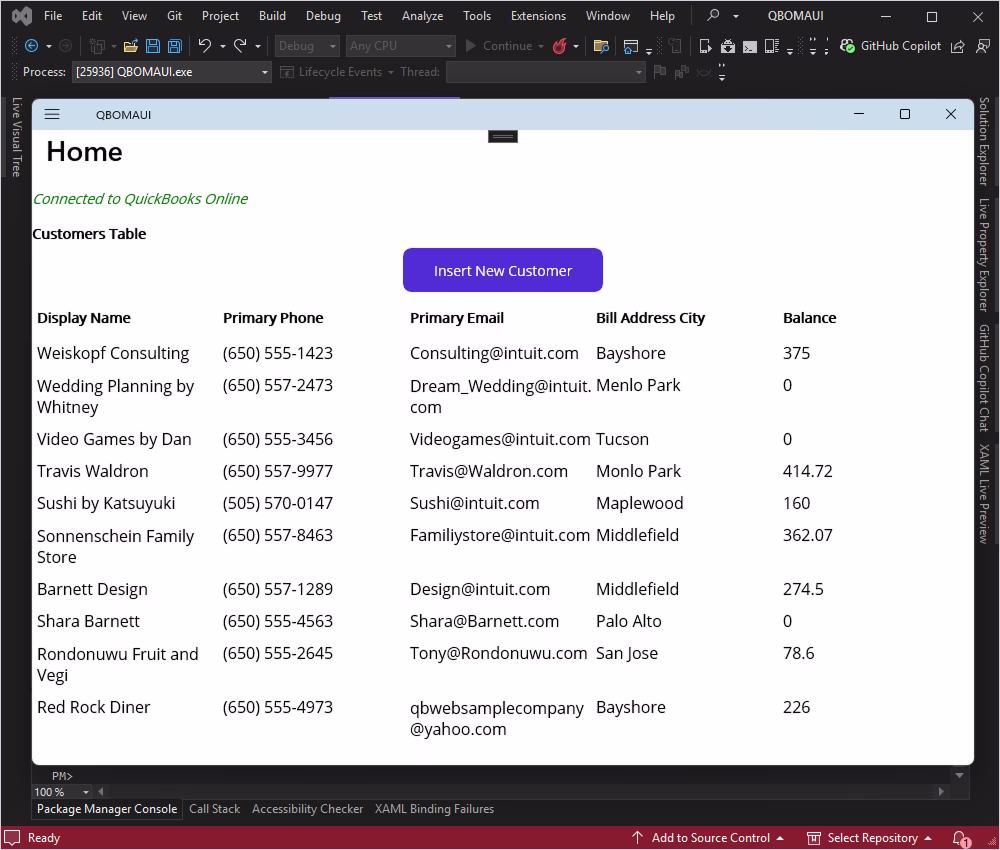
</ContentPage>After establishing the connection to QuickBooks Online, you can fetch and manage data from within the application.
Once you successfully connect your application to QuickBooks Online, you will be able to fetch and manage your data.

Add a method to QuickBooksService.cs to insert a new customer:
public bool InsertCustomer(string displayName, string primaryPhone, string primaryEmail, string billAddrCity, string balance)
{
  try
  {
    using (QuickBooksConnection connection = new QuickBooksConnection())
    {
      connection.ConnectionString = connectionString;
      connection.Open();

      string query = "INSERT INTO Customer (DisplayName, PrimaryPhone_FreeFormNumber, PrimaryEmailAddr_Address, BillAddr_City) VALUES (:DisplayName, :PrimaryPhone, :PrimaryEmail, :BillAddrCity)";

      using (QuickBooksCommand command = new QuickBooksCommand(query, connection))
      {
    command.Parameters.Add("DisplayName", DbType.String).Value = string.IsNullOrEmpty(displayName) ? DBNull.Value : displayName;
    command.Parameters.Add("PrimaryPhone", DbType.String).Value = string.IsNullOrEmpty(primaryPhone) ? DBNull.Value : primaryPhone;
    command.Parameters.Add("PrimaryEmail", DbType.String).Value = string.IsNullOrEmpty(primaryEmail) ? DBNull.Value : primaryEmail;
    command.Parameters.Add("BillAddrCity", DbType.String).Value = string.IsNullOrEmpty(billAddrCity) ? DBNull.Value : billAddrCity;

    int rowsAffected = command.ExecuteNonQuery();
    return rowsAffected > 0;
      }
    }
  }
  catch
  {
    return false;
  }
}Add a method to MainPage.xaml.cs to handle the insertion of a new customer. You can also add a button in your XAML to trigger this method.
private async void OnInsertCustomerClicked(object sender, EventArgs e)
{
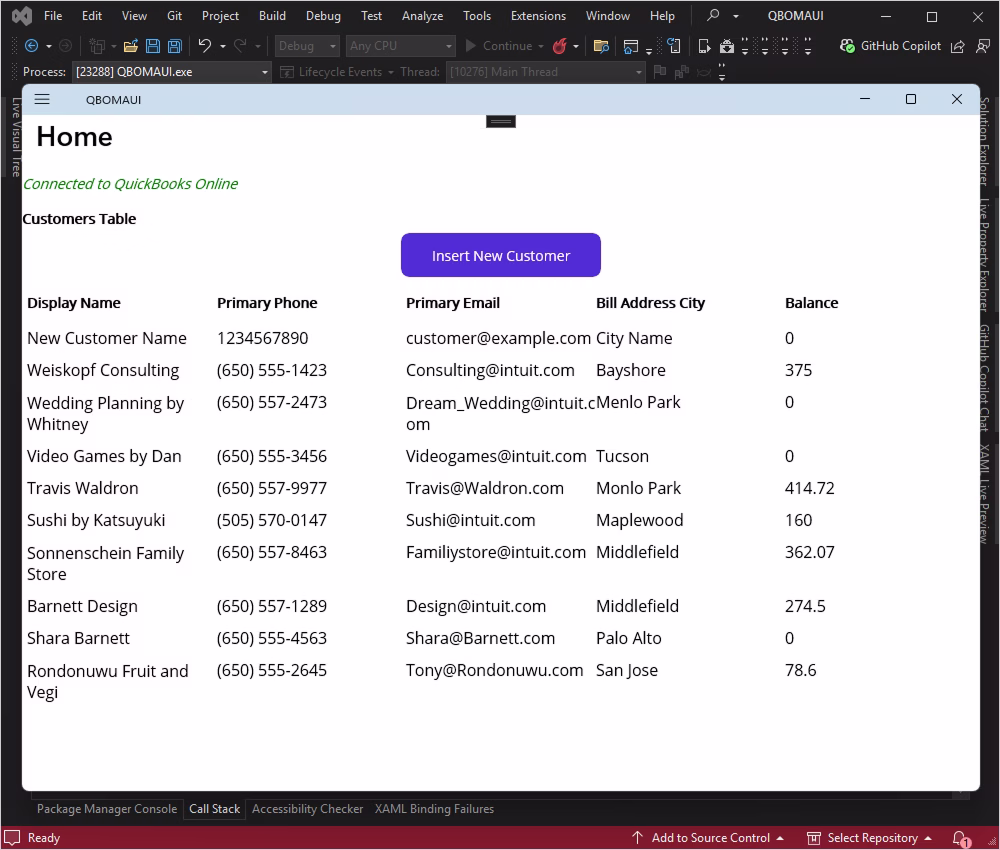
string displayName = "New Customer Name";
string primaryPhone = "1234567890";
string primaryEmail = "[email protected]";
string billAddrCity = "City Name";
string balance = "100.00";
bool isInserted = quickBooksService.InsertCustomer(displayName, primaryPhone, primaryEmail, billAddrCity, balance);
if (isInserted)
{
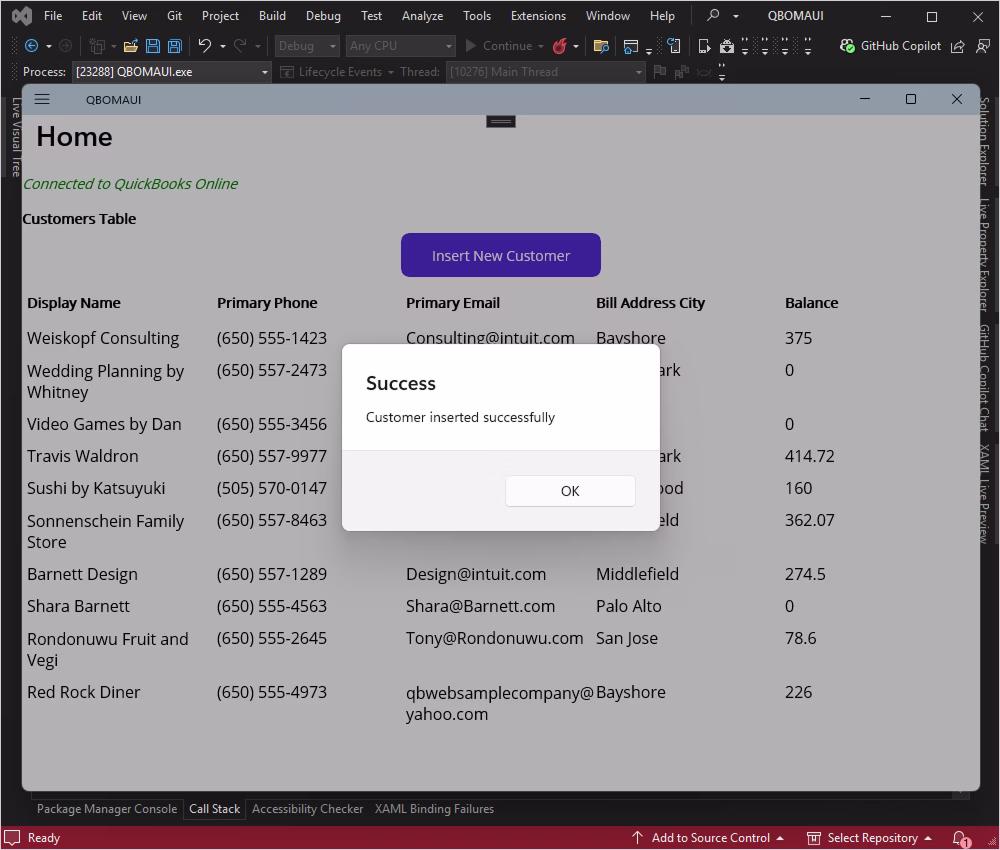
await DisplayAlert("Success", "Customer inserted successfully", "OK");
CheckConnectionAndLoadData(); // Refresh the data
}
else
{
await DisplayAlert("Error", "Failed to insert customer", "OK");
}
}Added the OnInsertCustomerClicked method to handle the insertion of a new customer and refresh the data.
Add a button to your MainPage.xaml to trigger the insertion of a new customer:
<Button Text="Insert New Customer"
        Clicked="OnInsertCustomerClicked"
        Margin="0,0,0,10"
        WidthRequest="200" />
A button was added to trigger the insertion of a new customer. Let's test it.
Click Insert New Customer.
Check the new customer record.
To add a method for removing a record and include the Delete button in each row of CollectionView, follow these steps:
First, add a method to QuickBooksService.cs to handle the deletion of a customer:
public bool RemoveCustomer(string customerId)
{
  try
  {
    using (QuickBooksConnection connection = new QuickBooksConnection())
    {
      connection.ConnectionString = connectionString;
      connection.Open();

      string query = "DELETE FROM Customer WHERE Id = :CustomerId";

      using (QuickBooksCommand command = new QuickBooksCommand(query, connection))
      {
        command.Parameters.Add("CustomerId", DbType.String).Value = customerId;

        int rowsAffected = command.ExecuteNonQuery();
        return rowsAffected > 0;
      }
    }
  }
  catch
  {
    return false;
  }
}Add a method to handle the deletion of a customer in MainPage.xaml.cs:
private async void OnDeleteCustomerClicked(object sender, EventArgs e)
{
if (sender is Button button && button.CommandParameter is string customerId)
{
bool isRemoved = quickBooksService.RemoveCustomer(customerId);
if (isRemoved)
{
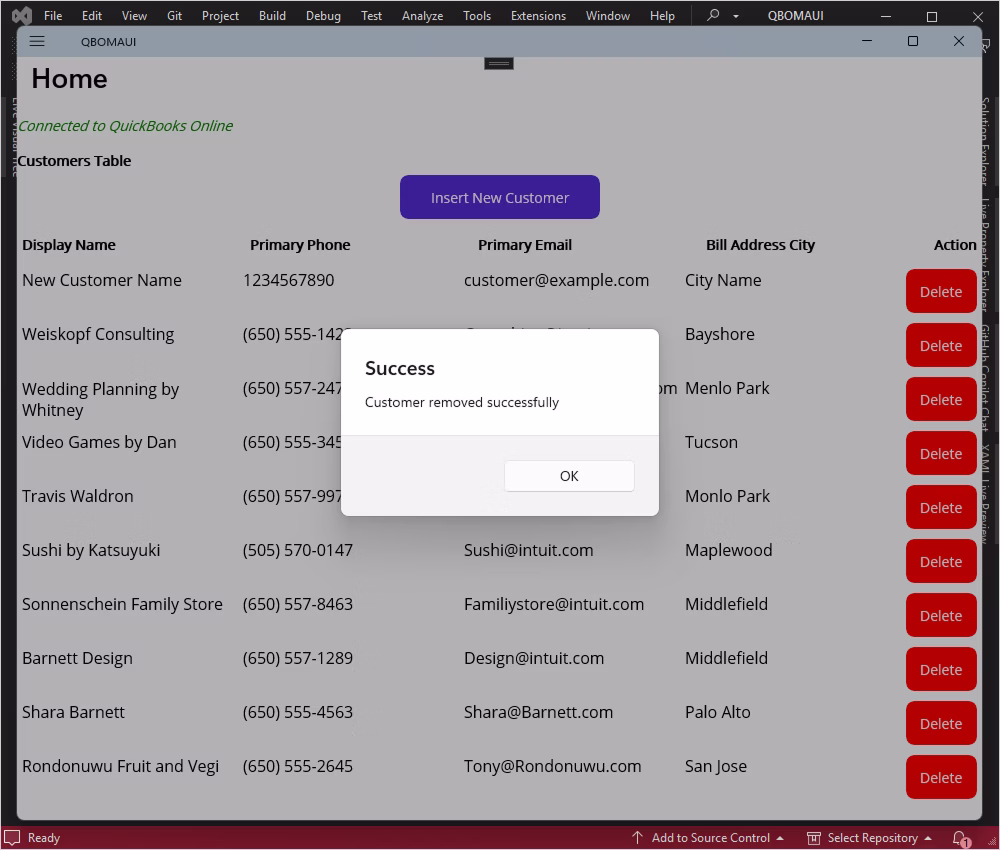
await DisplayAlert("Success", "Customer removed successfully", "OK");
CheckConnectionAndLoadData(); // Refresh the data
}
else
{
await DisplayAlert("Error", "Failed to remove customer", "OK");
}
}
}Modify the grid and CollectionView in MainPage.xaml to include a Delete button in each row:
<!-- Header Row -->
<Grid Padding="5" ColumnDefinitions="*,*,*,*,Auto" Margin="0,0,0,5">
	<Label Text="Display Name" FontAttributes="Bold" Grid.Column="0" />
	<Label Text="Primary Phone" FontAttributes="Bold" Grid.Column="1" />
	<Label Text="Primary Email" FontAttributes="Bold" Grid.Column="2" />
	<Label Text="Bill Address City" FontAttributes="Bold" Grid.Column="3" />
	<Label Text="Action" FontAttributes="Bold" Grid.Column="4" />
</Grid>

<CollectionView x:Name="CustomersCollectionView" ItemsSource="{Binding Customers}" VerticalOptions="FillAndExpand">
	<CollectionView.ItemTemplate>
		<DataTemplate>
			<Grid Padding="5" ColumnDefinitions="*,*,*,*,Auto">
		<!-- Display Name -->
		<Label Grid.Column="0" Text="{Binding DisplayName}" FontSize="16" />

		<!-- Primary Phone -->
		<Label Grid.Column="1" Text="{Binding PrimaryPhone_FreeFormNumber}" FontSize="16" />

		<!-- Primary Email -->
		<Label Grid.Column="2" Text="{Binding PrimaryEmailAddr_Address}" FontSize="16" />

		<!-- Bill Address City -->
		<Label Grid.Column="3" Text="{Binding BillAddr_City}" FontSize="16" />

		<!-- Delete Button -->
		<Button Grid.Column="4" Text="Delete" TextColor="White" BackgroundColor="Red"
		CommandParameter="{Binding Id}"
		Clicked="OnDeleteCustomerClicked" />
			</Grid>
		</DataTemplate>
	</CollectionView.ItemTemplate>
</CollectionView>
A red Delete button is added to each row in CollectionView. The button's CommandParameter is set to the customer's ID, and it triggers the OnDeleteCustomerClicked method when clicked.
Let's run our application and try to delete New Customer Name.
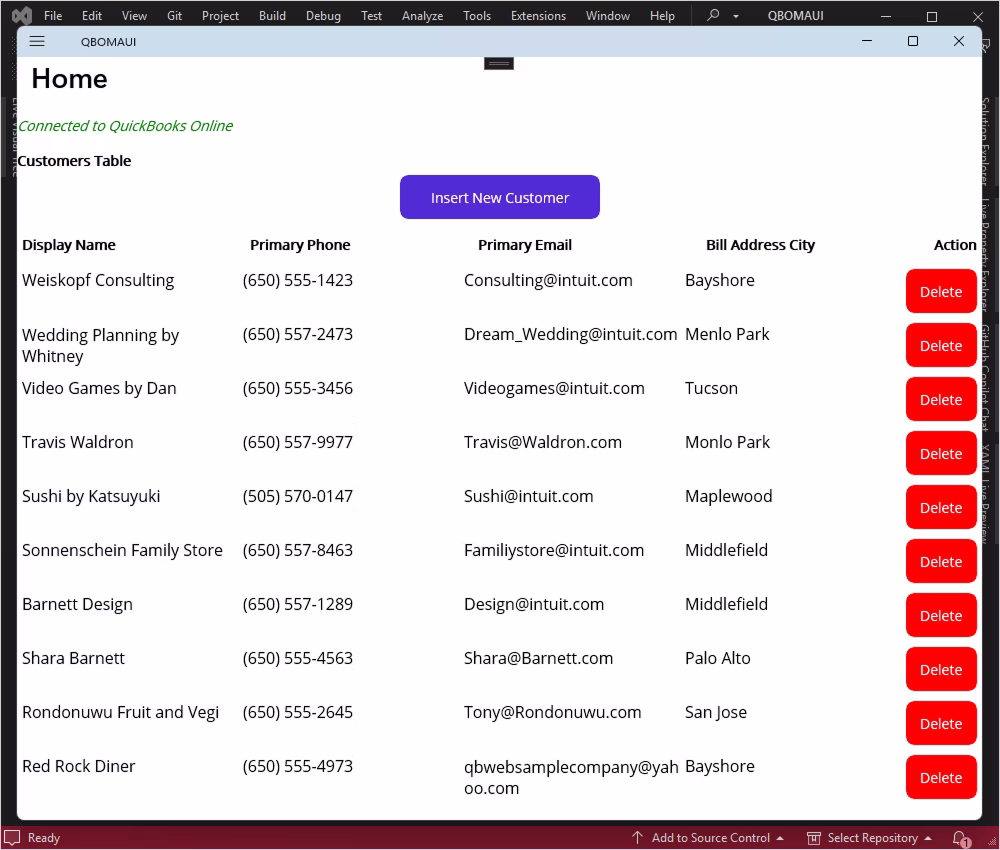
Now let's check the deleted row after reloading.
By following this guide, you can successfully integrate QuickBooks Online into your .NET MAUI application using dotConnect for QuickBooks Online. This enables data access and manipulation directly from your cross-platform app. For advanced scenarios, consider exploring dotConnect's support for EF Core and ORM features.
Install dotConnect for QuickBooks Online using the EXE installer or by adding the Devart.Data.QuickBooks NuGet package to your project. Then obtain your Activation Key from your Devart Customer Portal and include it in the connection string via the License Key parameter.
To authenticate with QuickBooks Online, set the connection string parameter: Authentication Type=OAuthInteractive. When QuickBooksConnection opens, a browser window launches for you to sign in to your Intuit account and grant access. After authorization, dotConnect automatically retrieves and stores the access and refresh tokens.
Define a connection string that includes the CompanyID, authentication parameters, and the License Key. Then create a QuickBooksConnection instance with this string and call Open() inside a TRY-CATCH block to establish the connection and handle possible errors.
Yes, dotConnect allows you to work with QuickBooks Online data using SQL queries. Developers can retrieve and manipulate objects such as Customers, Invoices, and Payments through familiar SQL commands.
Yes, you can use Entity Developer to visually generate an EF Core model from QuickBooks Online entities, or run Scaffold-DbContext with the Devart.Data.QuickBooks.EFCore package and a dotConnect connection string (including the License Key) to create the DbContext and entity classes.
Yes, open Server Explorer in Visual Studio add a new Data Connection, choose dotConnect for QuickBooks Online as the provider, configure authentication and company details, test the connection, and explore QuickBooks Online objects directly in the IDE.

I'm a technical content writer who loves breaking complex tech topics into clear and helpful content that's enjoyable to read. With a solid writing background and growing skill in software development and database tools, I create content that's accurate, easy to follow, and genuinely useful. When I'm not writing, you'll probably find me learning something new or sweating it out at the gym.