.NET MAUI (Multi-platform App UI) is a cross-platform framework for building desktop and mobile applications with C# and XAML, using a single codebase for all platforms.
SQLite is a lightweight, fast, and self-contained database engine, one of the most widely used SQL databases, that runs on virtually all smartphones and many computers.
In this tutorial, we will learn how to integrate SQLite into a .NET MAUI application. We will also design and manage a database used as part of the application backend via C# code.
Check SQLite database objects
Let us connect to SQLite via the Data Explorer in Visual Studio. Move the sakila database to the project folder and then click Tools > Connect to Database.
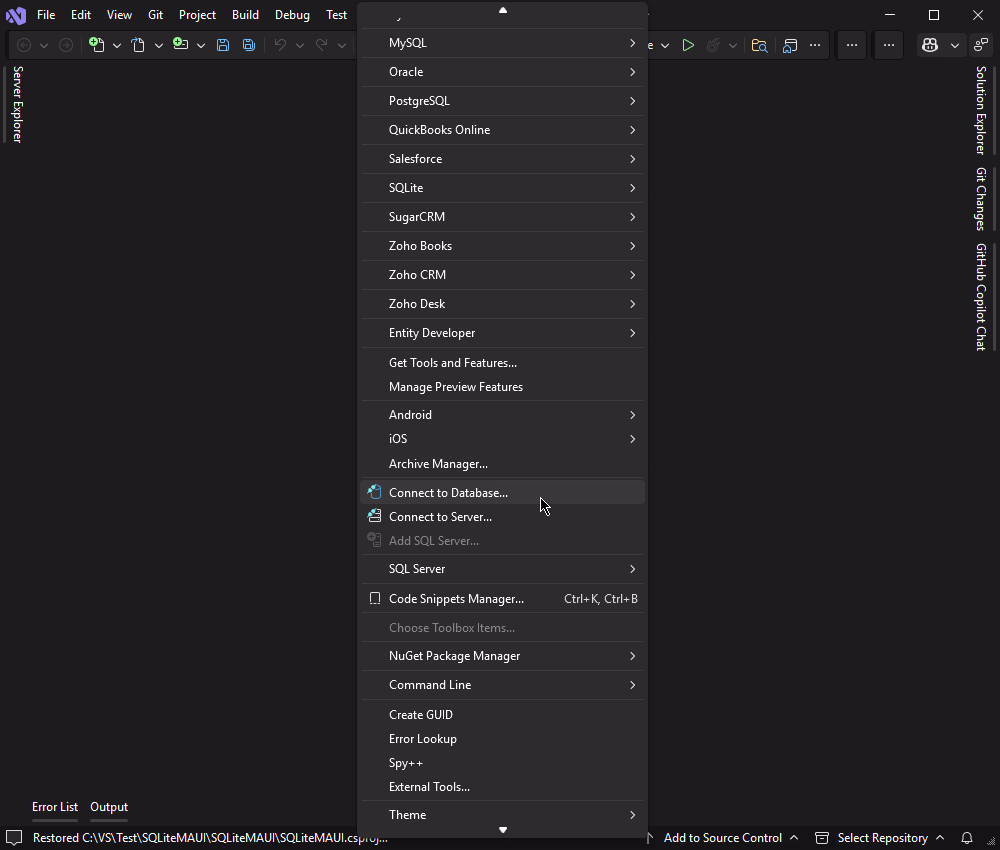
Choose SQLite as the data source and click Continue, then click Browse to select the database file and click OK.

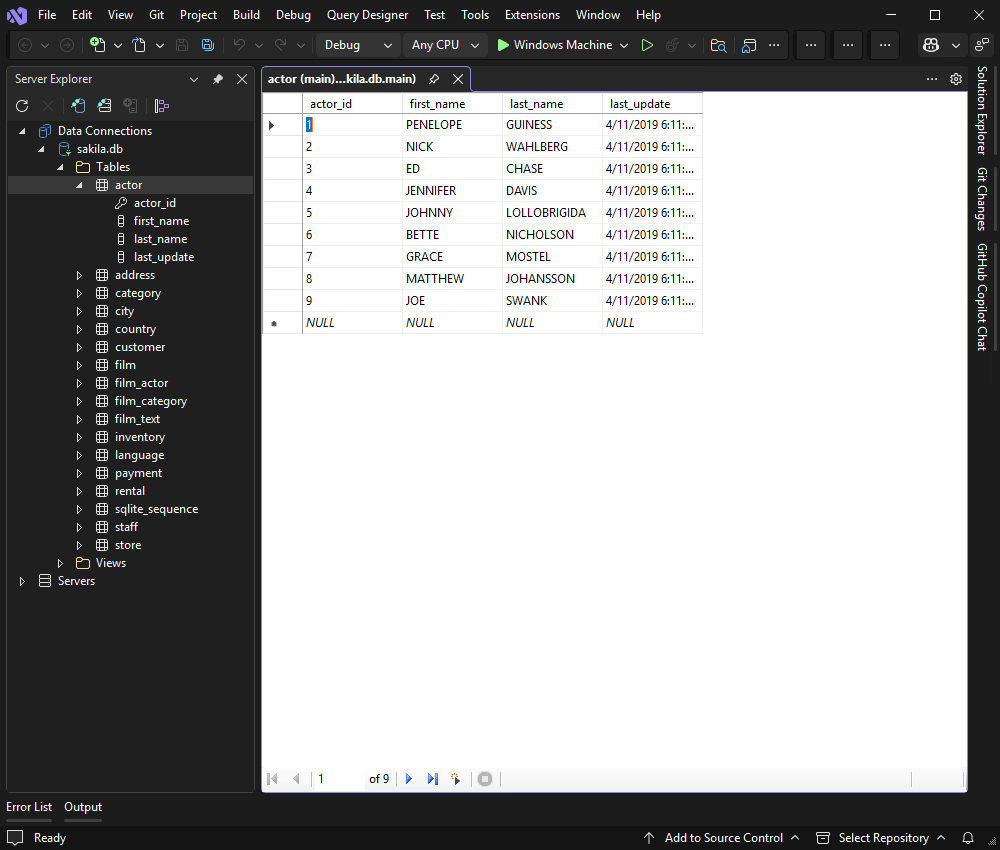
Once connected, you can browse tables, execute queries, and manage data directly within the Data Explorer.
Connect and retrieve SQLite data
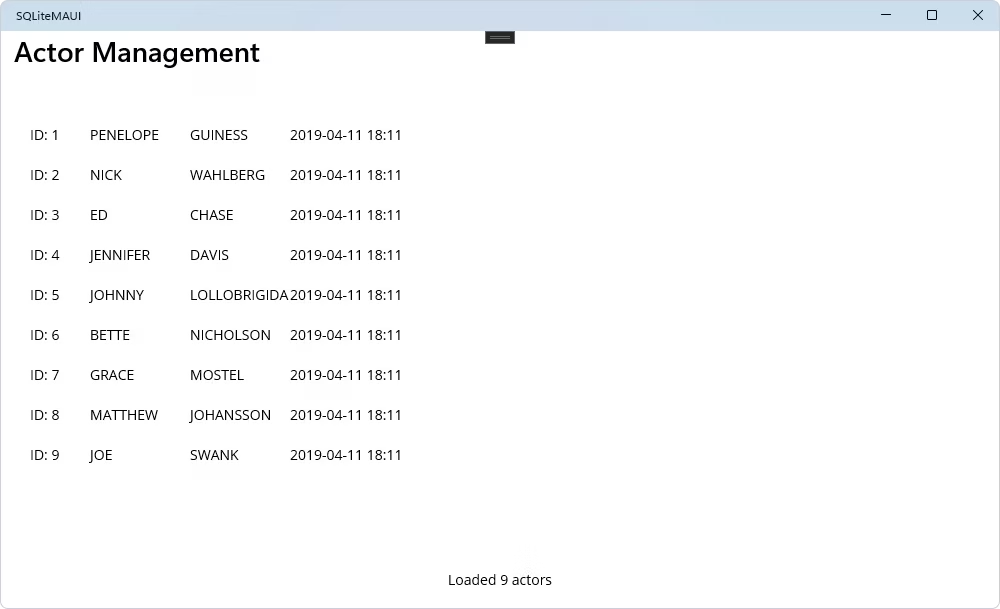
Here, our goal is to establish a connection to the SQLite database and display data in a read-only mode. This ensures our database connection and data service are correctly configured to provide the basics for the other CRUD operations.
Create the data model (Actor.cs)
The first step is to create a new C# class named Actor.cs in your project. This class will act as a model to hold the data for each actor record.
namespace SQLiteMAUI;
public class Actor
{
public int ActorId { get; set; }
public string FirstName { get; set; } = string.Empty;
public string LastName { get; set; } = string.Empty;
public DateTime LastUpdate { get; set; }
}
Create the database connection
Next, create the DatabaseConnection.cs file. This class centralizes our connection string, making it easy to manage. We use Devart.Data.SQLite and point it to the local sakila.db file.
Note
The connection string path ends with a semicolon inside the string literal
(@"...\sakila.db;"). When interpolated into the full connection string, this fragment is treated as a delimiter between the Data Source value and the License Key parameter. This format is expected for the Devart SQLite provider.
using Devart.Data.SQLite;
namespace SQLiteMAUI;
public class DatabaseConnection
{
private static readonly string DatabasePath =
@"..\sakila.db";
private static readonly string ConnectionString =
$"Data Source={DatabasePath};License Key=**********";
public static SQLiteConnection GetConnection()
{
return new SQLiteConnection(ConnectionString);
}
}
Create the data service page (ActorService.cs)
Create an ActorService.cs file. We will start by adding a single method, GetAllActors, that queries the database and returns a list of all actors.
using Devart.Data.SQLite;
namespace SQLiteMAUI;
public class ActorService
{
public static List<Actor> GetAllActors()
{
var actors = new List<Actor>();
using var connection = DatabaseConnection.GetConnection();
connection.Open();
using var command = new SQLiteCommand(
"SELECT actor_id, first_name, last_name, last_update FROM actor ORDER BY actor_id",
connection);
using var reader = command.ExecuteReader();
while (reader.Read())
{
actors.Add(new Actor
{
ActorId = reader.GetInt32(0),
FirstName = reader.GetString(1),
LastName = reader.GetString(2),
LastUpdate = reader.GetDateTime(3)
});
}
return actors;
}
}
Configure the user interface (MainPage.xaml)
Modify MainPage.xaml to contain a ListView for displaying the actors and a Label for status messages. At this stage, there are no input fields or buttons.
<?xml version="1.0" encoding="utf-8" ?>
<ContentPage xmlns="http://schemas.microsoft.com/dotnet/2021/maui"
xmlns:x="http://schemas.microsoft.com/winfx/2009/xaml"
x:Class="SQLiteMAUI.MainPage"
Title="Actor Management">
<Grid RowDefinitions="*,Auto" Padding="20" RowSpacing="15">
<ListView x:Name="ActorListView" Grid.Row="0">
<ListView.ItemTemplate>
<DataTemplate>
<ViewCell>
<HorizontalStackLayout Padding="10">
<Label Text="{Binding ActorId, StringFormat='ID: {0}'}" WidthRequest="60" />
<Label Text="{Binding FirstName}" WidthRequest="100" />
<Label Text="{Binding LastName}" WidthRequest="100" />
<Label Text="{Binding LastUpdate, StringFormat='{0:yyyy-MM-dd HH:mm}'}"
HorizontalOptions="EndAndExpand" />
</HorizontalStackLayout>
</ViewCell>
</DataTemplate>
</ListView.ItemTemplate>
</ListView>
<Label x:Name="StatusLabel" Grid.Row="1" Text="Connecting..."
HorizontalOptions="Center" />
</Grid>
</ContentPage>
Update the UI logic (MainPage.xaml.cs)
Update the code-behind file that is called MainPage.xaml.cs. The code will call the LoadActors method from the constructor, ensuring the data is fetched immediately upon application launch.
namespace SQLiteMAUI;
public partial class MainPage : ContentPage
{
public MainPage()
{
InitializeComponent();
LoadActors();
}
private void LoadActors()
{
try
{
var actors = ActorService.GetAllActors();
ActorListView.ItemsSource = actors;
StatusLabel.Text = $"Loaded {actors.Count} actors";
}
catch (Exception ex)
{
StatusLabel.Text = $"Error: {ex.Message}";
}
}
}
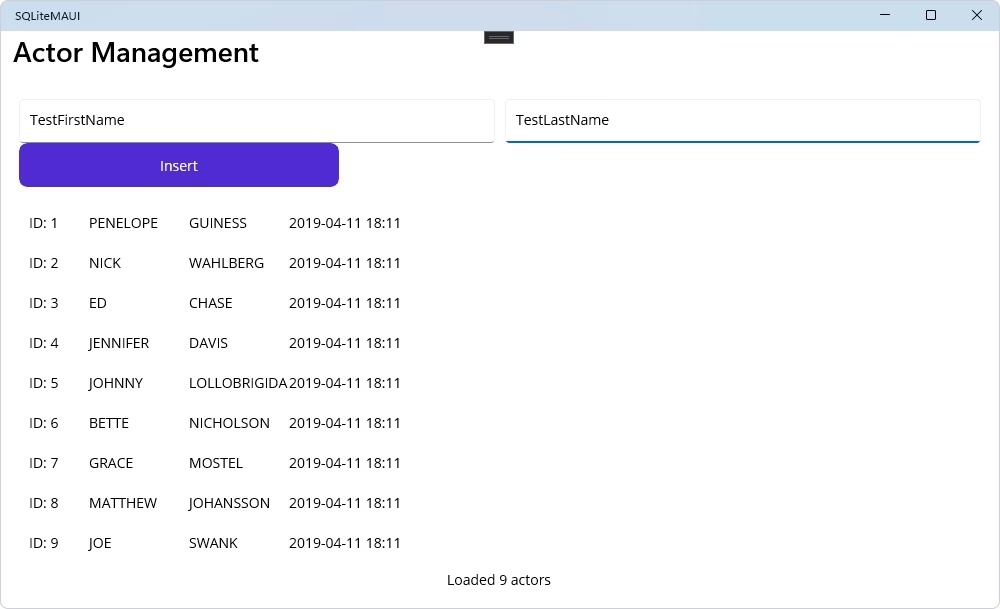
This way, you have built a functional, read-only .NET MAUI application that connects to a SQLite database and displays the data. Your core setup is working correctly.
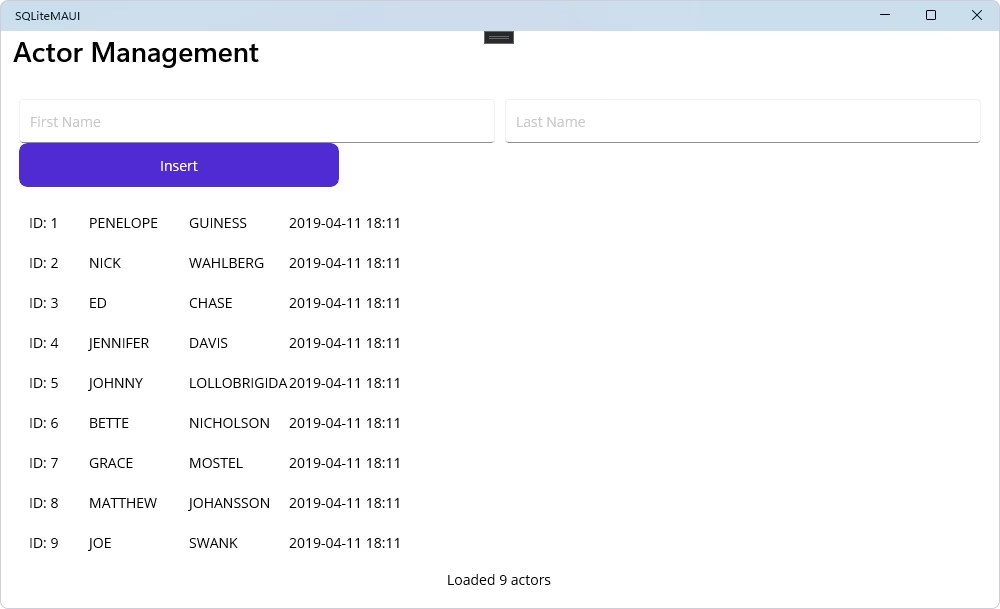
Insert SQLite data
Let us enhance our application by adding the ability to create new records. For that, we need to add input fields and a button to the UI, and also we need to implement the necessary logic to execute an INSERT SQL statement.
Update the UI (MainPage.xaml)
Modify MainPage.xaml to add Entry fields for the first and last name, and an Insert button. It will adjust the main grid layout to accommodate these new elements.
<?xml version="1.0" encoding="utf-8" ?>
<ContentPage xmlns="http://schemas.microsoft.com/dotnet/2021/maui"
xmlns:x="http://schemas.microsoft.com/winfx/2009/xaml"
x:Class="SQLiteMAUI.MainPage"
Title="Actor Management">
<Grid RowDefinitions="Auto,*,Auto" Padding="20" RowSpacing="15">
<Grid Grid.Row="0" ColumnDefinitions="*,*" ColumnSpacing="10" RowDefinitions="Auto,Auto">
<Entry x:Name="FirstNameEntry" Placeholder="First Name" Grid.Row="0" Grid.Column="0" />
<Entry x:Name="LastNameEntry" Placeholder="Last Name" Grid.Row="0" Grid.Column="1" />
<Button Text="Insert" Clicked="OnInsertClicked" Grid.Row="1" Grid.ColumnSpan="2" />
</Grid>
<ListView x:Name="ActorListView" Grid.Row="1">
<ListView.ItemTemplate>
<DataTemplate>
<ViewCell>
<HorizontalStackLayout Padding="10">
<Label Text="{Binding ActorId, StringFormat='ID: {0}'}" WidthRequest="60" />
<Label Text="{Binding FirstName}" WidthRequest="100" />
<Label Text="{Binding LastName}" WidthRequest="100" />
<Label Text="{Binding LastUpdate, StringFormat='{0:yyyy-MM-dd HH:mm}'}"
HorizontalOptions="EndAndExpand" />
</HorizontalStackLayout>
</ViewCell>
</DataTemplate>
</ListView.ItemTemplate>
</ListView>
<Label x:Name="StatusLabel" Grid.Row="2" Text="Ready" HorizontalOptions="Center" />
</Grid>
</ContentPage>
Update the data service (ActorService.cs)
Add the InsertActor method to the ActorService.cs file. This method takes the first and last names, connects to the database, and executes a parameterized INSERT query. Note that dotConnect for SQLite uses the @paramName syntax for parameters.
public static void InsertActor(string firstName, string lastName)
{
using var connection = DatabaseConnection.GetConnection();
connection.Open();
using var command = new SQLiteCommand(
"INSERT INTO actor (first_name, last_name, last_update) VALUES (@firstName, @lastName, @lastUpdate)",
connection);
command.Parameters.AddWithValue("@firstName", firstName);
command.Parameters.AddWithValue("@lastName", lastName);
command.Parameters.AddWithValue("@lastUpdate", DateTime.Now);
command.ExecuteNonQuery();
}
Update the UI logic (MainPage.xaml.cs)
Modify MainPage.xaml.cs to handle the new functionality. Add a private field _selectedActor (we'll use it in the next steps) and create the OnInsertClicked and ClearForm methods.
namespace SQLiteMAUI;
public partial class MainPage : ContentPage
{
private Actor? _selectedActor;
public MainPage()
{
InitializeComponent();
LoadActors();
}
private void LoadActors()
{
try
{
var actors = ActorService.GetAllActors();
ActorListView.ItemsSource = actors;
StatusLabel.Text = $"Loaded {actors.Count} actors";
}
catch (Exception ex)
{
StatusLabel.Text = $"Error: {ex.Message}";
}
}
private async void OnInsertClicked(object? sender, EventArgs e)
{
var firstName = FirstNameEntry.Text?.Trim();
var lastName = LastNameEntry.Text?.Trim();
if (string.IsNullOrWhiteSpace(firstName) || string.IsNullOrWhiteSpace(lastName))
{
await DisplayAlert("Validation", "Please enter both first and last name.", "OK");
return;
}
try
{
ActorService.InsertActor(firstName, lastName);
StatusLabel.Text = $"Inserted: {firstName} {lastName}";
ClearForm();
LoadActors();
}
catch (Exception ex)
{
StatusLabel.Text = $"Error: {ex.Message}";
}
}
private void ClearForm()
{
FirstNameEntry.Text = string.Empty;
LastNameEntry.Text = string.Empty;
_selectedActor = null;
ActorListView.SelectedItem = null;
}
}
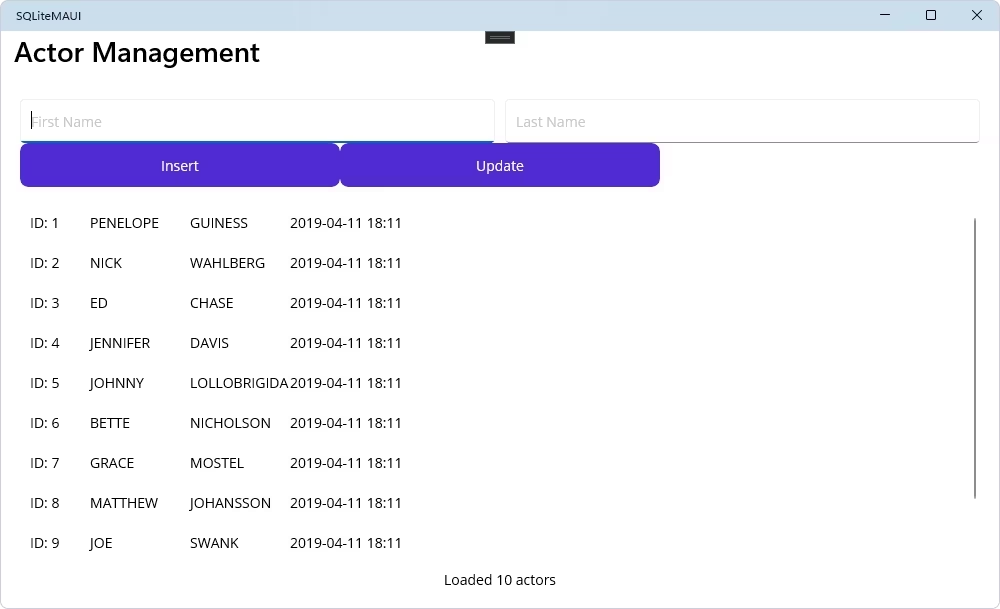
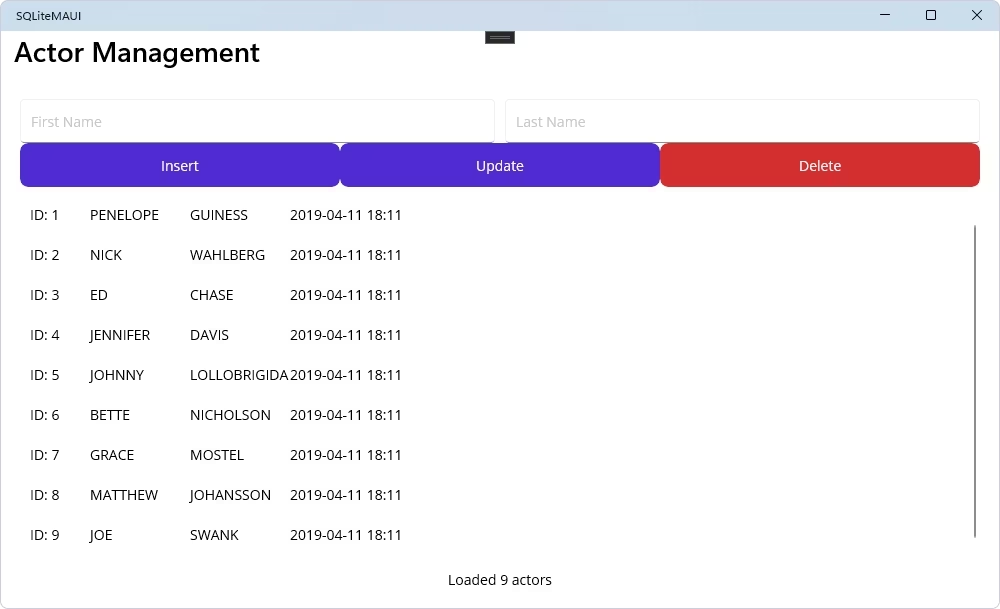
As a result, our application can add new records to the database. We can input data into the form, press the Insert Actor button, and see the list updated immediately with the new entry.

Update SQLite data
Here, we need to implement the ability to edit the existing records. For that, we have to configure the logic to select an item from the list, populate the input fields with its data, and then save the changes with an UPDATE SQL command.
Update the UI (MainPage.xaml)
In MainPage.xaml, add the Update button next to the Insert button and attach an ItemSelected event handler to the ListView.
<?xml version="1.0" encoding="utf-8" ?>
<ContentPage xmlns="http://schemas.microsoft.com/dotnet/2021/maui"
xmlns:x="http://schemas.microsoft.com/winfx/2009/xaml"
x:Class="SQLiteMAUI.MainPage"
Title="Actor Management">
<Grid RowDefinitions="Auto,*,Auto" Padding="20" RowSpacing="15">
<Grid Grid.Row="0" ColumnDefinitions="*,*" ColumnSpacing="10" RowDefinitions="Auto,Auto">
<Entry x:Name="FirstNameEntry" Placeholder="First Name" Grid.Row="0" Grid.Column="0" />
<Entry x:Name="LastNameEntry" Placeholder="Last Name" Grid.Row="0" Grid.Column="1" />
<Grid Grid.Row="1" Grid.ColumnSpan="2" ColumnDefinitions="*,*">
<Button Text="Insert" Clicked="OnInsertClicked" Grid.Column="0" />
<Button Text="Update" Clicked="OnUpdateClicked" Grid.Column="1" />
</Grid>
</Grid>
<ListView x:Name="ActorListView" Grid.Row="1" ItemSelected="OnActorSelected">
<ListView.ItemTemplate>
<DataTemplate>
<ViewCell>
<HorizontalStackLayout Padding="10">
<Label Text="{Binding ActorId, StringFormat='ID: {0}'}" WidthRequest="60" />
<Label Text="{Binding FirstName}" WidthRequest="100" />
<Label Text="{Binding LastName}" WidthRequest="100" />
<Label Text="{Binding LastUpdate, StringFormat='{0:yyyy-MM-dd HH:mm}'}"
HorizontalOptions="EndAndExpand" />
</HorizontalStackLayout>
</ViewCell>
</DataTemplate>
</ListView.ItemTemplate>
</ListView>
<Label x:Name="StatusLabel" Grid.Row="2" Text="Ready" HorizontalOptions="Center" />
</Grid>
</ContentPage>
Update the data service (ActorService.cs)
Add the UpdateActor method to ActorService.cs. This method will execute a parameterized UPDATE query based on the actor's ID.
public static void UpdateActor(int actorId, string firstName, string lastName)
{
using var connection = DatabaseConnection.GetConnection();
connection.Open();
using var command = new SQLiteCommand(
"UPDATE actor SET first_name = @firstName, last_name = @lastName, last_update = @lastUpdate WHERE actor_id = @actorId",
connection);
command.Parameters.AddWithValue("@firstName", firstName);
command.Parameters.AddWithValue("@lastName", lastName);
command.Parameters.AddWithValue("@lastUpdate", DateTime.Now);
command.Parameters.AddWithValue("@actorId", actorId);
command.ExecuteNonQuery();
}
Update the UI logic (MainPage.xaml.cs)
Add the OnActorSelected and OnUpdateClicked methods to MainPage.xaml.cs. After that, OnActorSelected will populate the form when a user taps an item in the list, while OnUpdateClicked will save the changes.
private void OnActorSelected(object? sender, SelectedItemChangedEventArgs e)
{
if (e.SelectedItem is Actor actor)
{
_selectedActor = actor;
FirstNameEntry.Text = actor.FirstName;
LastNameEntry.Text = actor.LastName;
}
}
private async void OnUpdateClicked(object? sender, EventArgs e)
{
if (_selectedActor == null)
{
await DisplayAlert("Validation", "Please select an actor to update.", "OK");
return;
}
var firstName = FirstNameEntry.Text?.Trim();
var lastName = LastNameEntry.Text?.Trim();
if (string.IsNullOrWhiteSpace(firstName) || string.IsNullOrWhiteSpace(lastName))
{
await DisplayAlert("Validation", "Please enter both first and last name.", "OK");
return;
}
try
{
ActorService.UpdateActor(_selectedActor.ActorId, firstName, lastName);
StatusLabel.Text = $"Updated: {firstName} {lastName}";
ClearForm();
LoadActors();
}
catch (Exception ex)
{
StatusLabel.Text = $"Error: {ex.Message}";
}
}

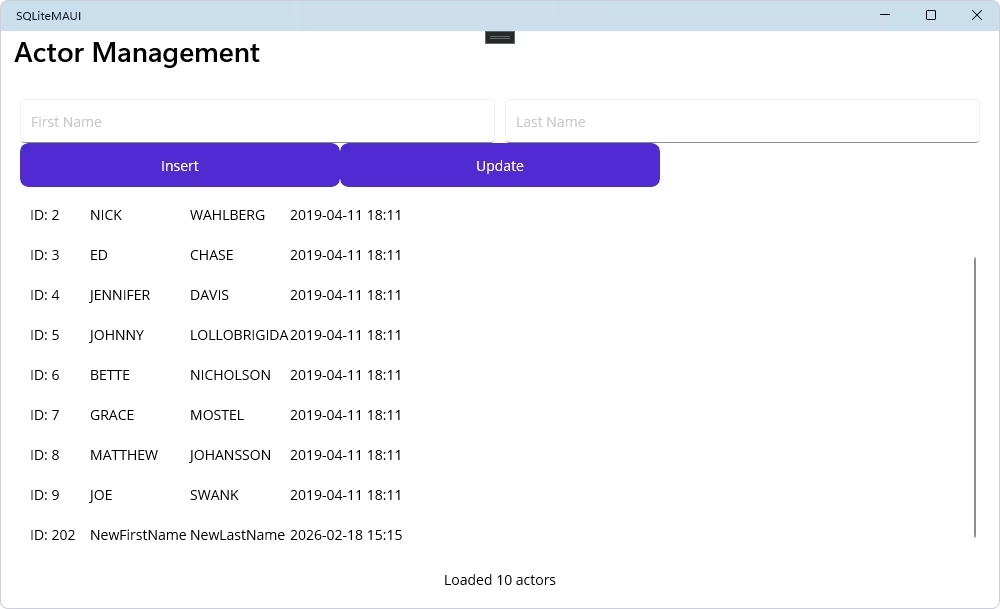
These updates enable our application to support editing data. We can select some actor, change that actor's details in the input form, and save the changes back to the database.
Delete SQLite data
Finally, we are implementing the delete functionality. For that, we need to add the Delete button and update the program logic to execute the DELETE SQL command, including the confirmation step to prevent accidental data loss.
Update the UI (MainPage.xaml)
Modify MainPage.xaml to include the Delete button. It will complete our set of CRUD controls.
<?xml version="1.0" encoding="utf-8" ?>
<ContentPage xmlns="http://schemas.microsoft.com/dotnet/2021/maui"
xmlns:x="http://schemas.microsoft.com/winfx/2009/xaml"
x:Class="SQLiteMAUI.MainPage"
Title="Actor Management">
<Grid RowDefinitions="Auto,*,Auto" Padding="20" RowSpacing="15">
<Grid Grid.Row="0" ColumnDefinitions="*,*" ColumnSpacing="10" RowDefinitions="Auto,Auto">
<Entry x:Name="FirstNameEntry" Placeholder="First Name" Grid.Row="0" Grid.Column="0" />
<Entry x:Name="LastNameEntry" Placeholder="Last Name" Grid.Row="0" Grid.Column="1" />
<Grid Grid.Row="1" Grid.ColumnSpan="2" ColumnDefinitions="*,*,*">
<Button Text="Insert" Clicked="OnInsertClicked" Grid.Column="0" />
<Button Text="Update" Clicked="OnUpdateClicked" Grid.Column="1" />
<Button Text="Delete" Clicked="OnDeleteClicked" Grid.Column="2" BackgroundColor="#D32F2F" />
</Grid>
</Grid>
<ListView x:Name="ActorListView" Grid.Row="1" ItemSelected="OnActorSelected">
<ListView.ItemTemplate>
<DataTemplate>
<ViewCell>
<HorizontalStackLayout Padding="10">
<Label Text="{Binding ActorId, StringFormat='ID: {0}'}" WidthRequest="60" />
<Label Text="{Binding FirstName}" WidthRequest="100" />
<Label Text="{Binding LastName}" WidthRequest="100" />
<Label Text="{Binding LastUpdate, StringFormat='{0:yyyy-MM-dd HH:mm}'}"
HorizontalOptions="EndAndExpand" />
</HorizontalStackLayout>
</ViewCell>
</DataTemplate>
</ListView.ItemTemplate>
</ListView>
<Label x:Name="StatusLabel" Grid.Row="2" Text="Ready" HorizontalOptions="Center" />
</Grid>
</ContentPage>
Update the data service (ActorService.cs)
Add the DeleteActor method to ActorService.cs. It will execute the DELETE query targeting a specific actor by the ID.
public static void DeleteActor(int actorId)
{
using var connection = DatabaseConnection.GetConnection();
connection.Open();
using var command = new SQLiteCommand(
"DELETE FROM actor WHERE actor_id = @actorId",
connection);
command.Parameters.AddWithValue("@actorId", actorId);
command.ExecuteNonQuery();
}
Update the UI logic (MainPage.xaml.cs)
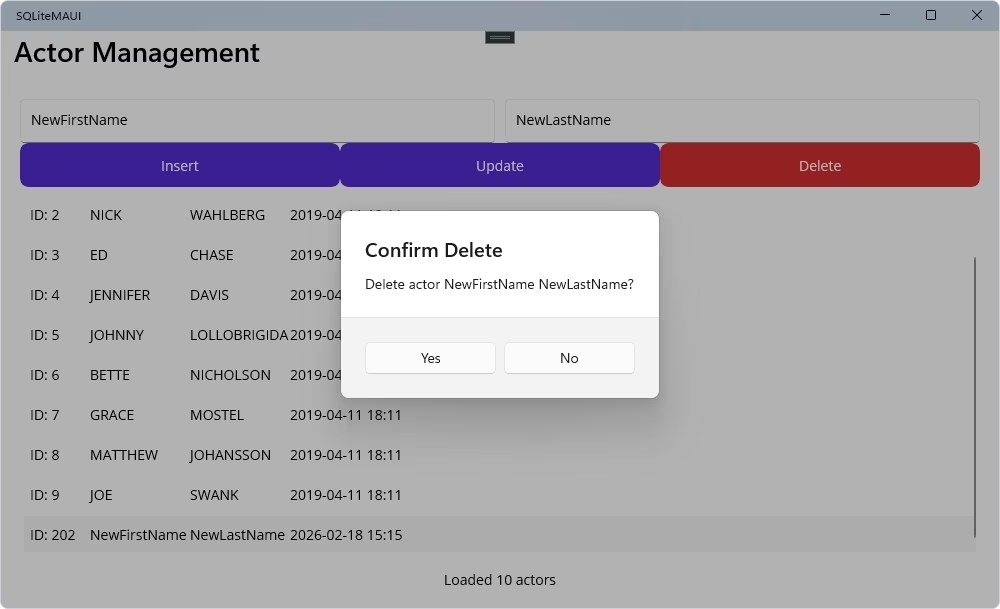
Add the OnDeleteClicked method to MainPage.xaml.cs. This method triggers the pop-up window to confirm the user's action first, and only after that it proceeds to delete the item.
private async void OnDeleteClicked(object? sender, EventArgs e)
{
if (_selectedActor == null)
{
await DisplayAlert("Validation", "Please select an actor to delete.", "OK");
return;
}
var confirm = await DisplayAlert("Confirm Delete",
$"Delete actor {_selectedActor.FirstName} {_selectedActor.LastName}?",
"Yes", "No");
if (!confirm) return;
try
{
ActorService.DeleteActor(_selectedActor.ActorId);
StatusLabel.Text = $"Deleted: {_selectedActor.FirstName} {_selectedActor.LastName}";
ClearForm();
LoadActors();
}
catch (Exception ex)
{
StatusLabel.Text = $"Error: {ex.Message}";
}
}
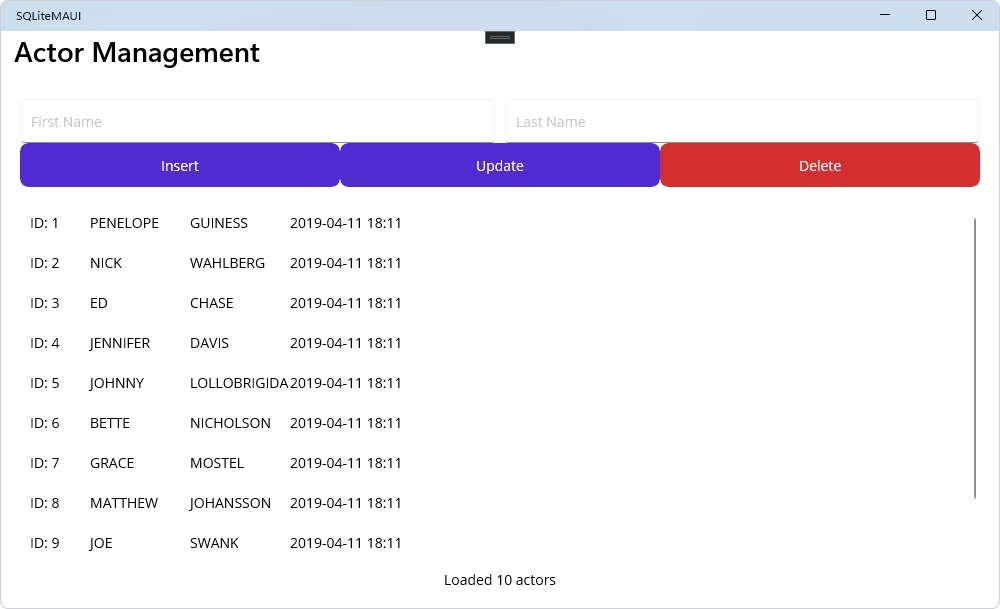
The application is complete. It has the CRUD functionality to read, create, update, and delete records in a SQLite database in a user-friendly way.
Conclusion
This tutorial demonstrated how to perform basic Create, Read, Update, and Delete (CRUD) operations with SQLite in a .NET MAUI application, with code examples to help you integrate SQLite into projects built with .NET MAUI. With this foundation, you can move forward to build applications that manage data in both local and remote environments.
Using dotConnect for SQLite further simplifies the process by reducing many of the challenges involved in establishing connectivity between an application and its data source. You can try dotConnect for SQLite in your own projects—start a free trial and experience the benefits firsthand!
FAQ
How do you install and activate dotConnect for SQLite in a .NET project?
Install dotConnect for SQLite either by running the
Windows installer (EXE) or by adding the
Devart.Data.SQLite NuGet package to your .NET project. Then, retrieve your activation key from the
Devart Customer Portal and specify it in your connection string by using the License Key parameter to activate the provider and connect successfully.
How do you create a connection to SQLite using dotConnect in C#?
Define a connection string that includes host, user ID, password, database, and the License Key value, then create an SQLiteConnection instance with this string and call Open() inside a TRY-CATCH block to test and handle connection errors.
How do you enable encryption for secure SQLite connections with dotConnect?
Use SQLite Native Network Encryption by configuring encryption in the sqlnet.ora file on both client and server sides. No special parameters are required in the connection string.
Can you connect to SQLite using Entity Framework Core and dotConnect?
Yes, you can either use Entity Developer to visually create an EF Core model from the database or run Scaffold-DbContext with a dotConnect connection string (including License Key) to generate the DbContext and entity classes.
Is it possible to connect to SQLite using Visual Studio Server Explorer with dotConnect?
Yes, add a new Data Connection in Server Explorer, select dotConnect for SQLite as the provider, enter your credentials, test the connection, and browse SQLite data directly in Visual Studio.