
You can install the driver by using the Windows installer.
After you receive the license key, add it to your connection strings to connect to the data source.
Working with cloud databases is a common task in modern .NET development, and Microsoft Azure SQL Database is among the popular options, with its scalable, secure, and high-performance relational databases, ideal for both small projects and enterprise applications.
This step-by-step guide will describe how to connect your .NET application to an Azure SQL Database using Devart dotConnect for SQL Server and perform the basic operations with data.
Connect to SQL Server directly via TCP/IP without installing SQL Server client software.
Leverage familiar ADO.NET interfaces and components for smooth integration and predictable behavior.
Supports encrypted connections and undergoes continuous performance and security testing to meet enterprise standards.
Works across all major versions of SQL Server and supports .NET Framework, .NET Core, and .NET 5/6/7+.
Features native integration with Visual Studio and complete design-time support.
Enjoy priority support, detailed documentation, and regular updates for continuous improvement.
You can start using dotConnect for SQL Server immediately with a 30-day free trial. Choose one of the following installation options:
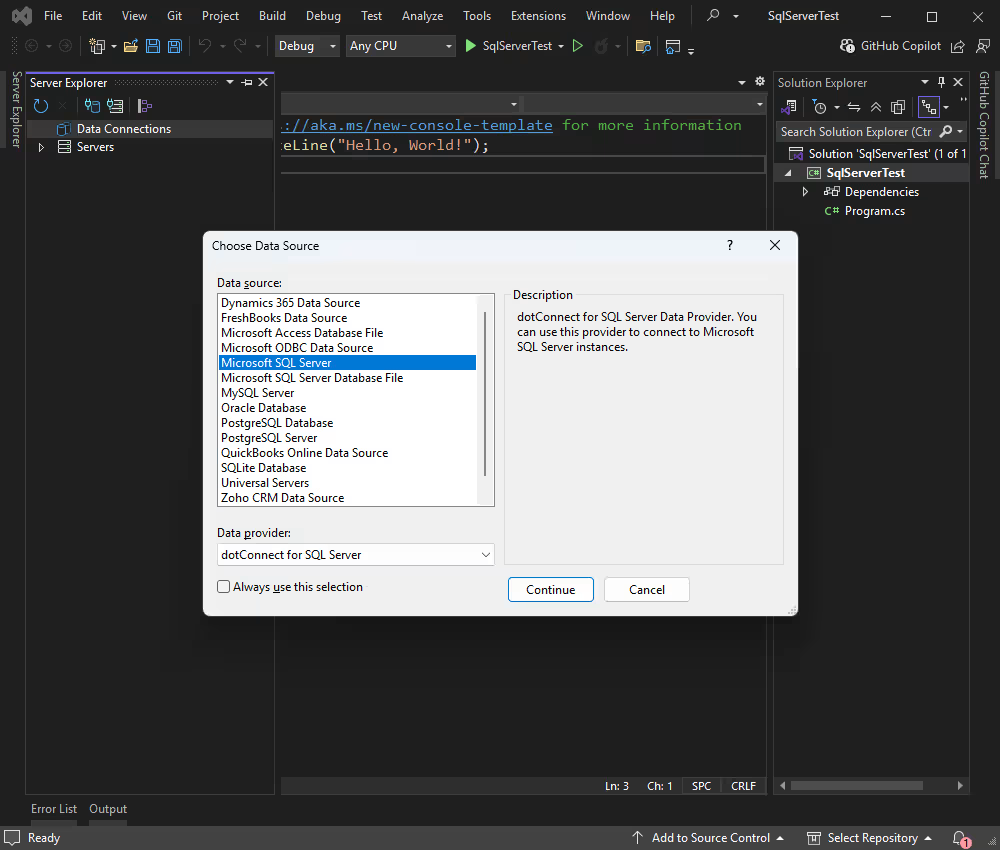
To connect to SQL Server using the built-in Data Explorer, click Tools and select Connect to Database. Then choose SQL Server as the data source.
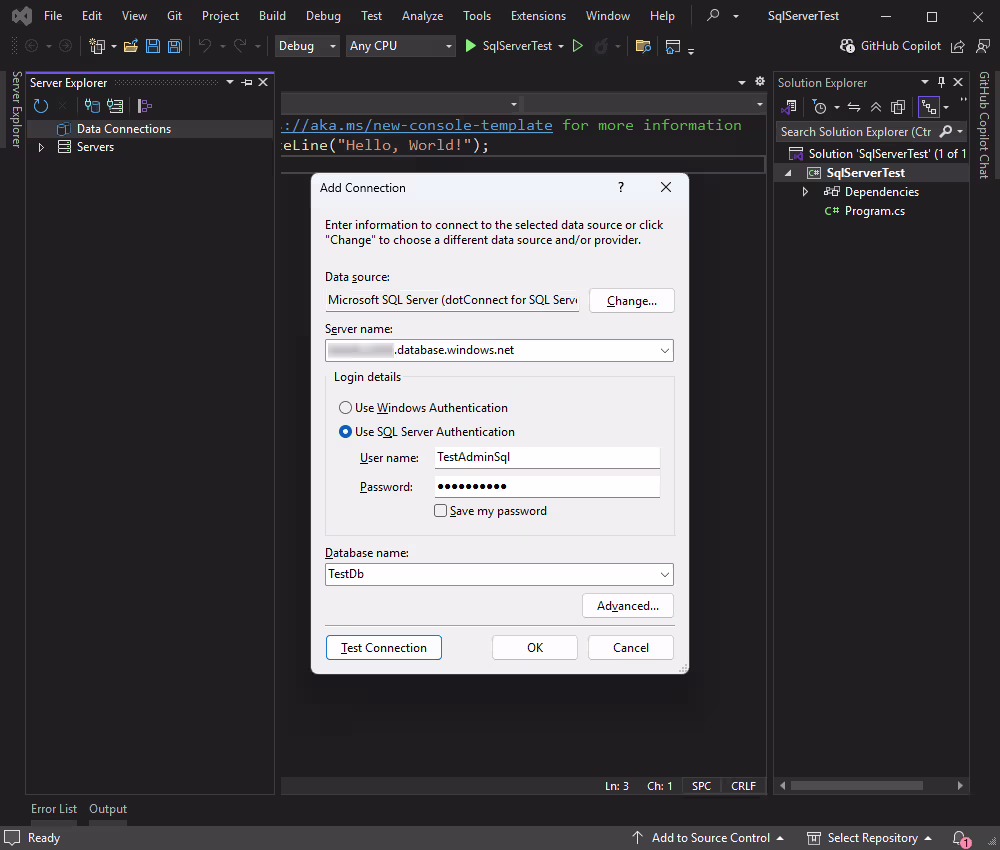
Enter the necessary credentials and click Connect.
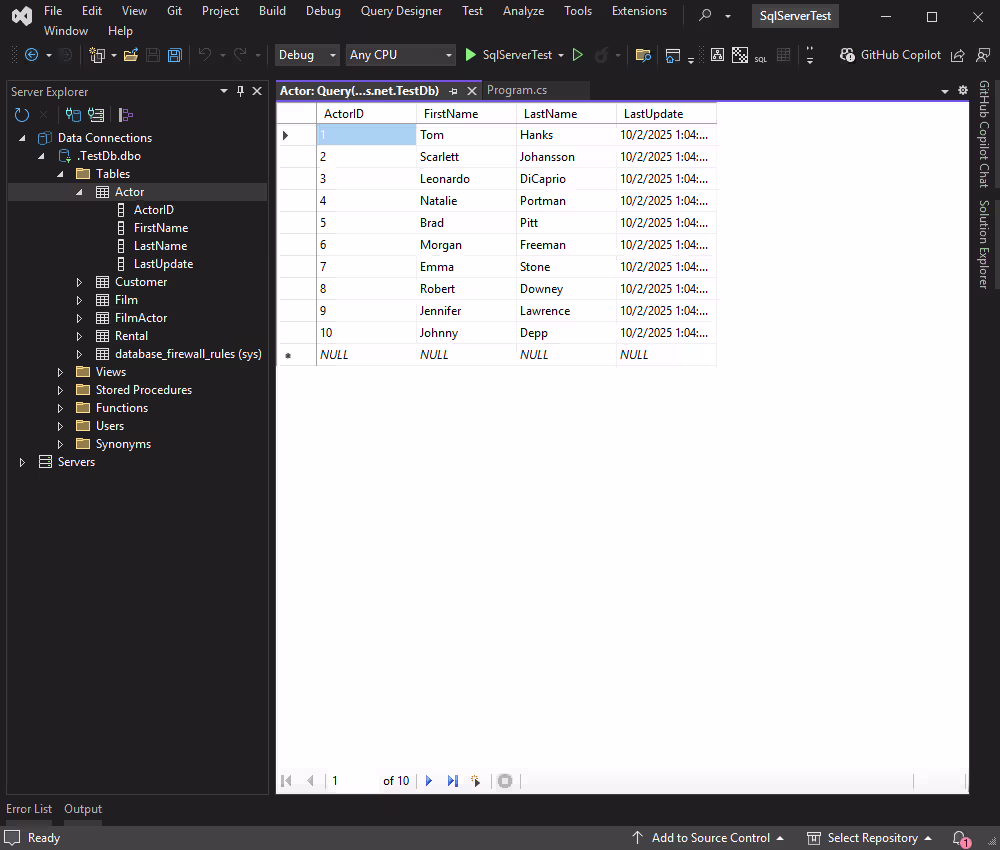
Once connected, you can browse tables, execute queries, and manage data directly within the Data Explorer.
Now that the project is ready, we can connect to Azure SQL Database to access and manipulate data.
This class keeps connection details separate for better maintainability.
using System;
using Devart.Data.SqlServer;

public static class DatabaseConnection
{
    public static SqlConnection CreateOpen()
    {
        var connectionString = Environment.GetEnvironmentVariable("AZURE_SQL_CONN_STR") ??
            "" +
            "User Id=TestUser;" +
            "Password=TestPassword;" +
            "Data Source=test.database.windows.net;" +
            "Initial Catalog=TestDatabase;" +
            "License key=**********";

        var connection = new SqlConnection(connectionString);
        connection.Open();
        return connection;
    }
}| Property | Meaning |
|---|---|
| Database | Default database to be used after connecting |
| Server or Host | Hostname or IP address of the SQL Server |
| License Key | Your license key. This is required only when using .NET Standard compatible assemblies |
| Password | Password for the user ID |
| Port | Port number on which the SQL Server is listening |
| UserId | User ID used to authenticate with SQL Server |
Replace the placeholders in the connection string with your actual SQL Server database credentials.
Add the code below to the Program.cs file.
try
{
    using var connection = DatabaseConnection.CreateOpen();
    Console.WriteLine($"Connection State: {connection.State}\n");

    const string sql = "SELECT * FROM Actor";
    using var cmd = new SqlCommand(sql, connection);
    using var reader = (SqlDataReader)cmd.ExecuteReader();

    if (!reader.HasRows)
    {
        Console.WriteLine("No rows found.");
    }
    else
    {
        for (int i = 0; i < reader.FieldCount; i++)
        {
            Console.Write(i == 0 ? reader.GetName(i) : $", {reader.GetName(i)}");
        }
        Console.WriteLine();

        while (reader.Read())
        {
            for (int i = 0; i < reader.FieldCount; i++)
            {
                var value = reader.IsDBNull(i) ? "NULL" : reader.GetValue(i);
                Console.Write(i == 0 ? value : $", {value}");
            }
            Console.WriteLine();
        }
    }
}
catch (SqlException ex)
{
    Console.WriteLine($"SQL error: {ex.Message}");
}
catch (Exception ex)
{
    Console.WriteLine($"Unexpected error: {ex.Message}");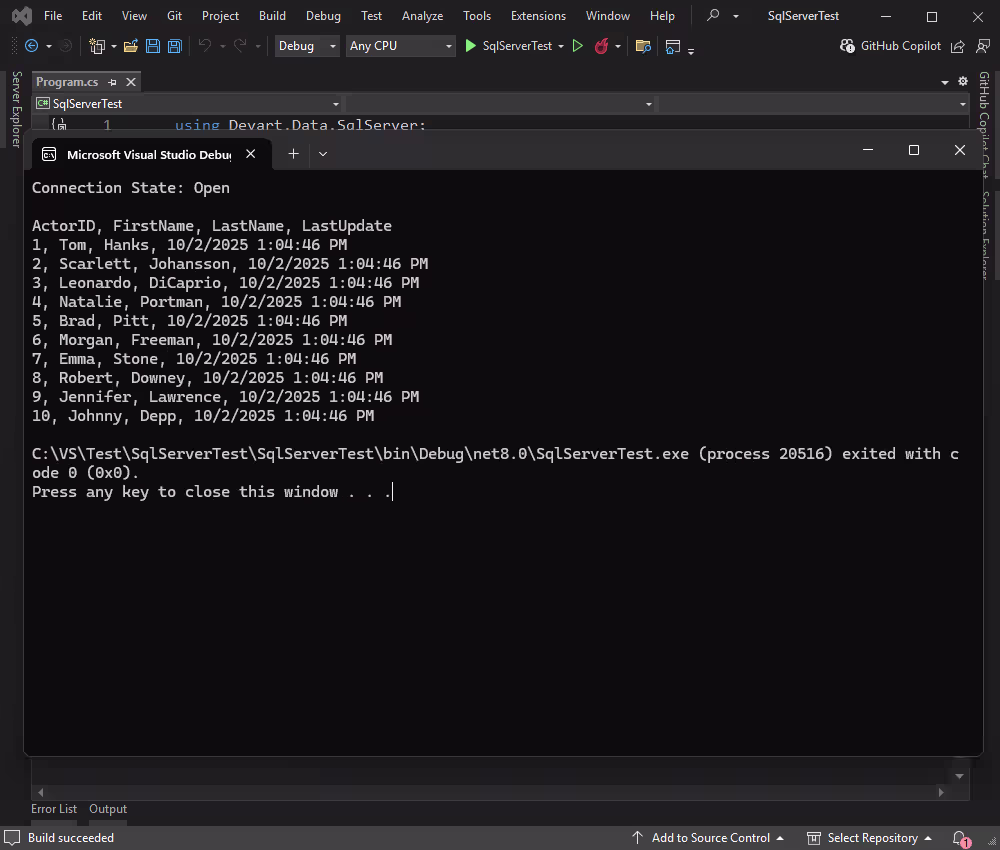
}Build and run your application: select Start from the menu or click F5. It displays the data retrieved from the database.
Let's add a new record to the database. In our test case, we want to insert a new row into the Actor table using standard ADO.NET classes in the application.
try
{
    using var connection = DatabaseConnection.CreateOpen();
    Console.WriteLine($"Connection State: {connection.State}\n");

    const string insertSql =
        "INSERT INTO Actor (FirstName, LastName)\n" +
        "OUTPUT INSERTED.*\n" +
        "VALUES (@FirstName, @LastName);";

    using (var insertCmd = new SqlCommand(insertSql, connection))
    {
        var pFirst = new SqlParameter("@FirstName", SqlType.VarChar, 100)
        {
            Direction = ParameterDirection.Input,
            Value = "Michael"
        };
        insertCmd.Parameters.Add(pFirst);

        var pLast = new SqlParameter("@LastName", SqlType.VarChar, 100)
        {
            Direction = ParameterDirection.Input,
            Value = "Anderson"
        };
        insertCmd.Parameters.Add(pLast);

        using var insertedReader = (SqlDataReader)insertCmd.ExecuteReader();
        Console.WriteLine("Newly inserted row:");

        if (insertedReader.HasRows)
        {
            for (int i = 0; i < insertedReader.FieldCount; i++)
            {
                Console.Write(i == 0 ? insertedReader.GetName(i) : $", {insertedReader.GetName(i)}");
            }
            Console.WriteLine();

            while (insertedReader.Read())
            {
                for (int i = 0; i < insertedReader.FieldCount; i++)
                {
                    var value = insertedReader.IsDBNull(i) ? "NULL" : insertedReader.GetValue(i);
                    Console.Write(i == 0 ? value : $", {value}");
                }
                Console.WriteLine();
            }
        }
        else
        {
            Console.WriteLine("Insert did not return a row.");
        }
    }
}
catch (SqlException ex)
{
    Console.WriteLine($"SQL error: {ex.Message}");
}
catch (Exception ex)
{
    Console.WriteLine($"Unexpected error: {ex.Message}");
}
View the results:

Now let's update an existing record: we can do it directly from the application. We want to modify the first and last name of an actor.
try
{
    using var connection = DatabaseConnection.CreateOpen();
    Console.WriteLine($"Connection State: {connection.State}\n");

    const string updateSql =
        "UPDATE Actor\n" +
        "SET FirstName = @FirstName, LastName = @LastName\n" +
        "OUTPUT INSERTED.*\n" +
        "WHERE ActorID = @ActorID;";

    using (var updateCmd = new SqlCommand(updateSql, connection))
    {

        var pId = new SqlParameter("@ActorID", SqlType.Int)
        {
            Direction = ParameterDirection.Input,
            Value = 12
        };
        updateCmd.Parameters.Add(pId);

        var pFirst = new SqlParameter("@FirstName", SqlType.VarChar, 100)
        {
            Direction = ParameterDirection.Input,
            Value = "Ethan"
        };
        updateCmd.Parameters.Add(pFirst);

        var pLast = new SqlParameter("@LastName", SqlType.VarChar, 100)
        {
            Direction = ParameterDirection.Input,
            Value = "Whitmore"
        };
        updateCmd.Parameters.Add(pLast);

        using var updatedReader = (SqlDataReader)updateCmd.ExecuteReader();
        Console.WriteLine("Updated row:");

        if (updatedReader.HasRows)
        {
            for (int i = 0; i < updatedReader.FieldCount; i++)
            {
                Console.Write(i == 0 ? updatedReader.GetName(i) : $", {updatedReader.GetName(i)}");
            }
            Console.WriteLine();

            while (updatedReader.Read())
            {
                for (int i = 0; i < updatedReader.FieldCount; i++)
                {
                    var value = updatedReader.IsDBNull(i) ? "NULL" : updatedReader.GetValue(i);
                    Console.Write(i == 0 ? value : $", {value}");
                }
                Console.WriteLine();
            }
        }
        else
        {
            Console.WriteLine("No row was updated.");
        }
    }
}
catch (SqlException ex)
{
    Console.WriteLine($"SQL error: {ex.Message}");
}
catch (Exception ex)
{
    Console.WriteLine($"Unexpected error: {ex.Message}");
}
The application shows us updated data:

To wrap up the data operations, let us remove the record we previously added. Use the below code:
try
{
    using var connection = DatabaseConnection.CreateOpen();
    Console.WriteLine($"Connection State: {connection.State}\n");

    const string deleteSql =
        "DELETE FROM Actor\n" +
        "OUTPUT DELETED.*\n" +
        "WHERE ActorID = @ActorID;";

    using (var deleteCmd = new SqlCommand(deleteSql, connection))
    {

        var pId = new SqlParameter("@ActorID", SqlType.Int)
        {
            Direction = ParameterDirection.Input,
            Value = 12
        };
        deleteCmd.Parameters.Add(pId);

        using var deletedReader = (SqlDataReader)deleteCmd.ExecuteReader();
        Console.WriteLine("Deleted row:");

        if (deletedReader.HasRows)
        {
            for (int i = 0; i < deletedReader.FieldCount; i++)
            {
                Console.Write(i == 0 ? deletedReader.GetName(i) : $", {deletedReader.GetName(i)}");
            }
            Console.WriteLine();

            while (deletedReader.Read())
            {
                for (int i = 0; i < deletedReader.FieldCount; i++)
                {
                    var value = deletedReader.IsDBNull(i) ? "NULL" : deletedReader.GetValue(i);
                    Console.Write(i == 0 ? value : $", {value}");
                }
                Console.WriteLine();
            }
        }
        else
        {
            Console.WriteLine("No row was deleted.");
        }
    }
}
catch (SqlException ex)
{
    Console.WriteLine($"SQL error: {ex.Message}");
}
catch (Exception ex)
{
    Console.WriteLine($"Unexpected error: {ex.Message}");
}
The operation is successful.

Connecting a .NET application to Azure SQL Database and performing basic data operations are foundational tasks for any application that deals with data stored in this relational database.
As you continue building applications with .NET, you can expand on this and proceed to more complex challenges, such as handling exceptions, working with stored procedures, or integrating data access into larger application architectures to develop more complex, data-driven applications.
License Key parameter for a working connection.
License Key value, then create an SqlConnection instance with this string and call Open() for it inside a try-catch block to test and handle connection errors.

I'm a technical content writer who loves turning complex topics — think SQL, connectors, and backend chaos–into content that actually makes sense (and maybe even makes you smile). I write for devs, data folks, and curious minds who want less fluff and more clarity. When I'm not wrangling words, you'll find me dancing salsa, or hopping between cities.