Database Projects:
Modern Approach to Database Development
This article guides you through how to create, build, and deploy a database project using dbForge Studio for MySQL.
We will use a project based on the Sakila sample database to demonstrate MySQL project management and deployment.
Creating a database project
Creating an empty project
You can create an empty database project or project with MySQL database objects imported from
an existing database. First, let's explore the case with an empty database project.
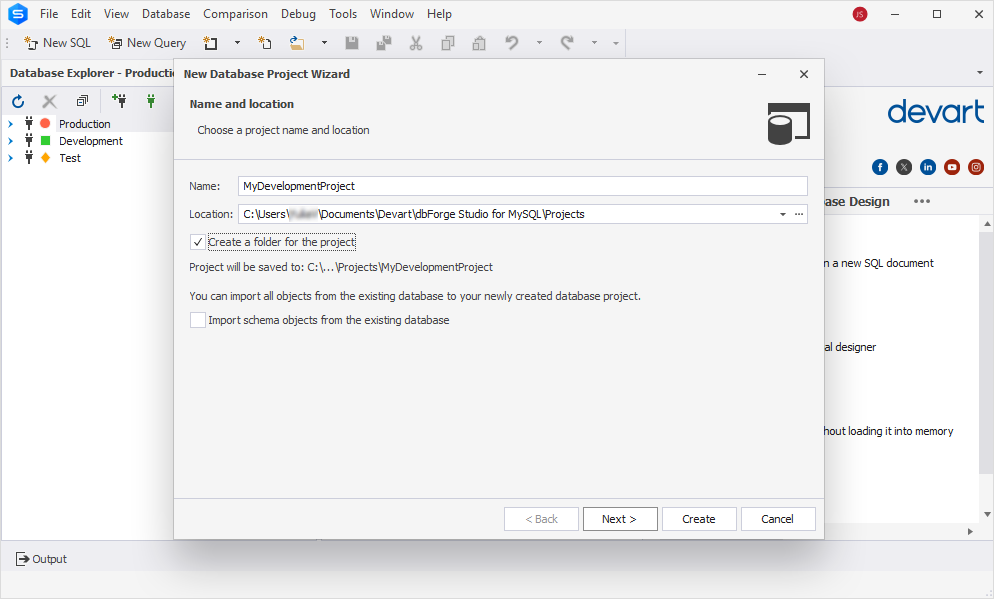
1. On the File menu, select New > Project.
2. In the New Database Project Wizard that opens, specify a project name. The default location to store the project is C:\Users\Username\Documents\Devart\dbForge Studio for MySQL\Projects.
If you want to save the project to an individual folder in the default directory, select the Create a folder for the project checkbox. The folder location will be displayed below the option.
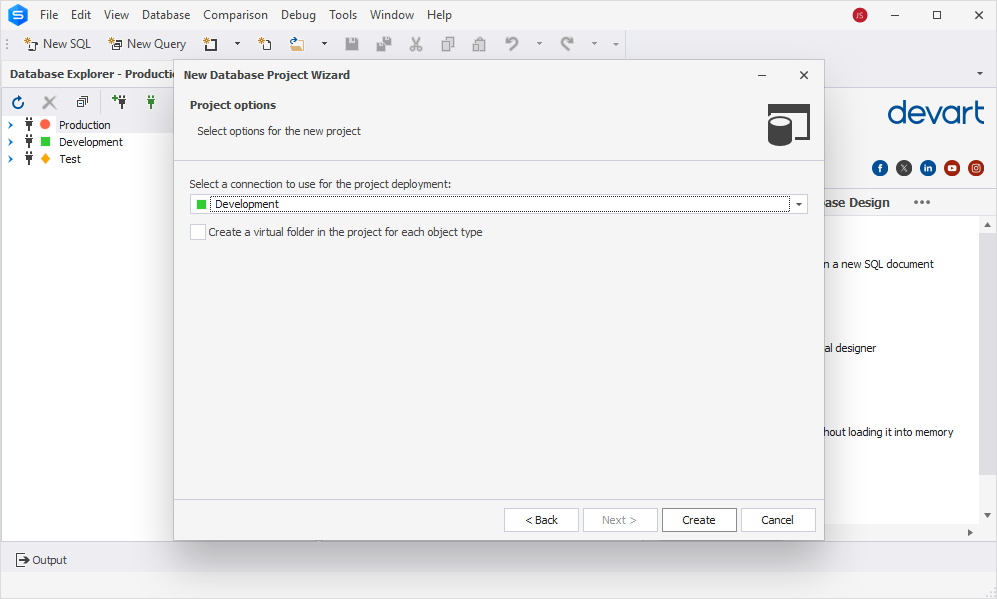
3. On the Project options page, select a connection you want to use for the project deployment.
4. Click Create to create the project and close the wizard.
5. Once done, the Project Explorer pane will automatically opens containing the project you've created. To save the project, click Save on the toolbar.
Creating a database project from an existing database
You can populate a project with MySQL database objects by importing schema objects from an existing database.
To import database objects into a project:
1. On the File menu, select New > Project.
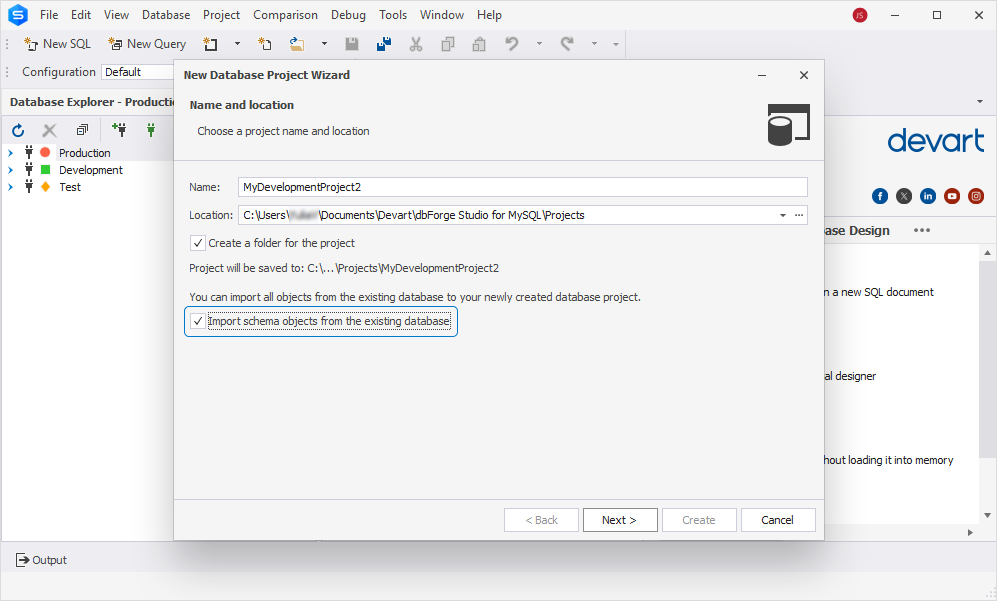
2. In the New Database Project Wizard, specify a project name, folder to save the project, and then select the Import schema objects from the existing database checkbox.
To proceed, click Next.
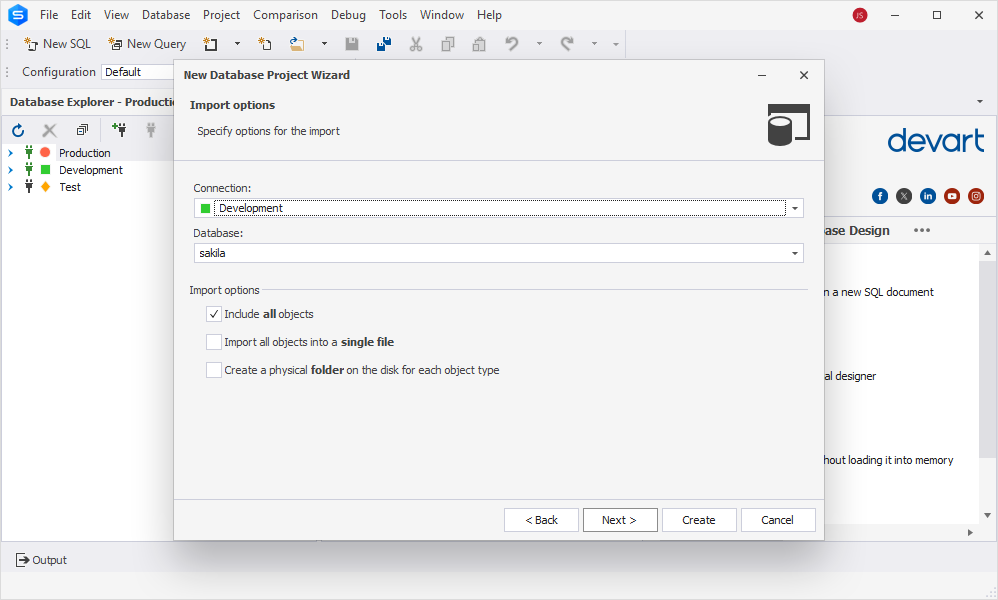
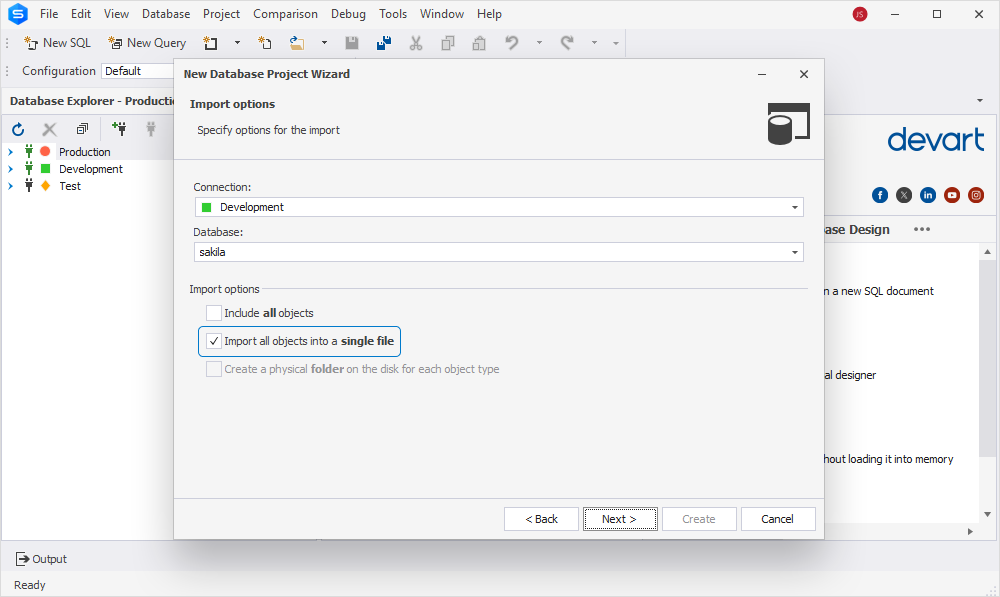
2. On the Import options page, select a connection and a database from which you want to import the database objects into the project. Also, select the import options.
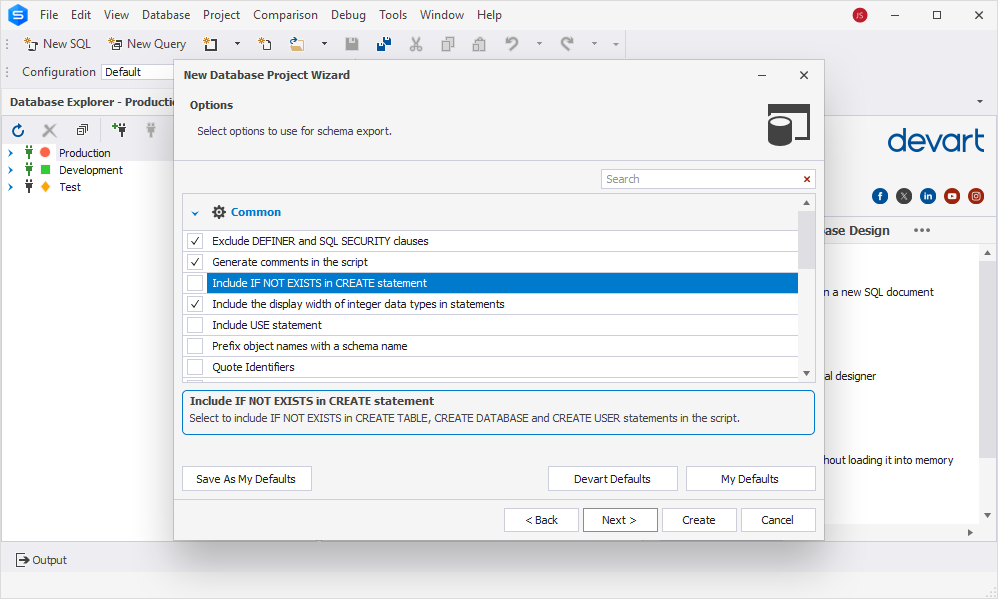
3. Depending on the import options you choose, the next pages of the wizard will differ. If you select the Include all objects and/or Import all objects into a single file checkboxes,
the Options page opens. Here you can select the options you want to use for schema import. Upon selection, the description of the option
will be displayed.
If you select the Import all objects into a single file checkbox on the Import options page, the in-between Import objects page opens.
In this case, first, you need to select all or specific objects you want to import into the project and click Next.
After that, on the Options page, select the import options to customize the default import behavior and click Next.
4. On the Project options page, select the connection to use for the project deployment and click Create to create the project and close the wizard.
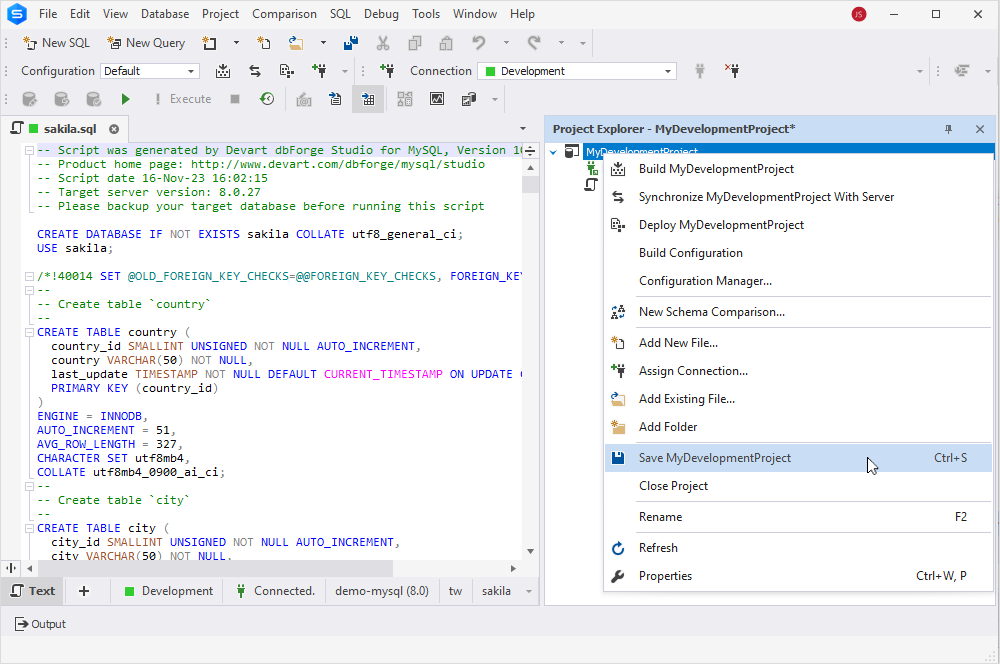
The Project Explorer pane opens displaying a .sql file containing the imported objects. You can save the project by clicking Save on the toolbar.
Note that when creating a new project from an existing database, an object DDL is formatted according to the formatting options.
Saving a database project
In Project Explorer, right-click the project and select Save < project_name >.
Alternatively, go to the View menu and select Project Explorer to activate the Project Explorer view.
After that, go to the File menu and select Save < project name >.
Opening a database project
To open a project, from the File menu, select Open Project. It should be noted that creating a new project will close the previously opened projects and all open documents.
The tool will also prompt you to save the unsaved projects - click Yes to keep the changes or No to discard them.
Managing project files
Using Project Explorer
You can view and manage your project files using Project Explorer, which allows you to:
- Build and deploy the project
- Synchronize the project with the server
-
View and quickly access all SQL and query files of the project, as they are accurately
organized as a tree structure
-
Add new or existing SQL files to the project
-
Edit or drop files in the project
-
Move files to ensure their best location within the project tree
-
Create and rename folders and subfolders in the project to neatly distribute
multiple files
-
Delete folders and subfolders from the project
-
Move folders by dragging them to include each other, to create subfolders
and get the desired folder structure
To manage the project, right-click the project in Project Explorer and select the required option.
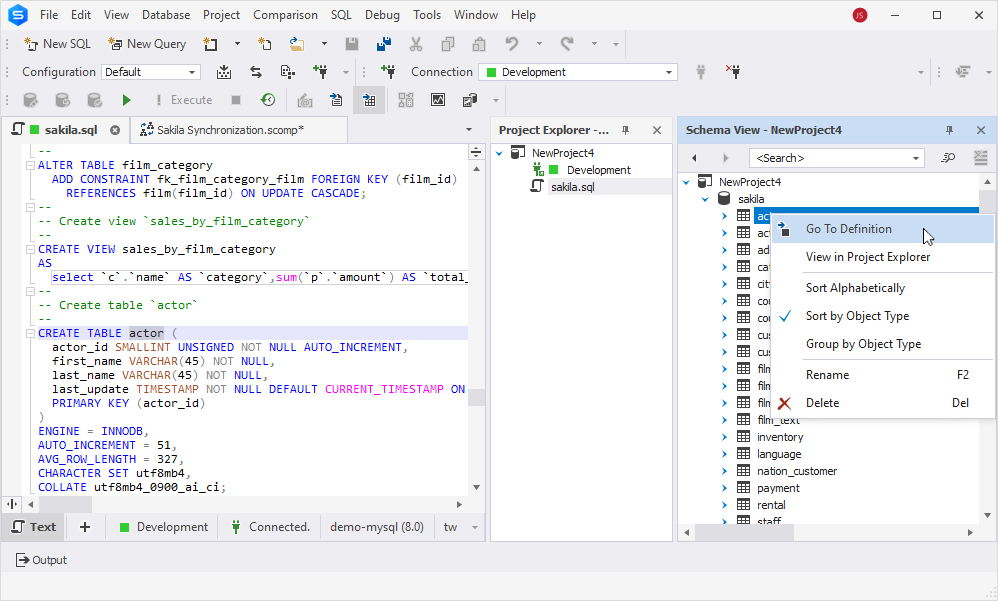
Using Schema View
You can manage project files using the Schema View pane. To open it, go to the View menu and select Schema View.
Within the Schema View pane, you can easily navigate and explore database objects generated by scripts in your project.
In addition, you can sort objects alphabetically or by type, group them by object type, and perform actions such as renaming or deleting objects as needed.
The Schema View allows you to quickly locate and examine the CREATE statement for each object in the script.
To do this, double-click the object or right-click it and select Go To Definition. The script will open, highlighting the object at the beginning of the relevant line.
Furthermore, you can edit project files in a user-friendly MySQL editor, which provides a
wide range of options for quick and efficient SQL code editing. For more information, see Advanced features: Code Snippets, SQL Syntax Checking, and Code Formatting.
Building a project with various configurations
Building a project
After you have made updates to your database project, it is important to build it to generate a script that will deploy all the project changes
to the database on the server. The project can be built into a single ready-to-deploy script or into a set of scripts with a batch
for execution either in the MySQL command-line tool or within dbForge Studio.
To build a project:
1. On the Project menu, select < project_name > Properties.
2. On the Build page of the Project Properties document, choose a project configuration to build.
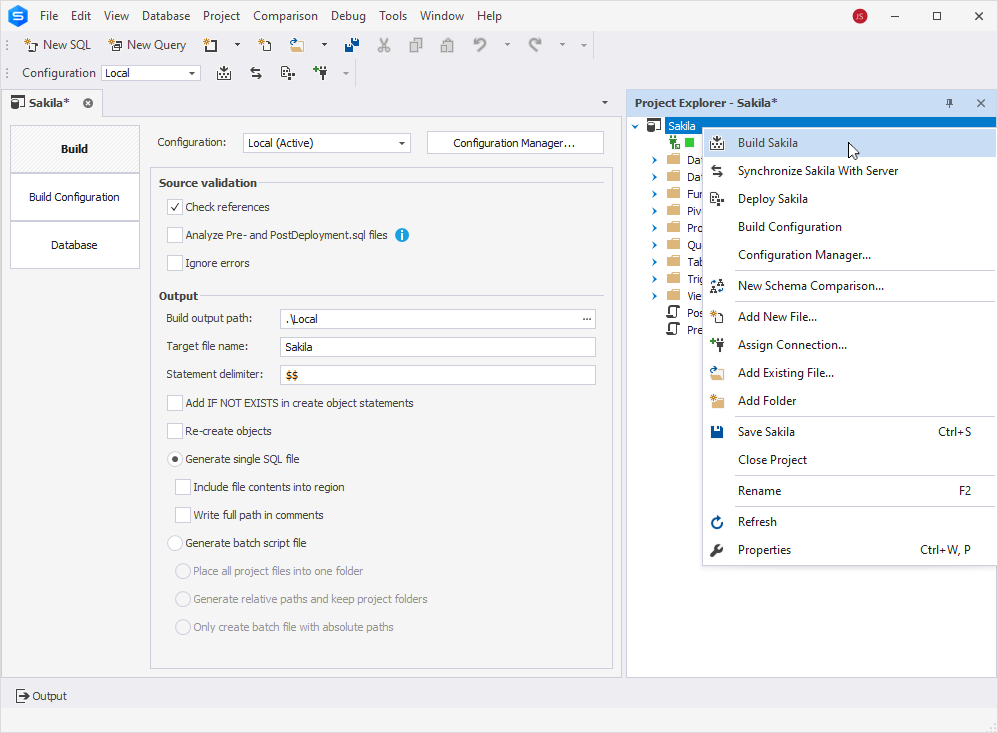
3. In Project Explorer, right-click the project and select Build.
During the project build, the following actions can be performed:
- Syntax check in project scripts. If any errors are found, the build is stopped
- Check references to schema objects in all statements
- Check for any object duplicates
Configuring project settings
Before building the project, you can set project options to customize build results.
To set project options:
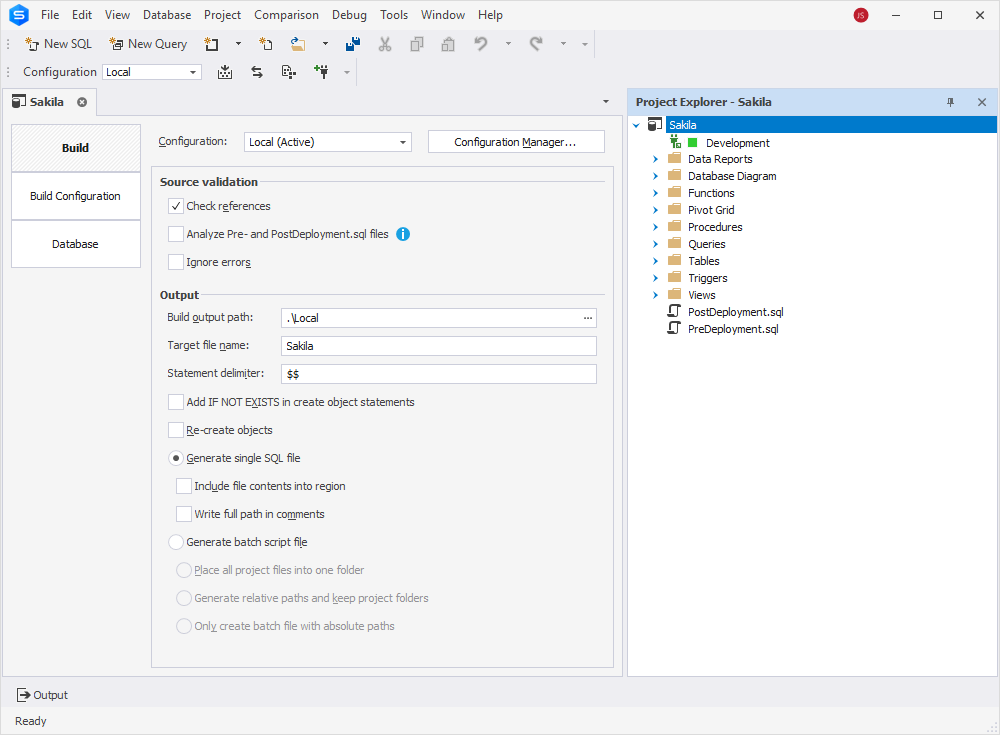
1. In Project Explorer, right-click the project and select Properties or use the Project menu.
The Project Properties document opens displaying three tabs - Build, Build Configuration, and Database.
2. On the Build tab, define the settings for the generated SQL file with
project changes including:
- Select the Check references checkbox to verify metadata in the project before building a deployment script.
If any errors occur, the build is stopped, and the deployment script is not generated
-
Select the Ignore errors checkbox to generate a deployment script regardless of any errors that occur during the build
-
Specify a build output path to store a deployment script
- Enter a target file name for the deployment script
- Select the Add IF NOT EXISTS in create object statements checkbox to include IF NOT EXISTS in create object statements. These objects
can be the table, trigger, view, procedure, function, event, sequence, package, and package body
- Select the Re-create objects checkbox to include the statement to remove the object from the database in the deployment script
- Generate the deployment script in a single file
- Select the Include file content into regions checkbox to wrap the file name in the #REGION .... #ENDREGION tags
- Select the Write full path in comments checkbox to specify the full path to the file with the original DDL in the comments
- Generate a deployment script as a batch file
- Place all project files in a single folder specified in the Build output path field
- Select the Generate relative paths and keep project folders option to copy source files to the folder specified in the Build output path keeping
the source folder structure, while the deployment script will have relative paths
- Select the Only create batch file with absolute paths option to generate a single batch file that will store absolute paths to the source object file location
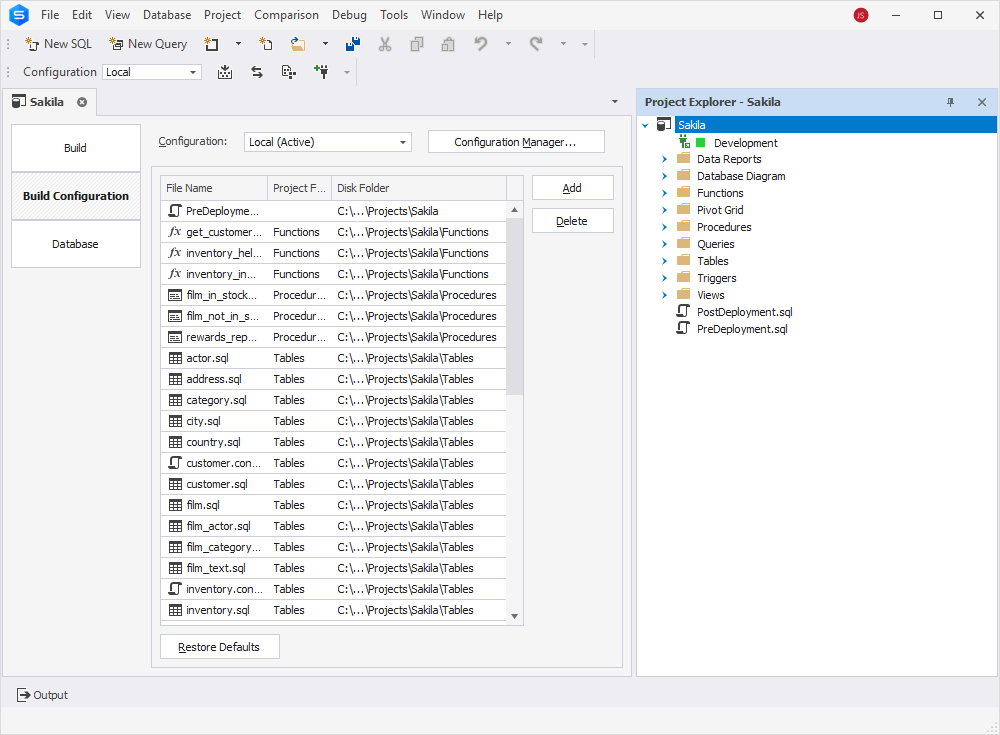
3. On the Build Configuration page, the sequence of files is set automatically and cannot be changed manually. You can also add a .sql file that is not in the current Build Project but is included in the project.
It is also possible to delete the project file from the current Build Project configuration.
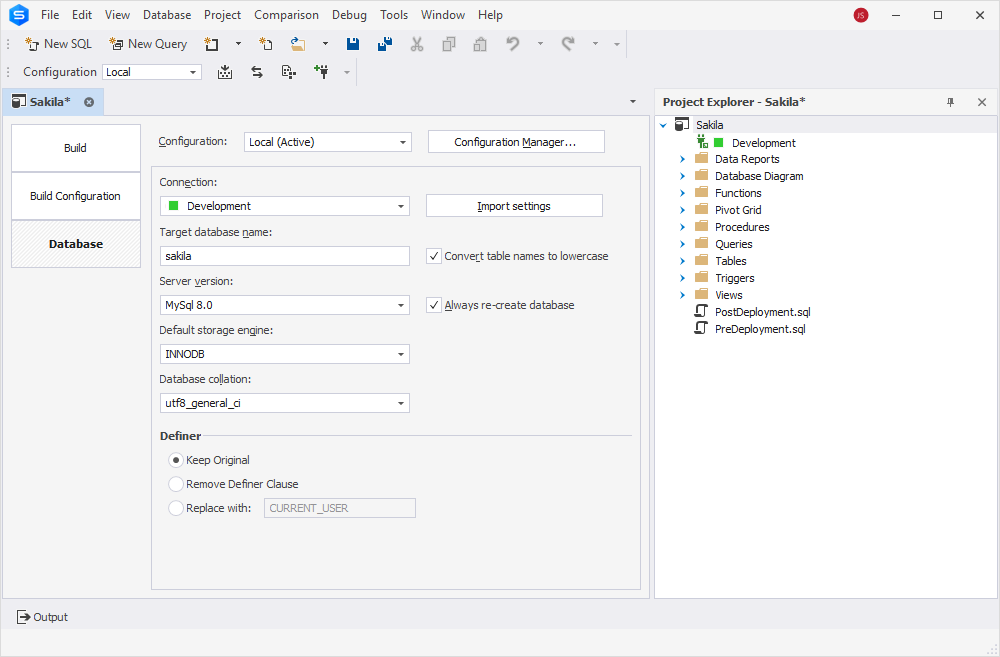
4. On the Database page, manage target database settings. For example, you can import settings or set a server version
to generate SQL statements using the syntax associated with this server version.
In addition, it is recommended to select the Always re-create a database option to guarantee database integrity.
For more information about how to work with database projects, see the database project tutorial.
Project configurations
Every new project has a default configuration, which you can rename, delete, or create a new one using the Configuration Manager.
It is possible to have multiple configurations, each with its own set of options. This ability allows you to deploy
the same database project on different servers. For example, you can test the project on one server and deploy the final version on another.
Deploying a project to a server
You can deploy either the entire project or only the changes to the database on a server.
Deploying the entire project
To deploy the entire project:
1. Check if a connection was assigned to the project; otherwise, the project deployment fails.
2. In Project Explorer, right-click the project and select Deploy. Alternatively,
on the Project menu, click Deploy < Project name >.
Deploying changes from your project
When you want to deploy only the changes from your project to a server, you should
compare your project with the database on the server and create a
schema synchronization script
that will deploy only the required changes to the server.
To deploy the changes from your project:
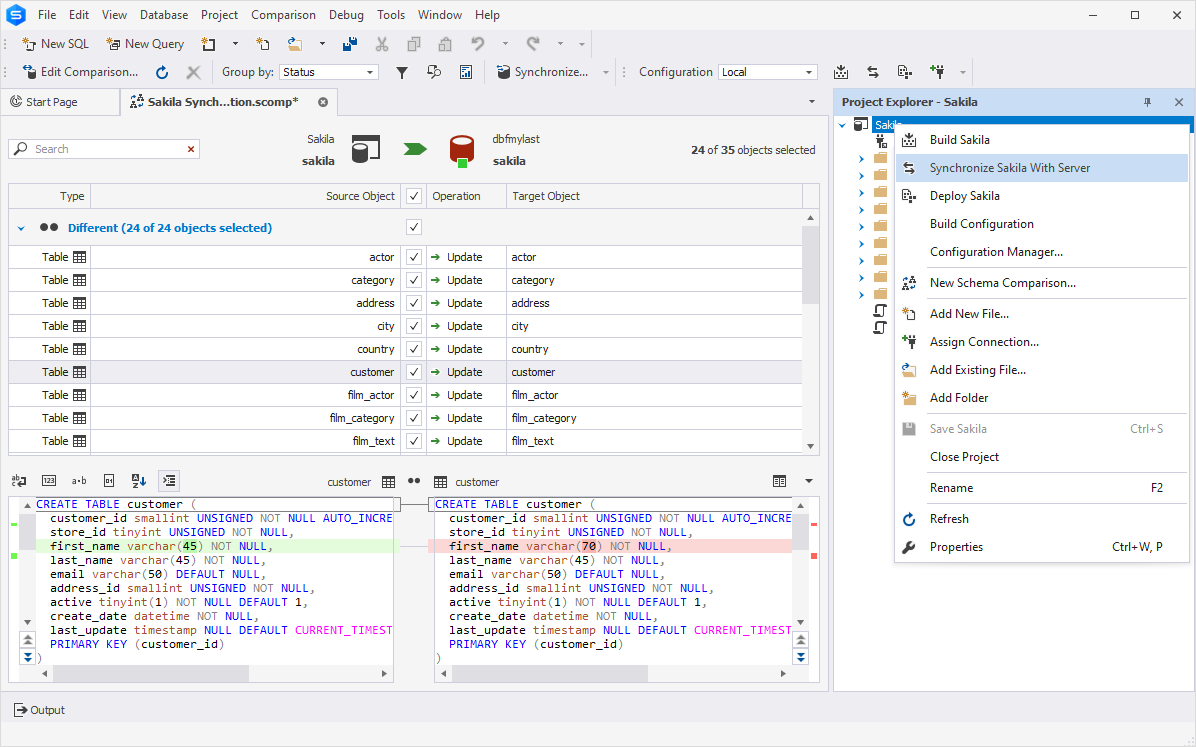
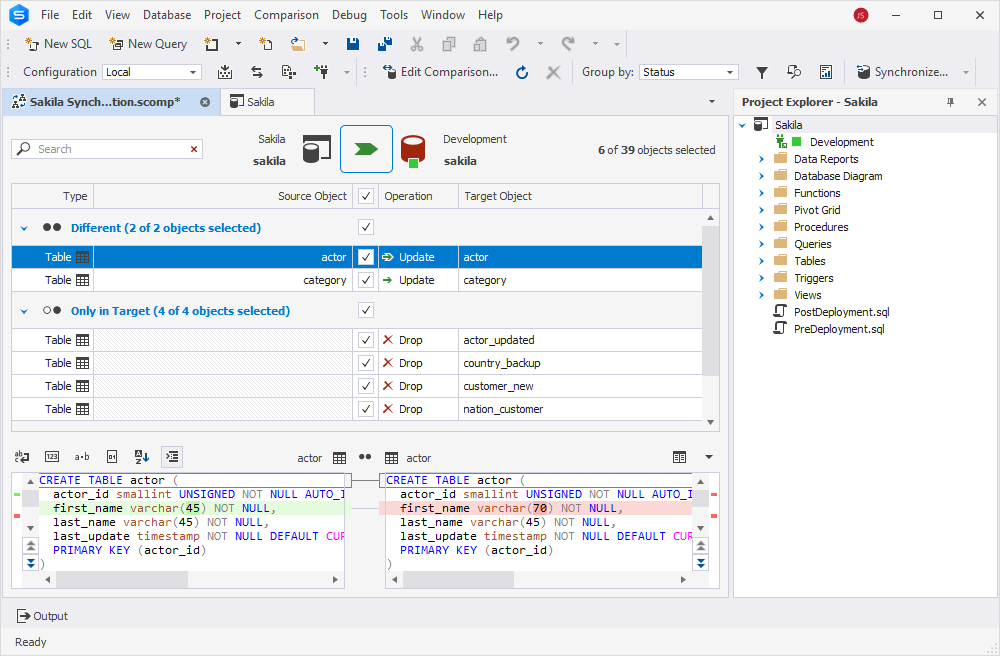
1. In Project Explorer, right-click the project and select
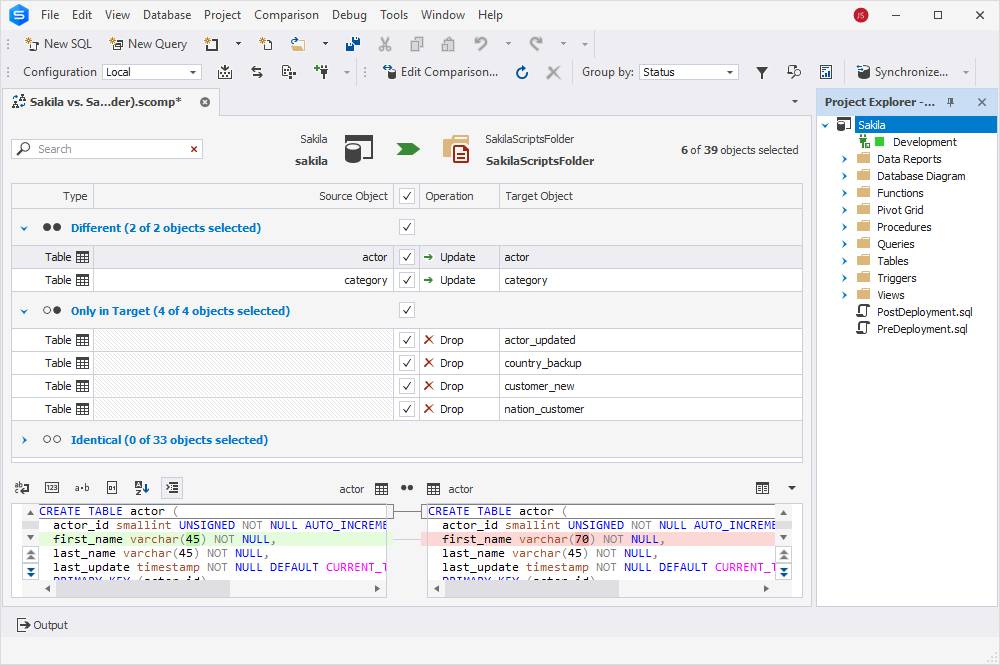
Synchronize Project With Server. The Schema Comparison document with comparison results opens.
2. By default, the synchronization actions are automatically selected for each object to be compared.
You can change them, for example, by selecting None from the Operation column in order not to apply the change.
3. On top of the Schema Comparison document, click Synchronize objects to the target database to deploy the project’s
changes to the database. Alternatively, go to the Comparison menu and select Synchronize.
Synchronizing and comparing the project
with a database or a scripts folder
Synchronizing database changes with the project
You can synchronize the changes from the database on the server or a scripts folder with your project.
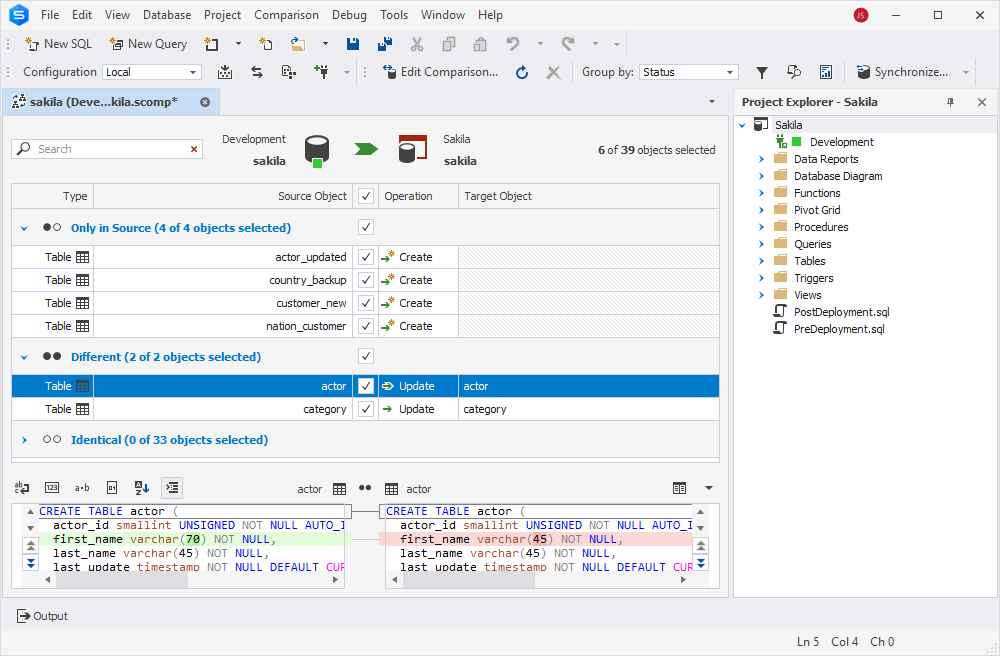
To synchronize a database with the project:
1. In Database Explorer, right-click the database you want to synchronize the project with and select Tasks > New Schema Comparison.
2. On the Source and Target page of the New Schema Comparison wizard, select the project as Target and specify the path to the project.
Note: While comparing, the project can be either Source or Target. The project is
automatically built during comparison, so if any errors occur during this process, the comparison fails.
3. Optional: On the Options page, specify options for schema comparison.
4. To start schema comparison, click Compare.
5. In the Schema Comparison document, analyze the differences. By default, the synchronization actions are automatically
selected for each compared object; however, you can change them if needed.
6. To synchronize the database with the project, click Synchronize objects to the target database on top of the Schema Comparison document.
7. In the Schema Synchronization wizard that opens, select Synchronize project and click Synchronize.
Creating a scripts folder
A scripts folder is a set of scripts that represent a database schema. In dbForge Studio for MySQL, you can synchronize your project with the scripts folder.
Scripts folders can be used either as a source or a target for comparison and deployment.
First, create a scripts folder if you have not done that yet. For this, follow the steps:
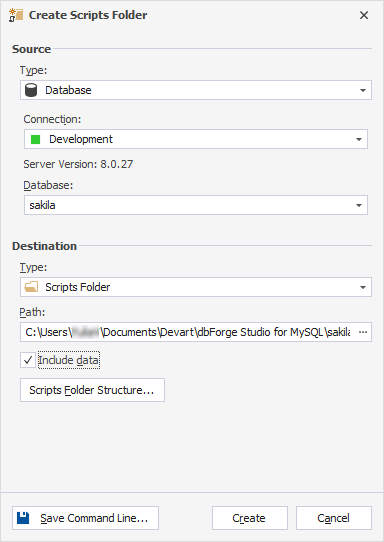
1. On the Database menu, select Tasks > Create Scripts Folder.
2. In the Create Scripts Folder dialog that opens, select Source: either a database or a scripts folder.
3. Under Source, depending on the source type you have chosen, do the following:
- For a database: Select a connection and a database.
- For a scripts folder: Specify a path to the database scripts folder.
4. Under Destination, select a Scripts Folder type and specify a path to store the scripts folder.
5. Optional: To create a scripts folder structure, click Scripts Folder Structure.
6. Optional: To insert data, select the Include data checkbox.
7. To create the folder, click Create.
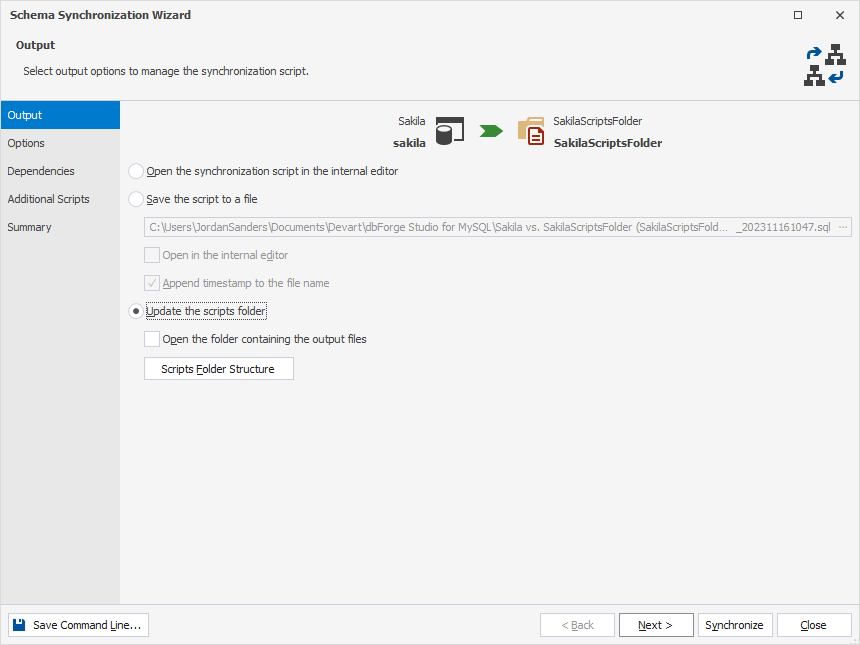
Synchronizing the project with a scripts folder
To compare the project with a database scripts folder:
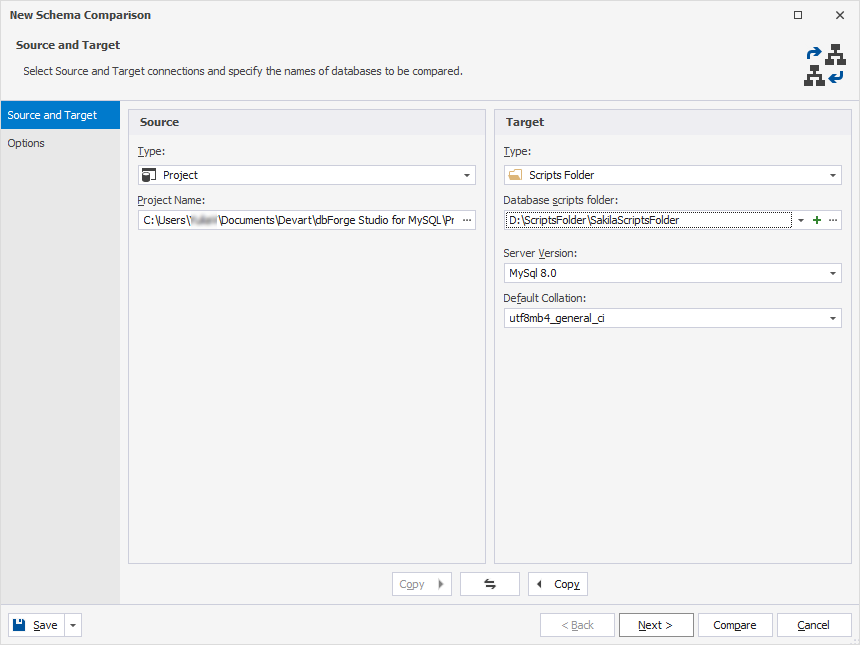
1. In Project Explorer, right-click the project you want to compare and select New Schema Comparison.
Alternatively, go to the Comparison menu and select New Schema Comparison. In the wizard that opens,
select the project as a source type.
2. On the Source and Target page, select a scripts folder from the Target type dropdown list.
3. In the Database scripts folder field, specify the path to the scripts folder.
4. Optional: Select a server version and a default collation and click Next.
5. Optional: On the Options page, select options for schema comparison and click Compare.
6. In the Schema Comparison document, all objects to be synchronized are selected by default. Clear those you want to exclude from
synchronization and click Synchronize objects to the target database.
In the Schema Synchronization Wizard, select Update the scripts folder and click Synchronize.
Conclusion
Projects significantly simplify database development by organizing scripts into a logical and easily navigational structure.
The Projects feature provides offline database development with a set of useful functionalities, including syntax check and
MySQL code completion, refactoring, schema comparison and synchronization, etc. You can generate either a single SQL script file
or a batch script file for deployment to the server. You can also deploy specific changes to the project.
To sum it up, empower yourself with database projects as you develop databases and feel the difference.