Dynamics 365 is an AI-powered platform from Microsoft that provides a comprehensive suite of services for managing sales, customer service, finance, marketing, and operations. This unified solution consolidates data, automates repetitive business processes, and improves customer engagement. Its ERP and CRM applications integrate smoothly with existing systems and serve as a central data source for various business applications.
When developing applications based on Dynamics 365, connectivity plays a crucial role. Applications must be able to connect to the data source easily and reliably, retrieve the necessary data, and perform data operations directly within the system. This need is effectively addressed by dotConnect for Dynamics 365, a robust data provider that enables direct connections and supports all necessary data operations.
This article explores different methods of connecting to Dynamics 365 from .NET applications.
Why dotConnect for Dynamics 365?
Easy integration with Dynamics 365
dotConnect efficiently resolves the connectivity challenges, allowing .NET applications to work with Dynamics 365 entities directly.
Interactive OAuth token generation
Support for Interactive OAuth authentication allows you to generate access and refresh tokens via a browser-based login flow.
User-friendly ADO.NET classes
Using familiar ADO.NET classes enables developers to work with Dynamics 365 data according to standard .NET patterns.
Advanced ORM support
The provider is fully compatible with EF Core, Dapper, NHibernate, and other ORM technologies for flexible data access in .NET applications.
Full ADO.NET compliance
The latest ADO.NET specifications ensure reliable integration with .NET frameworks and consistent behavior in enterprise applications.
Support & frequent updates
Priority technical support, full documentation, and product updates grant reliability and compatibility with Dynamics 365 and .NET.
Download and activate dotConnect for Dynamics 365
You can start using dotConnect for Dynamics 365 immediately with a 30-day free trial. Choose one of the following installation options:
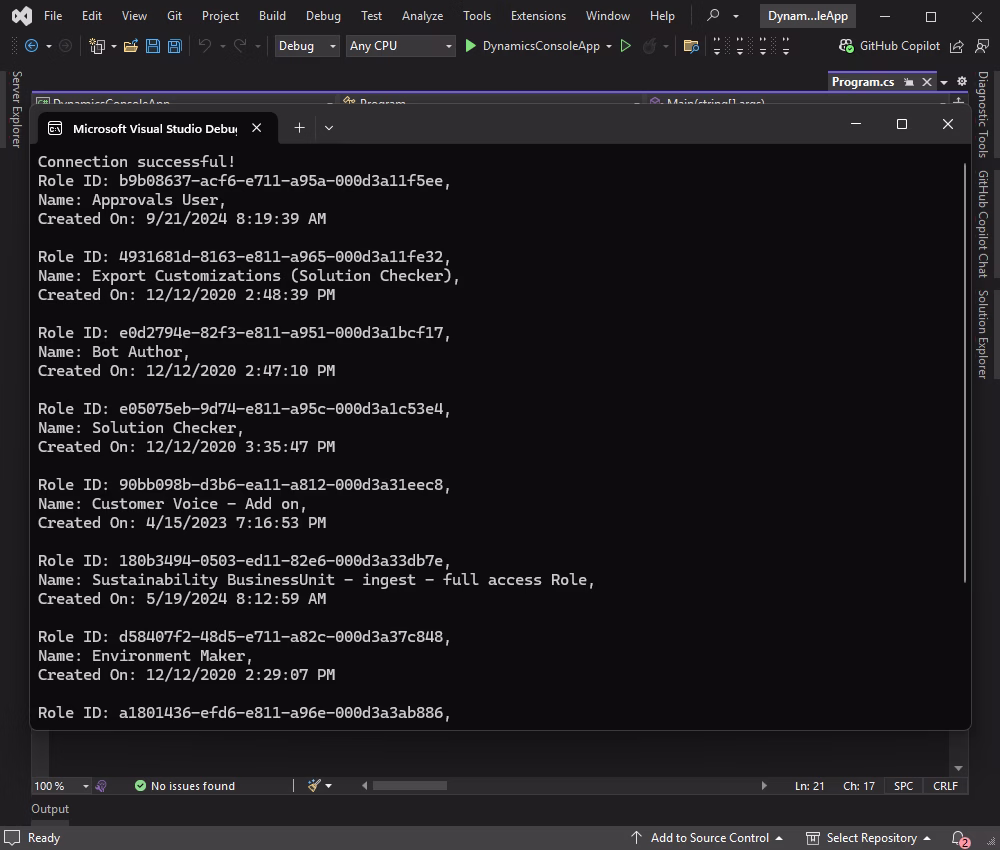
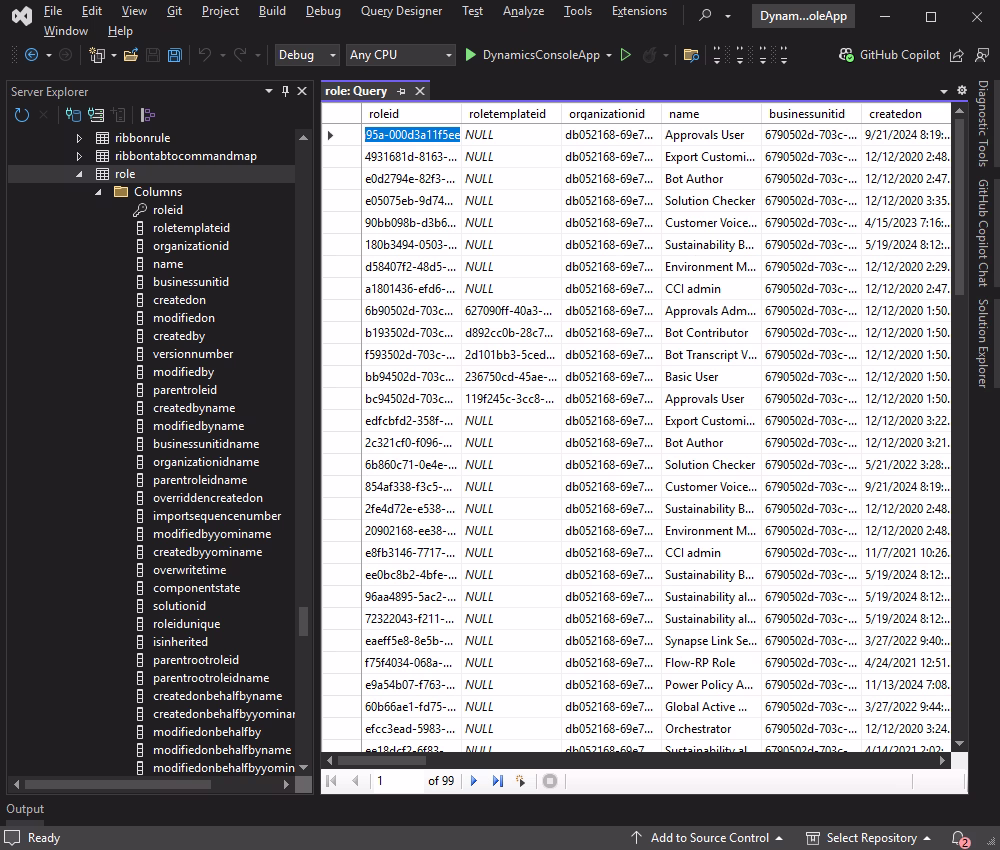
When the connection is established, your application successfully retrieves the first eight rows from the role table and displays them in the console.
The connection string in this code is the string containing the information necessary to establish a successful connection to Dynamics 365. The following table lists the valid names for values within the Dynamics 365 connection strings.
Name
Description
Authentication Type
The authentication method to use. The supported types are RefreshToken, RefreshTokenInteractive, and UsernamePassword. For more information, refer to AuthenticationType.
Server
The login URL to Dynamics CRM service.
User Id
The Dynamics CRM login account that is required for UserNamePassword authentication.
Password
The password for UserNamePassword authentication.
Client Id
One part of the OAuth 2.0 credentials pair obtained when the OAuth 2.0 application is registered in the Azure AD tenant.
Client Secret
The second part of the OAuth 2.0 credentials pair obtained when the OAuth 2.0 application is registered in the Azure AD tenant.
Refresh Token
OAuth 2.0 refresh token for the RefreshToken authentication.
License Key
The license key that should be specified in the connection string.
For the full list of all connection string parameters, refer to the detailed guideline.
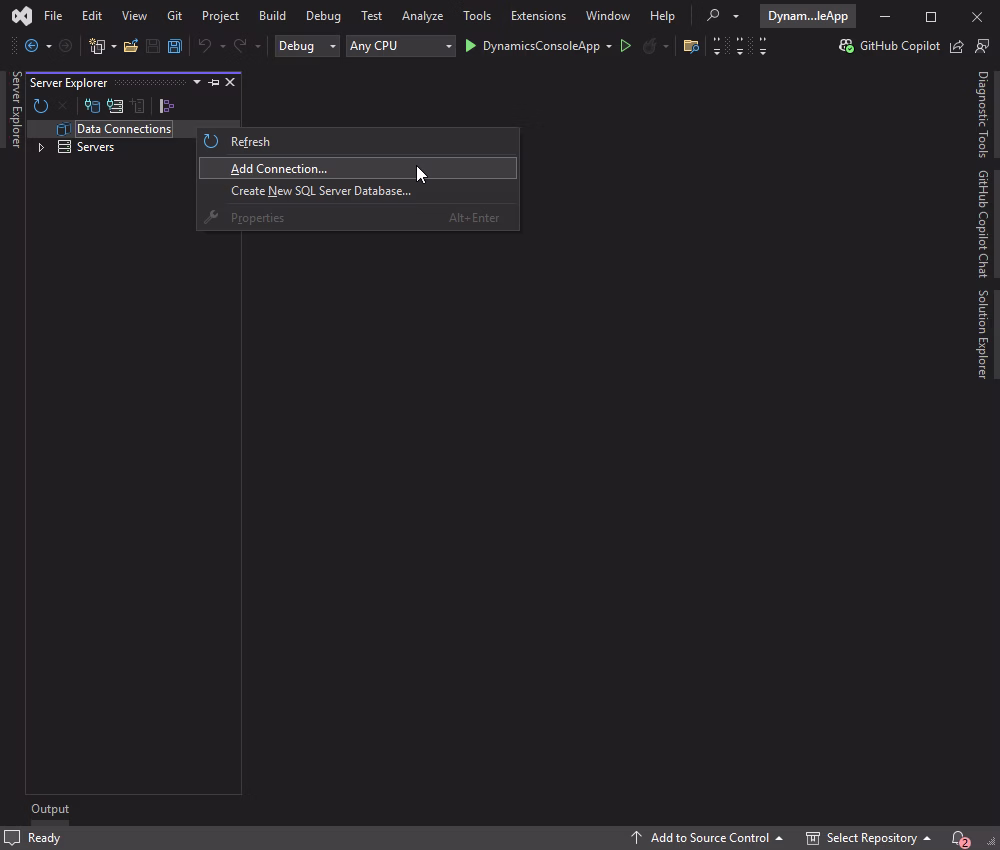
Connect using Server Explorer
You can connect to your Dynamics 365 data using the Server Explorer. Right-click Data Connections and select Add Connection from the context menu.
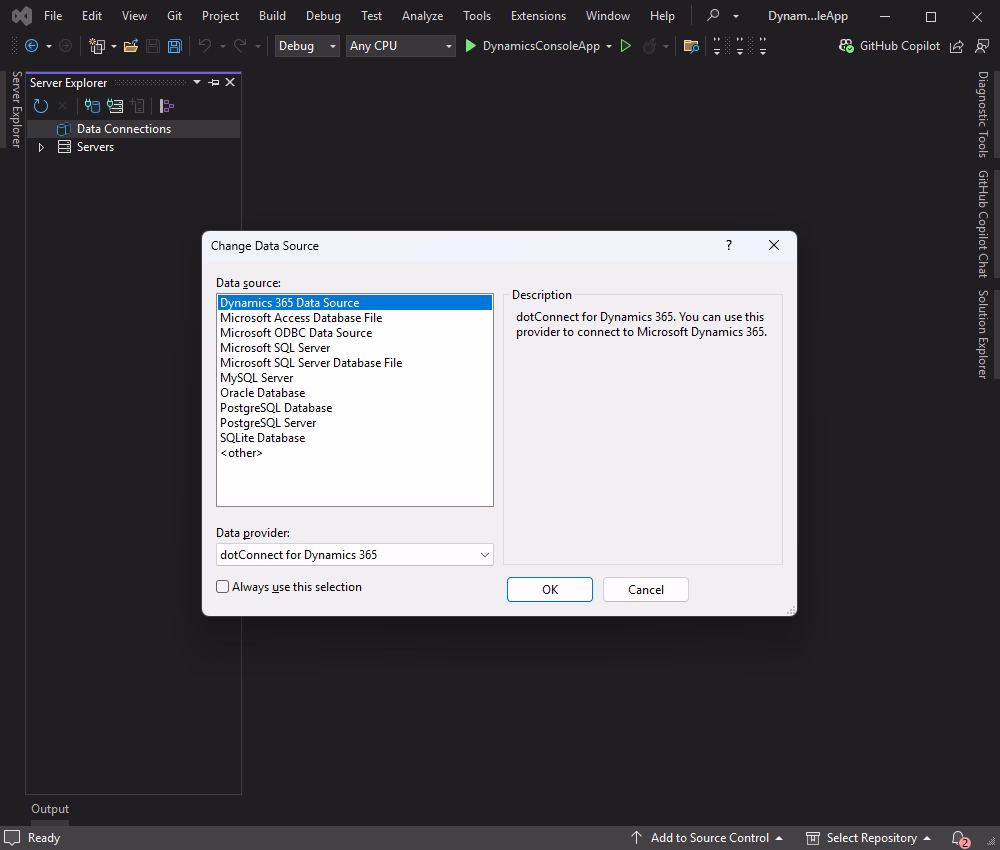
It opens the Change Data Source dialog. Select dotConnect for Dynamics 365 from the list of installed data providers.
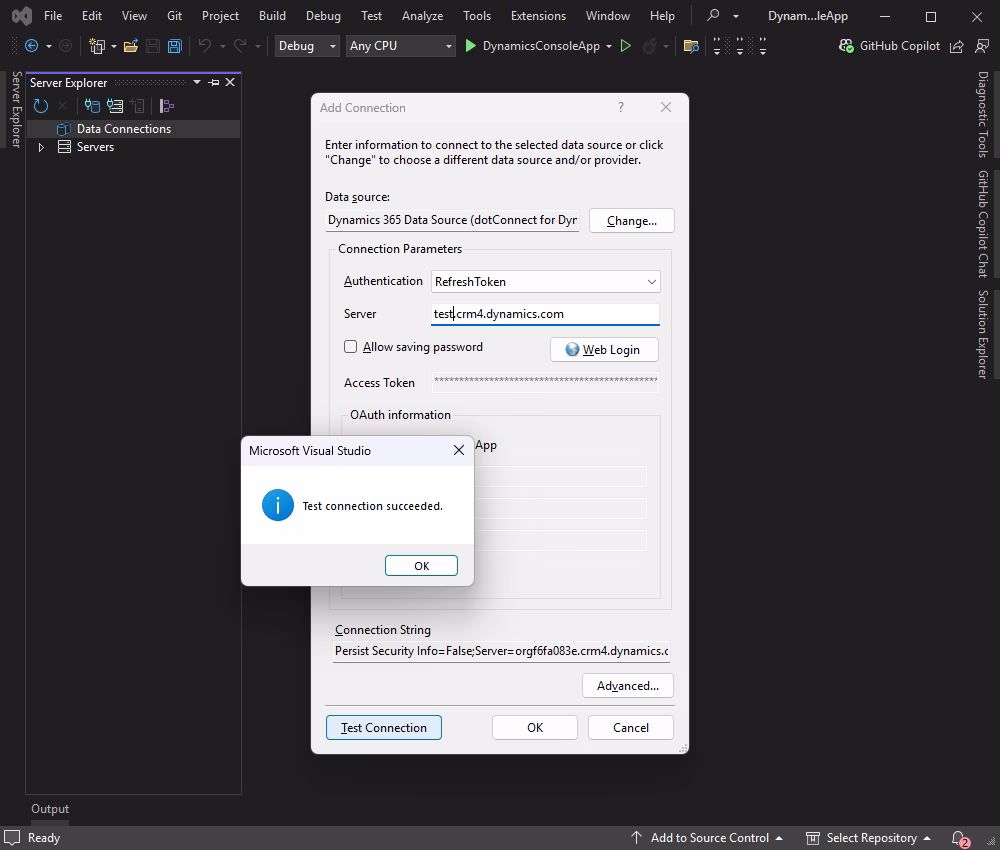
Fill in the connection properties and click Test Connection to verify the settings. You can connect to Dynamics 365.
After connecting, expand the newly-created data connection in the Server Explorer and view the data source structure, including all tables and table columns.
To view the data from some particular table, right-click it and select Retrieve Data from Table. This action opens a new query window with a SELECT statement to fetch the data from the table.
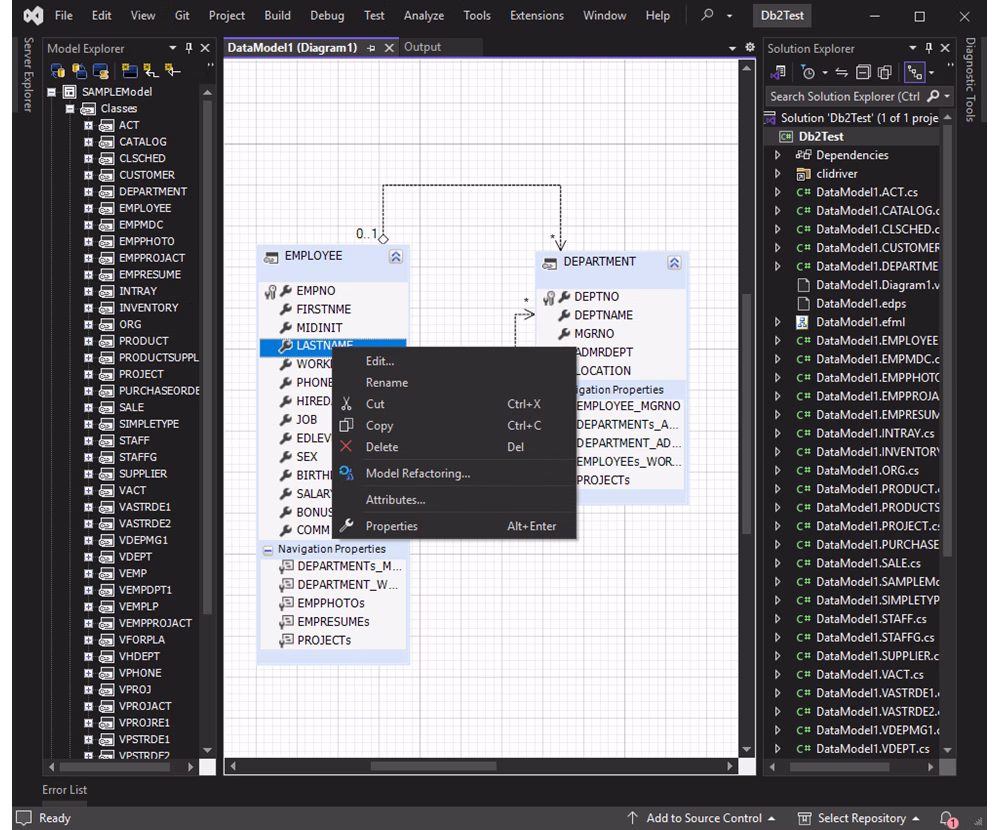
Connect with EF Core using Entity Developer
Entity Developer is a powerful visual ORM builder that enables developers to create EF Core models from Dynamics 365. If you don't have it already installed, close your Visual Studio instance, download Entity Developer, and install it following the on-screen instructions.
After that, follow the detailed illustrated guide to create your database model using Entity Developer. When this process is complete, the model you created opens for you to view it and start working with it.
Connect with EF Core using Scaffold-DbContext
Another method of connecting to Dynamics 365 involves using Entity Framework Core (EF Core) and the Scaffold-DbContext command. Here, we will generate the necessary EF Core model classes and DbContext based on the existing database schema.
First of all, we need to install the required NuGet packages via the Solution Explorer in Visual Studio and the Manage NuGet Packages options:
Open the Package Manager Console: Tools > NuGet Package Manager > Package Manager Console.
Run the following command to scaffold the DbContext and entity classes from your data source. Ensure to replace the connection string with your actual connection details.
Notice that the -OutputDir Models parameter specifies the output directory to store the generated model classes (in this case, it is Models). After running the scaffold command, EF Core will generate the DbContext class and entity classes in the specified output directory.
Review the generated code and check how it matches your database schema.
Conclusion
Dynamics 365 is a popular platform for data-driven business applications, and integrating it into your work environment is a common task for many organizations where ensuring stable connectivity between the database and the application is crucial. dotConnect for Dynamics 365 effectively resolves all challenges, allowing developers to connect directly to the data source and utilize it in their applications.
You can explore dotConnect for Dynamics 365 with a fully functional 30-day free trial. Experience its benefits firsthand and see how it can improve your daily workflows.
FAQ
How do you install and activate dotConnect for Dynamics 365 in a .NET project?
Install dotConnect for Dynamics 365 using the Windows installer (EXE) or by adding the Devart.Data.Dynamics NuGet package to your .NET project. Then, obtain your Activation Key from your Devart Customer Portal and include it in the connection string via the License Key parameter.
How do you authenticate to Dynamics 365 using Interactive OAuth in dotConnect?
To authenticate using Interactive OAuth, set the connection string parameter: Authentication Type=AccessRefreshTokenInteractive. When DynamicsConnection opens, a browser window appears where you sign in to your Dynamics 365 account. After authentication, dotConnect automatically retrieves and manages the access and refresh tokens.
How do you create a connection to Dynamics 365 using dotConnect in C#?
Define a connection string that includes the URL of your Dynamics 365 organization and the License Key, along with the authentication parameters. Then create a DynamicsConnection instance and call Open() inside a TRY-CATCH block to establish and validate the connection.
Can you access Dynamics 365 data using standard SQL queries with dotConnect?
Yes, dotConnect allows you to query Dynamics 365 entities using standard SQL syntax, eliminating the need to work directly with the Dynamics Web API. This makes retrieving and manipulating data more convenient for .NET developers.
Can you connect to Dynamics 365 using Entity Framework Core and dotConnect?
Yes, you can use Entity Developer to visually create an EF Core model based on Dynamics 365 entities, or run Scaffold-DbContext with the Devart.Data.Dynamics.EFCore package and a dotConnect connection string (including License Key) to generate the DbContext and entity classes.
Is it possible to explore Dynamics 365 data using Visual Studio Server Explorer with dotConnect?
Yes, you can use Visual Studio Server Explorer for that. Add a new Data Connection, choose dotConnect for Dynamics 365 as the provider, configure authentication, test the connection, and browse Dynamics 365 entities directly from the IDE.
I'm a technical content writer who loves breaking complex tech topics into clear and helpful content
that's enjoyable to read. With a solid writing background and growing skill in software development and
database tools, I create content that's accurate, easy to follow, and genuinely useful. When I'm not
writing, you'll probably find me learning something new or sweating it out at the gym.