Installing PostgreSQL on Linux:
A Step-by-Step Guide
Learn how to install PostgreSQL on Linux using apt and yum repositories, allow remote connections, uninstall, update, and efficiently
manage PostgreSQL on Linux both via CLI and a specialized GUI tool.
Linux and PostgreSQL make a powerful combination for database management, offering stability, flexibility, and performance. Linux's open-source nature and robust support for scaling make it an ideal platform for running PostgreSQL, whether for small applications or large-scale enterprise solutions. This article walks you through installing PostgreSQL on Linux, configuring remote access, and managing your databases with both command-line tools and dbForge Studio for PostgreSQL, a user-friendly GUI that streamlines common database tasks.
TL;DR
PostgreSQL can be installed on Linux using apt or yum repositories, with options for configuring remote connections and managing databases through CLI or GUI tools. After installation, you can use PostgreSQL's built-in tools or dbForge Studio for PostgreSQL to simplify tasks like schema comparison, data import/export, and cross-platform database management, making it easier for developers and administrators to work with PostgreSQL efficiently.
About Linux
Linux is an open-source operating system that has become increasingly popular for software development in recent years. Let us find out why.
Open-Source Ecosystem
Linux is an open-source operating system, which allows developers to access and modify the source code of the operating system, providing greater flexibility and control over the development process.
Cost-effectiveness
Since Linux is open source, it is free to use, which can save businesses and organizations a significant amount of money compared to proprietary operating systems.
Community Support
The open-source nature of Linux means that it has a large community of developers and users who can offer support, answer questions, and provide resources and tools to help with software development. This collaborative approach helps to ensure that the operating system is constantly evolving and improving, providing a stable and reliable platform for software development.
Scalability and Performance
Linux is known for its stability and reliability, making it a good choice for demanding applications, such as large-scale software systems. The open-source nature of the operating system also means that it can be easily modified and optimized for specific requirements, making it easier to scale and improve performance.
Security
Linux is a secure operating system that provides a secure environment for storing and managing sensitive data. The open-source nature of the operating system also makes it easier to identify and fix security vulnerabilities, helping to ensure the safety of the data.
Innovation
Linux is at the forefront of innovation in the tech industry, with many new technologies and features being developed and integrated into the operating system. This makes it an exciting platform for developers and users who want to stay on the cutting edge of technology.
Certain Relational Database Management Systems, that play a crucial role in many software applications, especially those that require handling large amounts of data, are even reported to perform better on Linux, than macOS and Windows. PostgreSQL is one of them.
About PostgreSQL
PostgreSQL, also known as Postgres, is a powerful open-source relational database management system (RDBMS) that can run on various operating systems, including Windows, Linux, macOS, FreeBSD, etc. It is known for its reliability, stability, and security, which makes it a popular choice for many businesses and organizations.
PostgreSQL is capable of handling large amounts of data, complex transactions, and multi-user environments, making it suitable for various purposes such as web development, data warehousing, and business intelligence.
When used on Linux, PostgreSQL leverages the security and stability features of the operating system to provide a robust database solution. PostgreSQL is easily installed and configured through the package management system of the Linux distribution, and it can be managed through a web-based interface, a command-line interface, or through integrated tools such as pgAdmin.
About Linux
Linux is a free, open-source operating system that was first introduced in 1991 by Linus Torvalds. It is based on the Unix and has become one of the most widely used operating systems in the world, powering everything from smartphones and personal computers to supercomputers and data centers.
One of the key advantages of Linux is its open-source nature, which means that the source code is freely available for anyone to use, modify, and distribute. This has led to a large community of developers and users who collaborate on improving and enhancing the operating system.
Another advantage of Linux is its stability and reliability. The operating system is designed to run smoothly and efficiently even under heavy loads, and it is less prone to crashes and other issues compared to other operating systems.
There are many different Linux distributions, or "distros," that cater to different needs and user preferences. PostgreSQL can be installed on a variety of them, including:
Ubuntu
Fedora
CentOS
Debian
Red Hat Enterprise Linux (RHEL)
SUSE Linux Enterprise Server (SLES)
Arch Linux
Gentoo
Mint
openSUSE
These are some of the most widely used Linux distributions, but PostgreSQL can be installed on many others as well. The installation process usually involves using the package manager of the particular Linux distribution, such as apt or yum, to download and install the PostgreSQL package.
Prerequisites for installing PostgreSQL on Linux
To install PostgreSQL on Linux, you will need the following:
Stable Internet connection
A system running a Linux distribution
An account with sudo privileges
Access to the terminal
How to install PostgreSQL from the Apt repository
1 - Add the PostgreSQL Apt repository to your Linux distro
The PostgreSQL Apt Repository contains the latest versions of PostgreSQL, so you first need to add it to your system. For this run the following commands:
sudo sh -c 'echo "deb http://apt.postgresql.org/pub/repos/apt $(lsb_release-cs)-pgdg main" > /etc/apt/sources.list.d/pgdg.list'
You can skip Step 1 and install PostgreSQL from the default Linux repositories. Keep in mind that the version available in these repositories may not be the latest.
2 - Install PostgreSQL
To ensure your local package index is up-to-date for your current session, refresh it using the following command:
sudo apt update
Next, install both the PostgreSQL package and the contrib package, which provides additional utilities and features, using the following command:
sudo apt install postgresql postgresql-contrib
To verify that the PostgreSQL server is running, run the following command:
sudo systemctl start postgresql.service
To switch to the postgres account on your server, execute the following command:
sudo -i -u postgres
To access the PostgreSQL prompt, type:
psql
This will log you into the PostgreSQL prompt where you can interact with the database management system.
To view the PostgreSQL server version running, use the command:
psql -V
To exit the PostgreSQL prompt, type:
\q
This will bring you back to the postgres Linux command prompt.
How to install PostgreSQL from the Yum repository
1 - Add the PostgreSQL Yum repository to your Linux distro
To begin with, make sure your system is up-to-date:
sudo yum update
Then, install a repository configuration package using the official PostgreSQL repository for the desired Linux distro.
You can skip Step 1 and install PostgreSQL from the default Linux repositories. Keep in mind that the version available in these repositories may not be the newest. If you choose to bypass Step 1, make sure to update your Yum repository first by executing the following command: sudo yum update.
2 - Install PostgreSQL
To install the PostgreSQL server, use the following command:
sudo yum install postgresql14-server
Before you can use your Postgres databases, you need to create a new database cluster. It comprises a collection of databases that are managed by a single server instance. Create a new PostgreSQL database cluster with the following command:
sudo /usr/pgsql-14/bin/postgresql-14-setup initdb
Now you can start and enable PostgreSQL using the following commands:
To switch to the postgres account on your server, execute the following command:
sudo -i -u postgres
To access the PostgreSQL prompt, type:
psql
This will log you into the PostgreSQL prompt where you can interact with the database management system.
To view the PostgreSQL server version, use the command:
psql -V
To exit the PostgreSQL prompt, type:
\q
This will bring you back to the postgres Linux command prompt.
Connect to a PostgreSQL database
To connect to a PostgreSQL database on Linux, you need to follow the steps below:
1. Install the PostgreSQL client on your Linux system, if it's not already installed. The command for this will depend on the distribution you're using. For example, on Ubuntu/Debian, you can run:
sudo apt-get install postgresql-client
On CentOS/Red Hat, you can run:
sudo yum install postgresql
2. Connect to the database using the psql command. You need to specify the database name, username, and host name of the PostgreSQL server:
You will be then prompted for the password for the specified username. After entering the password, you will be connected to the database and will see the PostgreSQL prompt.
After that, you can run SQL commands on the database. To exit the psql prompt, you can use the \q command.
Connect to PostgreSQL using a GUI client
Let us now look at how you can connect to a remote PostgreSQL server on Linux using a GUI client. For demonstration purposes, we will use dbForge Studio for PostgreSQL – a top-rated and feature-rich PostgreSQL GUI client for developing, managing, and administering PostgreSQL databases. The Studio is genuinely a Windows application; however, it can be run on Linux and macOS via the solution called CrossOver.
1 - Allow remote connections to the PostgreSQL server residing on Linux
To configure Postgres for external connections, follow these steps:
1. Open the PostgreSQL configuration file:
sudo nano /etc/postgresql/10/main/postgresql.conf
Note
The location of the configuration file may vary depending on the Linux distribution you are using
Then, install a repository configuration package using the official PostgreSQL repository for the desired Linux distro.
2. Find the following line:
#listen_addresses = 'localhost'
3. Uncomment it and change the value to '*', allowing connections from any IP address:
listen_addresses = '*'
4. Save and close the file.
5. Next, modify the pg_hba.conf file to also allow connections from everyone. Open the file:
sudo nano /etc/postgresql/10/main/pg_hba.conf
Note
The location of the configuration file may vary depending on the Linux distribution you are using.
6. Modify the following section:
# IPv4 local connections: host all all 127.0.0.1/32 md5
to this:
# IPv4 local connections: host all all 0.0.0.0/0 md5
This file stores the client authentication, with each record specifying an IP address range, database name, username, and authentication method. By granting all database users access to all databases with any IP address range, you are allowing connections from any IP address.
7. Save and close the file.
8. Allow port 5432 through the firewall by executing:
sudo ufw allow 5432/tcp
9. Finally, restart PostgreSQL server to apply all the changes:
sudo systemctl restart postgresql
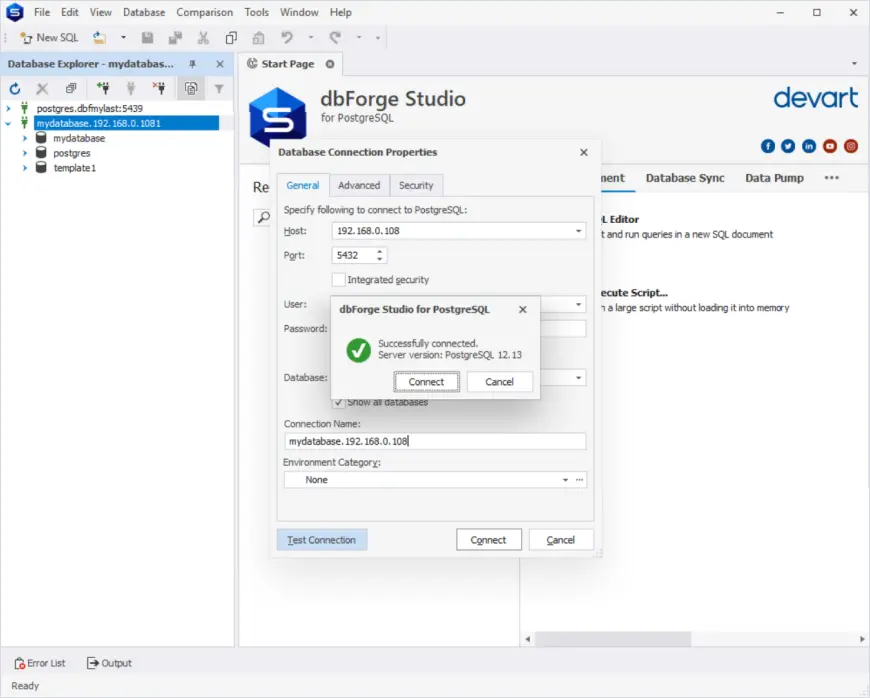
2 - Connect to a remote PostgreSQL server on Linux from dbForge Studio for PostgreSQL
1. On the Database menu, select New Connection.
2. On the Database Connection Properties> General tab, specify the connection details:
Host: Provide the host name
Port: Provide the port number
User and Password: Enter respective user credentials. By default, the password is saved automatically. If you don’t want to save the password, clear the Allow saving password checkbox.
Database: Enter the name of a PostgreSQL database you want to connect to or select it from the drop-down list.
Optional: Connection Name: The connection name is generated automatically from the host name. If you want to create a distinctive name for the connection, type the new name.
Click Test Connection to verify the connection details you have provided. Click Connect to connect to a PostgreSQL server.
Need a reliable solution to manage your PostgreSQL databases?
Get the most comprehensive PostgreSQL IDE - dbForge Studio for PostgreSQL
dbForge Studio for PostgreSQL is like a superhero for your databases on Linux! It's got all the tools you need to manage your data loads with ease. Some of the benefits are:
Advanced SQL editor
The Studio has a highly advanced SQL editor that supports syntax highlighting, code completion, and SQL formatting. This makes it easy to write and execute complex SQL scripts with ease.
User-friendly interface
The Studio's user-friendly interface simplifies database tasks for users of all levels of technical proficiency. The learning curve is notably low since the tool's interface is designed to resemble popular developers' tools.
Data Reporting
The Studio comes with an effective tool for generating customized reports based on your data. It allows you to create reports using a visual report designer, with a variety of tools and options for customizing the look and feel of your reports. With this feature, you can easily create reports that highlight key insights and trends in your data, enabling you to make well-informed decisions and grasp a comprehensive understanding of your data.
Pivot Table
dbForge Studio contains a valuable tool for data analysis and visualization. It allows you to transform complex data sets into easy-to-understand summaries, making it easy to identify patterns, trends, and insights. With this feature, you can quickly create pivot tables and charts based on your data, helping you to make informed decisions and gain a better understanding of your data.
Data & Schema Compare
The Studio is a game-changer for database management. It enables you to effortlessly compare your PostgreSQL schemas and data, spot discrepancies with lightning speed, and deploy the desired changes with ease.
Object management
The tool provides comprehensive support for database object management, including the ability to create, modify, and delete tables, views, procedures, functions, and more.
Data Import/Export
dbForge Studio for PostgreSQL boasts a convenient Data Import/Export feature that streamlines the process of moving data between databases. With a simple and user-friendly interface, you can easily import data from a variety of sources, including CSV, Excel, and SQL files, and export PostgreSQL database data to the format of your choice.
Data Generator
With dbForge Studio for PostgreSQL, you can quickly and easily generate test data for your databases. It supports a wide range of data types, including integers, strings, dates, and more, and provides a flexible and intuitive interface for populating databases with the most accurate synthetic data based on your specific requirements.
Support for cloud connections
dbForge Studio for PostgreSQL supports cloud PostgreSQL connections, allowing users to connect to PostgreSQL databases hosted in the cloud. This makes it possible for developers and database administrators to manage their PostgreSQL databases and execute queries on cloud-hosted data. With dbForge Studio for PostgreSQL, users can connect to their cloud PostgreSQL instances, view and edit data, manage database objects, and execute queries, just as they would with a locally installed database.
Cross-platform compatibility
The tool is compatible with multiple platforms, including Linux, which makes it a flexible solution for managing your databases, regardless of the operating system you are using. The Studio is primarily a Windows application; however, it can also be run on Linux and macOS systems using a compatibility layer software known as CrossOver by Codeweavers. CrossOver allows Windows applications to run on non-Windows operating systems without the need for a virtual machine.
How to uninstall PostgreSQL on Linux
Uninstall PostgreSQL on Linux distros that use the Apt package management system
To uninstall PostgreSQL on Linux, you can follow the steps below:
1. Stop the PostgreSQL server: If the PostgreSQL server is running, you need to stop it before you can uninstall it. You can do this by using the following command:
sudo systemctl stop postgresql
2. Remove the PostgreSQL packages: The next step is to remove the PostgreSQL packages from your system. You can do this by using the following command:
sudo apt-get remove postgresql postgresql-contrib
3. Remove the data directory: By default, PostgreSQL stores its data in the /var/lib/postgresql/ directory. After you have removed the packages, you need to remove the data directory as well. You can do this by using the following command:
sudo rm -r /var/lib/postgresql/
4. Remove other related files: Finally, you should also remove any other related files, such as configuration files and log files that may still be on your system. You can do this by using the following command:
sudo rm -r /etc/postgresql/
Note
The above steps may vary depending on the version of Linux you are using and the method you used to install PostgreSQL. Please consult the official PostgreSQL documentation for more information.
Uninstall PostgreSQL on Linux distros that use the Yum package management system
To uninstall PostgreSQL from a Linux system that uses the Yum package manager, you can use the following command:
sudo yum remove postgresql
This will remove the PostgreSQL package and any related dependencies from your system. If you want to also remove the configuration files and data directory, you can use the following command:
sudo yum remove postgresql\*
Note
The \* at the end of the command is used to match all packages that start with the name "postgresql".