Data import and export tools for SQL Server
Data import and export are common tasks in data and database management operations. Developers and database administrators need to sync database structures during migration and automate data transfer between systems. Managers and analysts require efficient ways to load data from various sources and export results in standard formats. All of them need smart and flexible tools to do it with minimum effort.
SQL Server Import and Export Wizard: What it is and when to use it
If we're talking about data import and export within the Microsoft SQL Server ecosystem, the first thing that comes to mind is SQL Server Import and Export Wizard, a graphical utility for transferring data between different data sources and destinations. It is commonly accessed through tools such as SQL Server Management Studio (SSMS) or SQL Server Data Tools (SSDT). The wizard guides you through selecting a source and a destination, choosing the data to transfer, mapping columns and data types, and running the transfer.
In practical terms, it is designed to make data migration and basic ETL tasks accessible without requiring you to write a custom script or build a full integration package. You can use it to import data from sources such as Excel files, CSV/text files, and other databases into SQL Server, or export SQL Server data to those destinations. It is particularly convenient for ad-hoc or one-off transfers, while more complex, recurring, or automated operations are usually better handled with SSIS or other ETL solutions.
This is where we'd like to introduce a much more flexible alternative that provides you with import and export wizards as part of a comprehensive IDE that works with SQL Server, Azure SQL Database, and related cloud services. It's called dbForge Studio for SQL Server, and it helps you do the following:
- Export data from SQL Server using 14 data formats
- Import data into SQL Server using 10 data formats
- Migrate data between heterogeneous servers through ODBC
- Use the import and export wizards to tailor the process to your preferences
- Create reusable import and export templates
- Automate regular operations from the command line
SQL Server Import and Export Wizard vs dbForge Studio
Both tools can handle common SQL import/export tasks, but they differ in the level of control and automation they offer. The following table compares their key capabilities.
| Need | SSMS SQL Server Import and Export Wizard | dbForge Studio for SQL Server |
|---|---|---|
| Basic data copying | Yes | Yes |
| Column mapping | Yes | Yes |
| Import modes | Basic copying | Append, Update, Append/Update, Delete, Repopulate |
| Preview before import | Yes | Yes |
| Error handling | Basic error reporting | Error handling with logging |
| Reusable templates | Limited | Yes |
| Command-line automation | Yes | Yes |
| Best for | One-off import/export tasks | One-off tasks, scheduled recurring tasks, handling of multiple formats, ODBC transfers, automated DevOps workflows |
Now, let's see how easy it is to export and import data in dbForge Studio.
Export data from a SQL Server database using the Data Export wizard
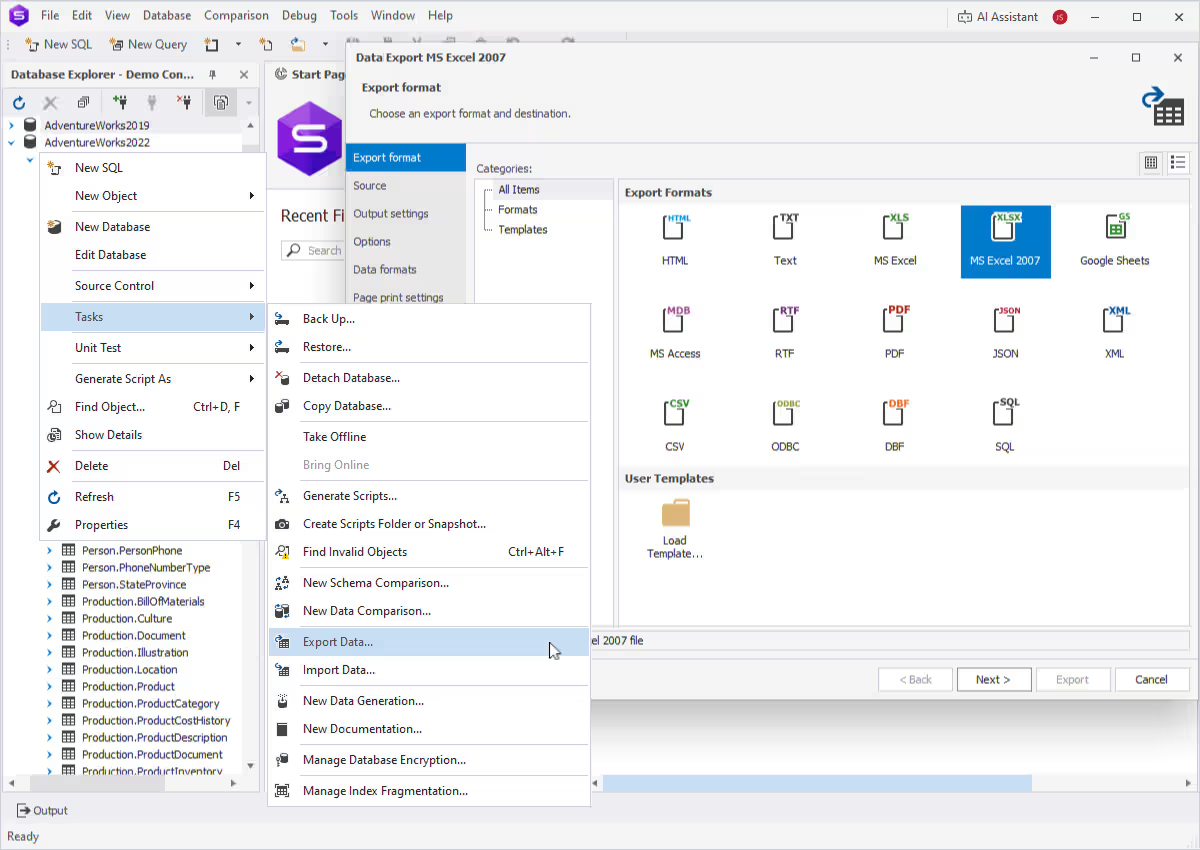
To export data in dbForge Studio, you need to open the Data Export wizard. There are several ways to do it.
- On the Start Page, select Data Pump > Export Data.
- In Database Explorer, right-click the required database or server connection and select Tasks > Export Data.
- In Database Explorer, right-click the required table or view and select Export Data.
- On the menu bar, select Database > Tasks > Export Data.
- In Data Editor, click the Data Export icon or right-click anywhere in the grid and select Export Data. You can export either the selected rows or the entire table.
Choose from the 14 supported export file formats
When the wizard opens, you start with choosing a format. You can export data to the following formats: HTML, TXT, XLS, XLSX, MDB, RTF, PDF, JSON, XML, CSV, ODBC, DBF, SQL, and Google Sheets.
Select data for export
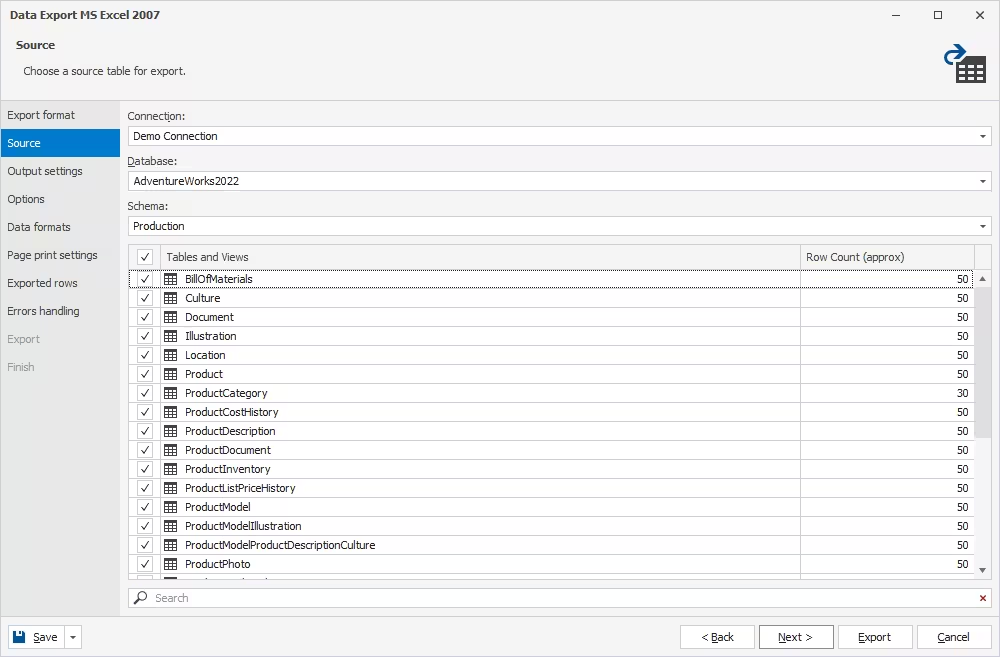
On the Source page, specify the SQL Server connection, database, table(s), and view(s) for export.
Configure export options
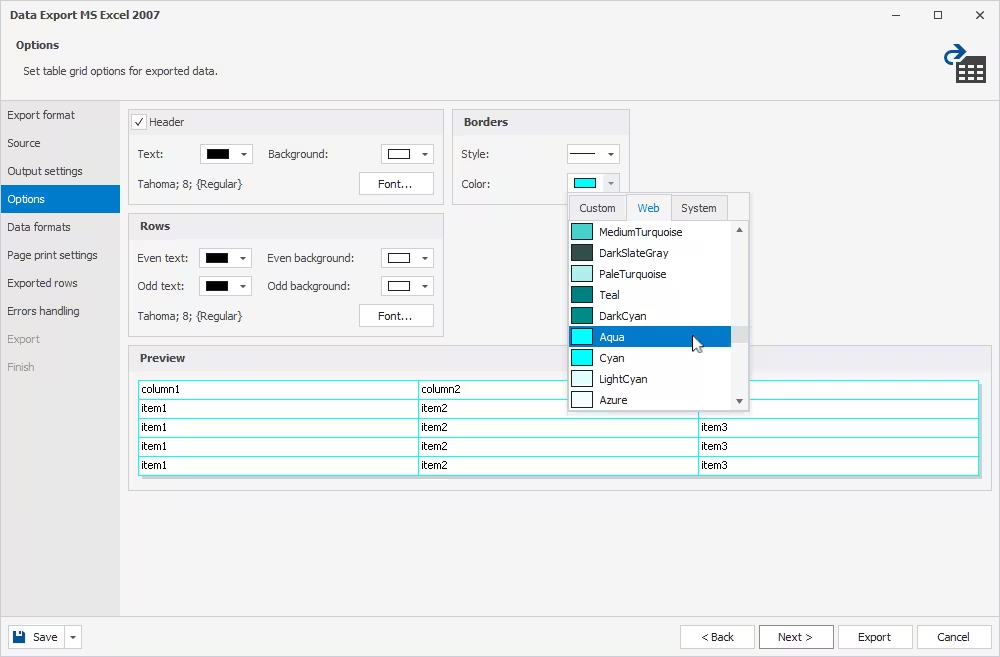
On the Options page, customize table grid options for exported data:
- Header text color and background
- Row text color and background
- Border width and color
In the Preview section, check the appearance of the exported dataset.
For your convenience, you can make odd and even rows look different.
Customize data formats
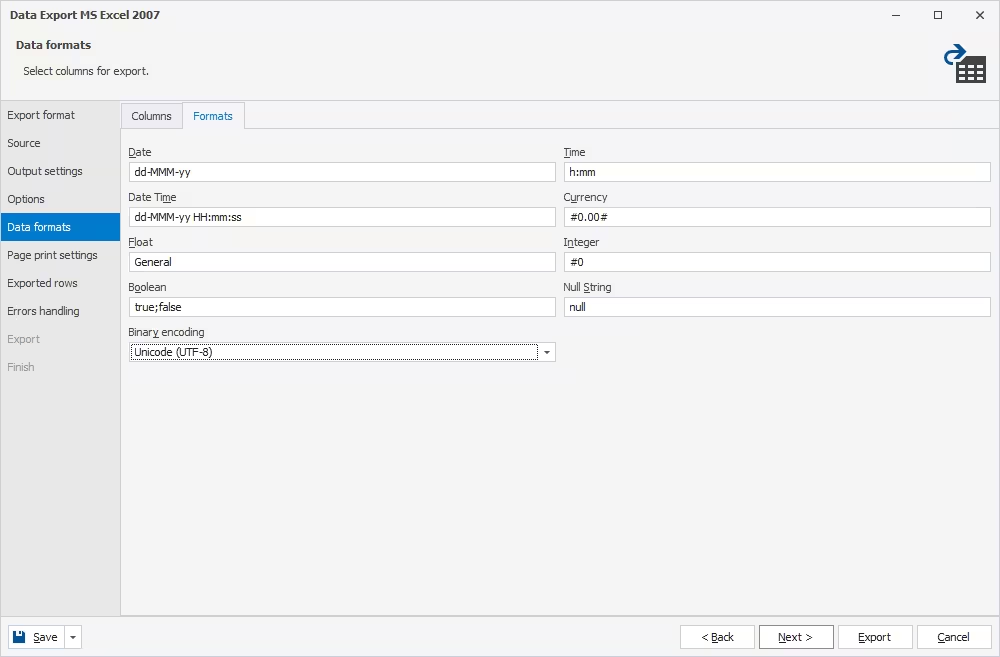
The Data formats page has two tabs. On the first one, which is called Columns, select the columns for export and check/edit their aliases and data types.
On the second one, which is called Formats, you can change the default format settings for Date, Time, Date Time, Currency, Float, Integer, Boolean, and Null String, as well as select the required binary encoding from the dropdown list.
Select rows for export
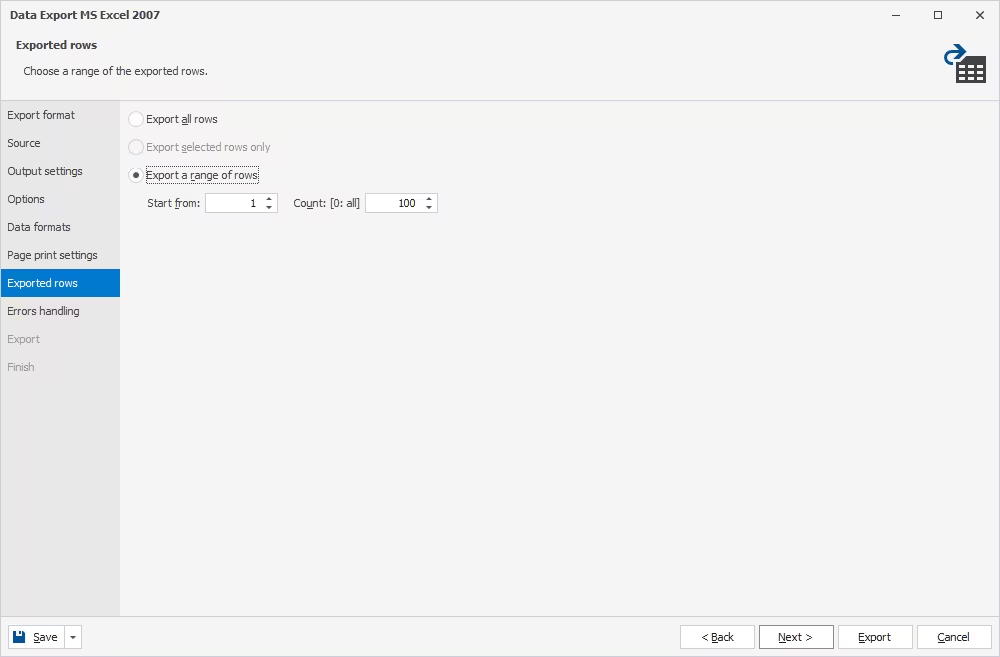
Another notable page is Exported rows. When there is no need to export the entire table, you can select to export all rows, selected rows only, or a range of rows.
Configure errors handling
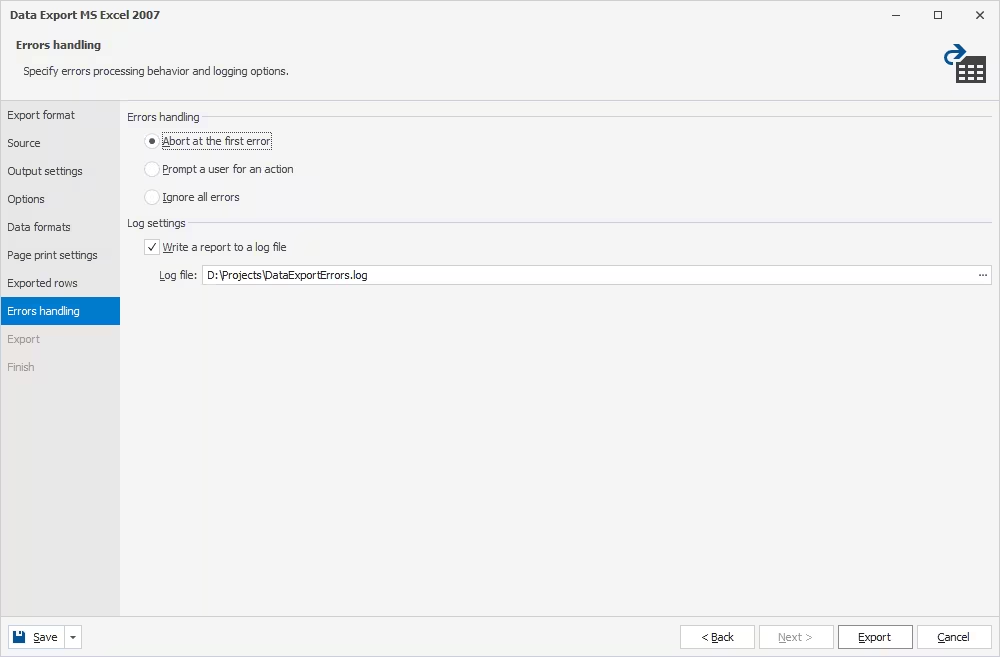
On the Errors handling page, configure how dbForge Studio should behave if it encounters an error during export. There are three possible options:
- Prompt you for an action
- Ignore all errors
- Abort at the first error
Also, you can select to create a log file with a report and set a path to it.
Complete the export
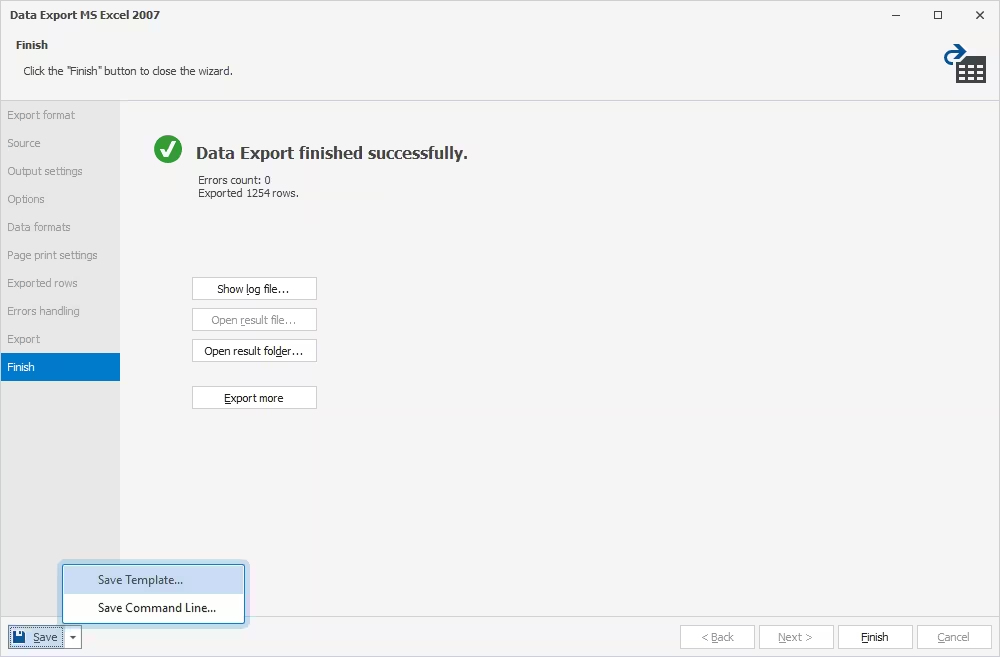
Once you configure all the required settings, click Export to start the operation. When your export is completed, on the Finish page, select one of the following actions:
- Show log file to open the log file
- Open result file to open the exported file
- Open result folder to open the folder containing the exported file
- Export more to start another export
Export data from the command line
dbForge Studio for SQL Server offers extensive automation options for regular SQL Server data export operations:
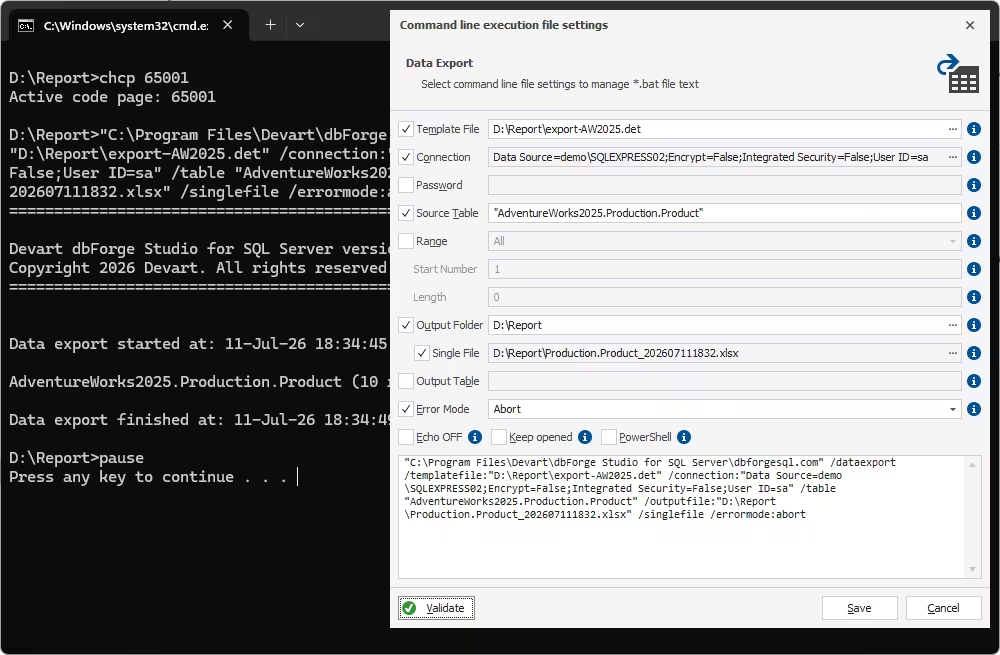
- Use the command line to automate exports
- Save data export settings as a command-line execution file (.bat) and run it whenever you need
- Schedule batch file execution via Windows Task Scheduler
Import data into a SQL Server database using the Data Import wizard
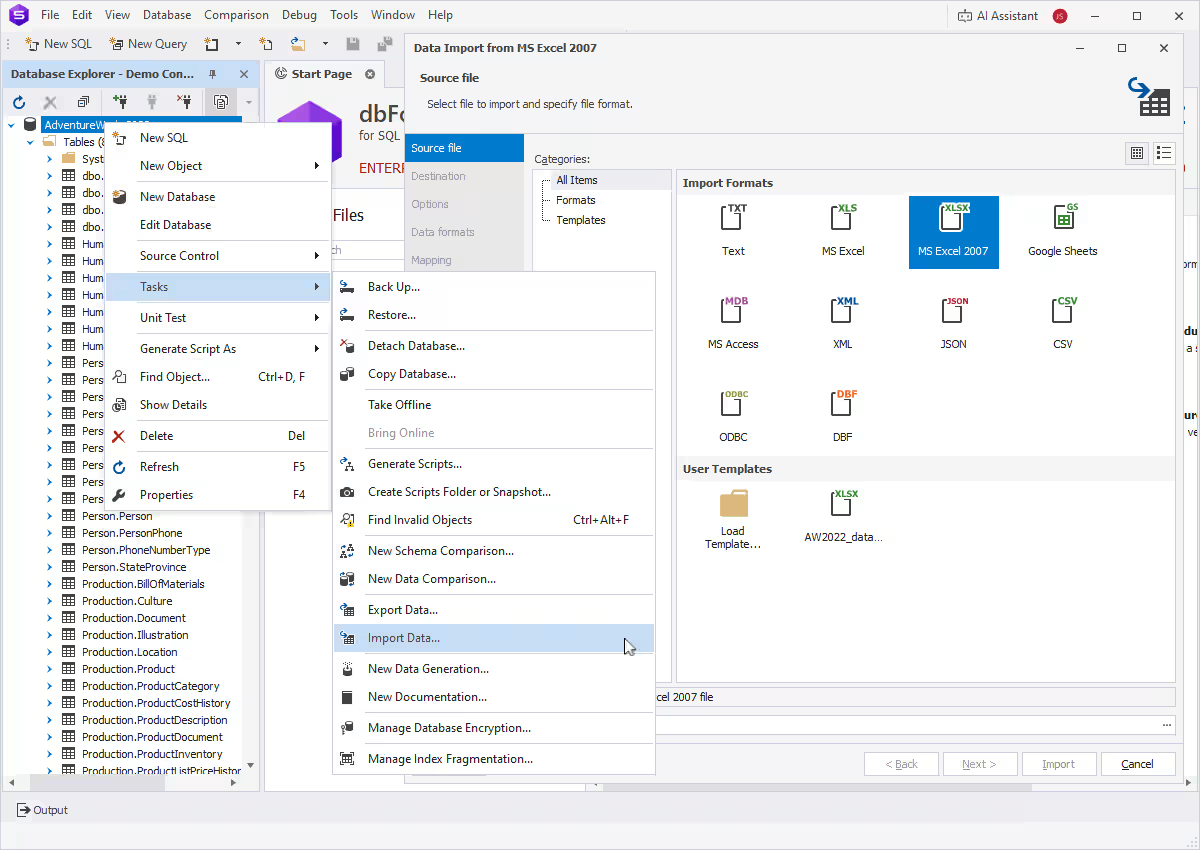
To import data in dbForge Studio, you need to open the Data Import wizard. There are several ways to do it.
- On the Start Page, select Data Pump > Import External Data.
- In Database Explorer, right-click the required database or server connection and select Tasks > Import Data.
- In Database Explorer, right-click the required table or view and select Import Data.
- On the menu bar, select Database > Tasks > Import Data.
Choose from the 10 supported SQL data import formats
When the wizard opens, you start with choosing a format. You can import data from the following formats: TXT, XLS, XLSX, MDB, JSON, XML, CSV, ODBC, DBF, and Google Sheets. There, you also select a file to import data from.
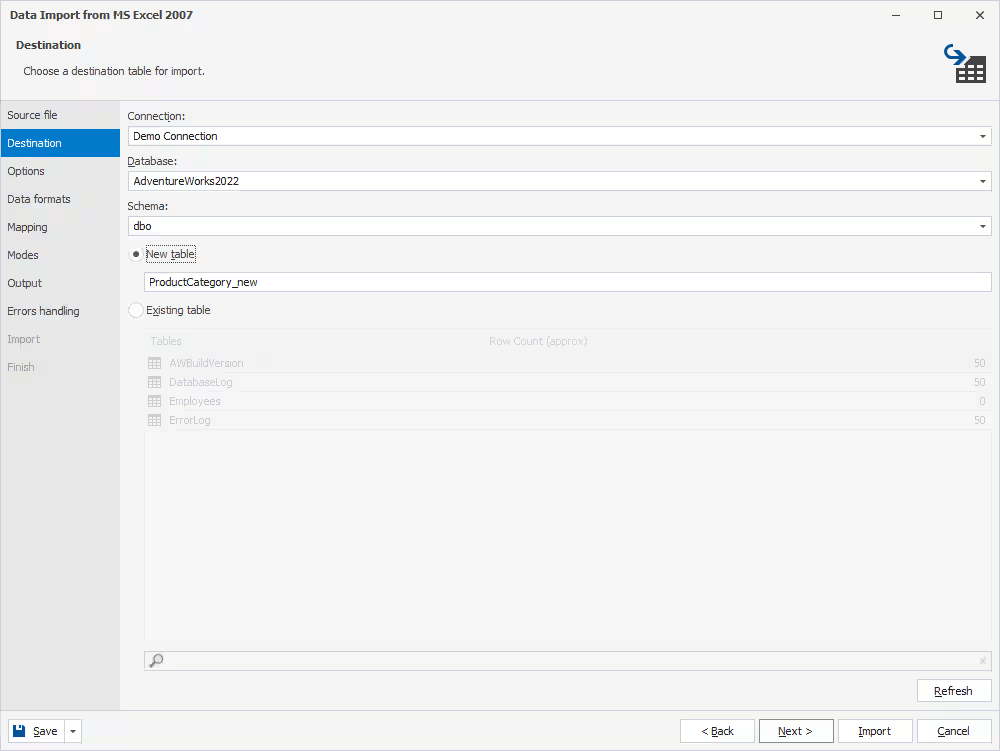
Import into a table
On the Destination page, select the destination for data import: namely, the SQL Server connection, database, schema, and a new or existing table.
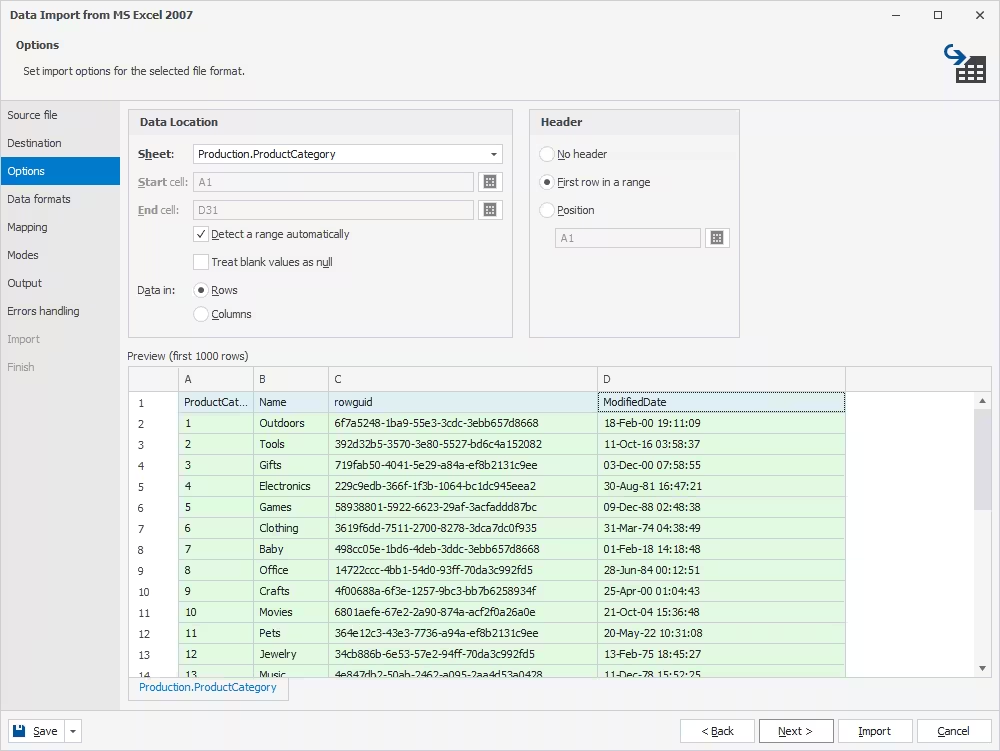
Set import options
Next comes the Options page, where custom settings depend on the selected format. In the Preview section, you can conveniently double-check your configurations.
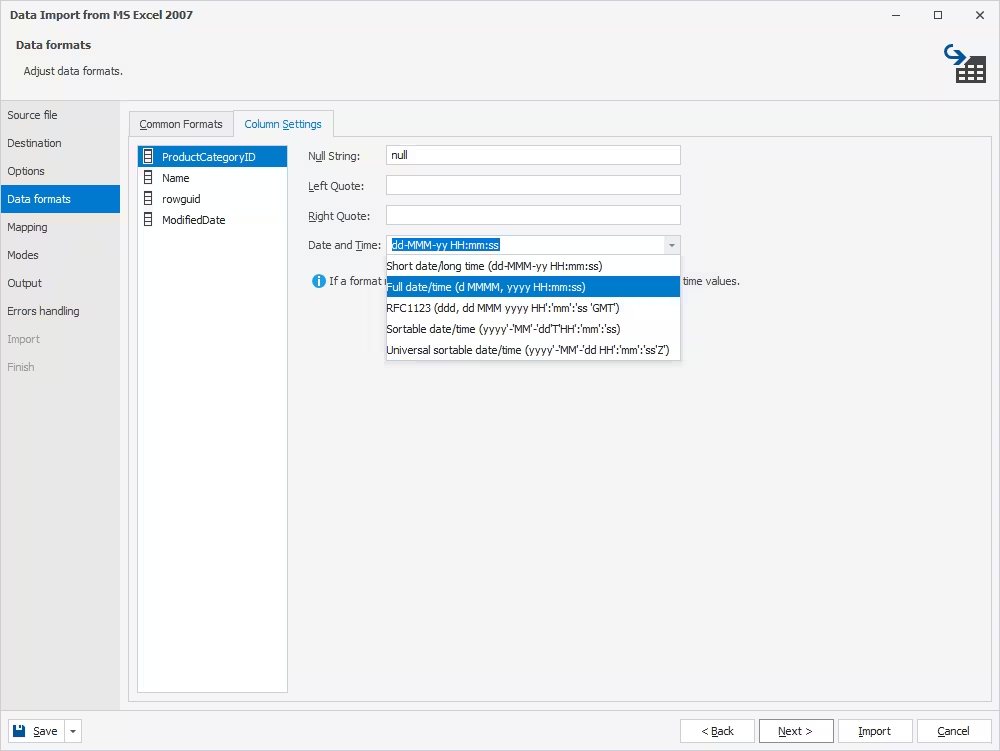
Configure data formats
The Data formats page has two tabs. On the first one, which is called Common Formats, you can change the default format settings for all columns:
- Null string
- Thousand separator
- Decimal separator
- Boolean
- Date and Time
On the second one, which is called Column Settings, you can specify format settings for each particular column.
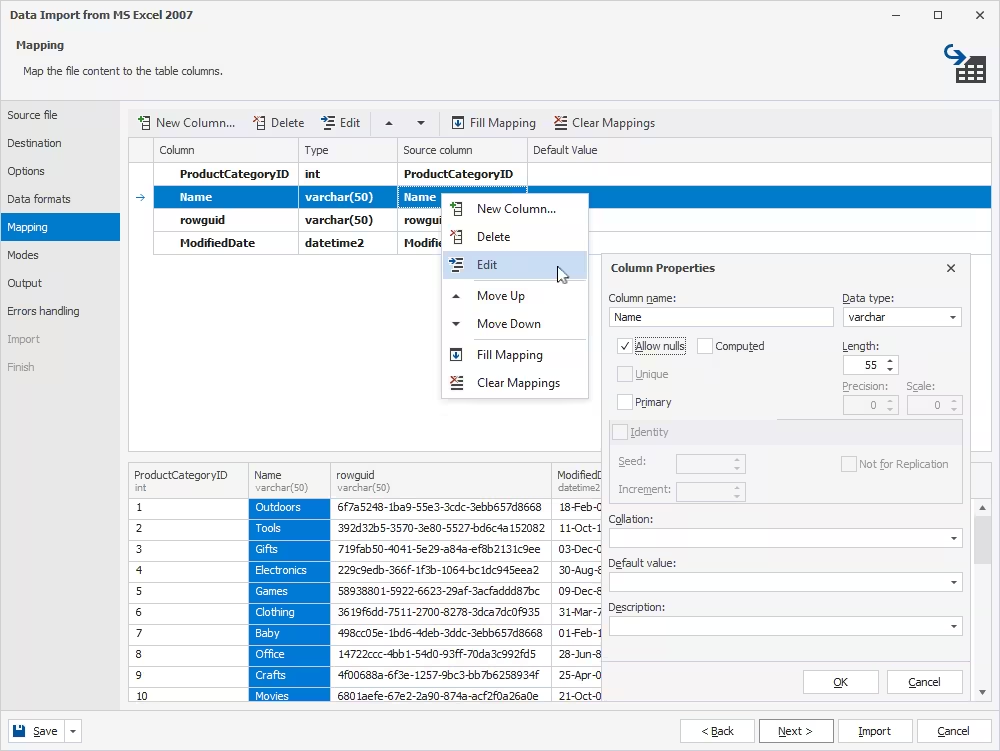
Configure mapping
Column mapping is one of the core features that enables cross-database support within a single schema.
When you import data into a new table, the Studio automatically creates and maps all the columns.
When you import data into an existing table, the columns with the same names are mapped automatically, while all the remaining columns must be mapped manually.
Choose a data import mode
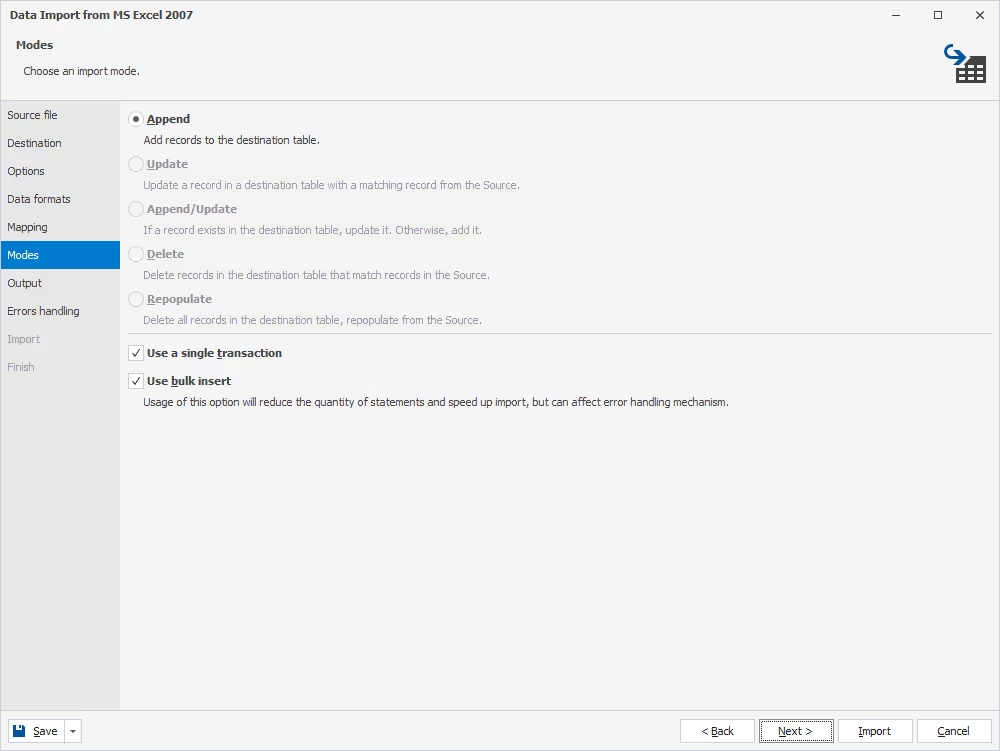
On the Modes page, choose the required data import mode:
- Append
- Update
- Append/Update
- Delete
- Repopulate
You can select to import data in a single transaction and/or in bulk.
Select output options
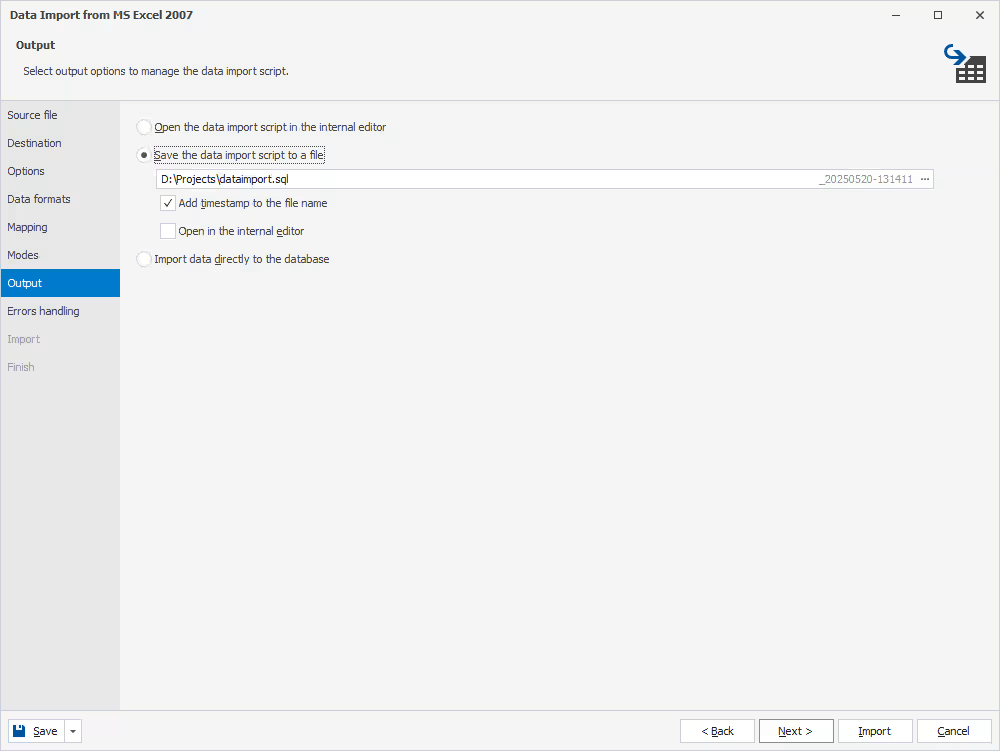
On the Output page, select one of the following options:
- Open the script in the internal editor
- Save the script to a file
- Import data directly to the database
If you select to save the script to a file, the Studio also allows adding a timestamp to the file name and selecting a folder to save your file to.
Manage import errors
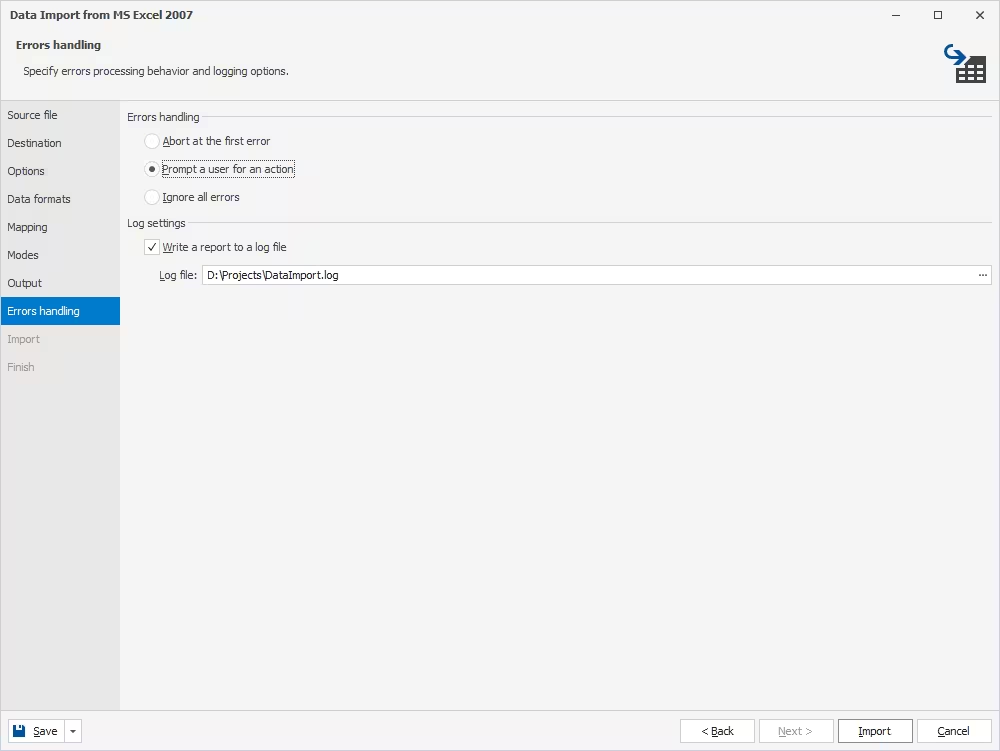
On the Errors handling page, configure how dbForge Studio should behave if it encounters an error during import. There are three possible options:
- Prompt you for an action
- Ignore all errors
- Abort at the first error
Also, you can select to create a log file with a report and set a path to it.
Save reusable import templates
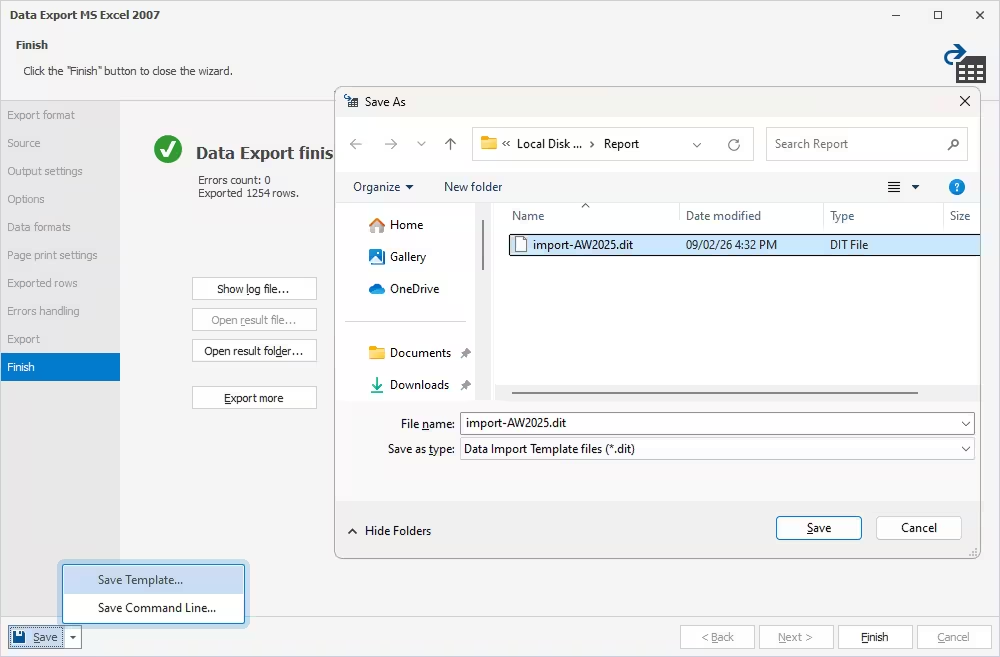
You can also save your import settings as templates for recurring scenarios. The flow is similar to that of data export: expand the Save menu in the bottom left corner of the wizard and select Save Template. Next, enter a name for your template file, pick a folder, and click Save. All saved templates will be available during your following import operations.
Finally, once you configure all the required settings, click Import to start the operation.
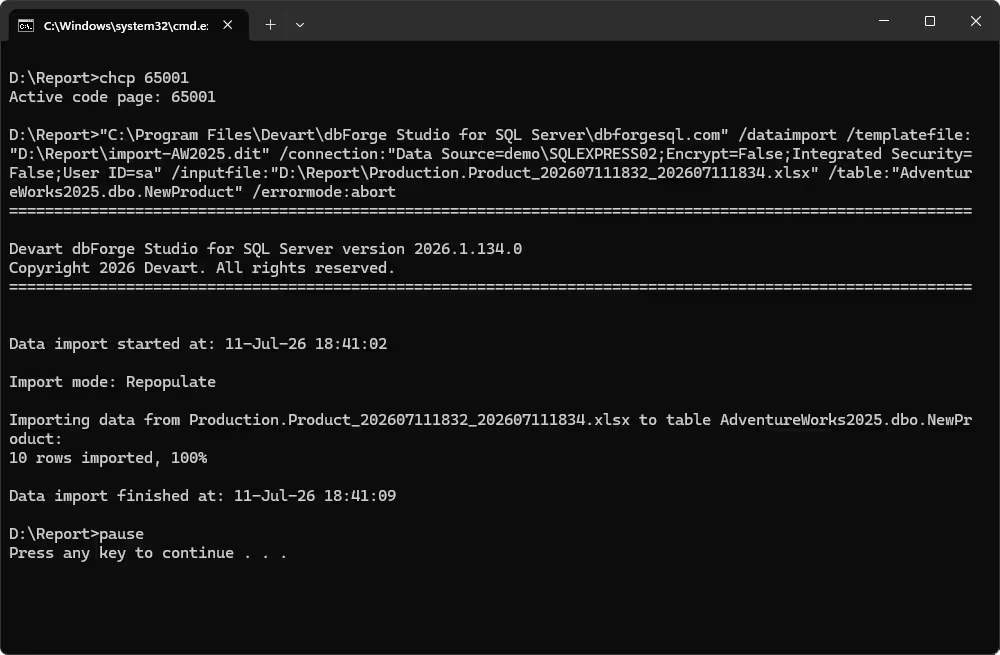
Import data from the command line
dbForge Studio delivers CLI-powered automation of SQL data import. You can do the following:
- Override the connection specified in the template
- Create a new table during import
- Import data using the template settings
- Specify the required file with the data to import
- Specify the table or view to import data from
- Specify the target table
- Specify the error handling behavior
Supported data export/import formats in dbForge Studio
Now, let's take a closer look at all the formats supported by dbForge Studio.
| Format | Import | Export | Typical use case |
|---|---|---|---|
| HTML | No | Yes | Web pages, reports, data sharing |
| TXT | Yes | Yes | Plain-text data exchange, logs, bulk data |
| XLS | Yes | Yes | Legacy Excel files, business reporting |
| XLSX | Yes | Yes | Excel workbooks, business reporting |
| Google Sheets | Yes | Yes | Cloud-based spreadsheets, collaborative reporting |
| MDB | Yes | Yes | Microsoft Access databases, legacy data migration |
| RTF | No | Yes | Formatted documents, reports |
| No | Yes | Reports, document sharing, archival | |
| JSON | Yes | Yes | APIs, application data, web integrations |
| XML | Yes | Yes | System integrations, structured data exchange |
| CSV | Yes | Yes | Data exchange, reports, bulk import |
| ODBC | Yes | Yes | Cross-database data transfers |
| DBF | Yes | Yes | Legacy databases, GIS and business applications |
| SQL | No | Yes | Scripts, database migration and backup workflows |
Video guide: How to export and import data in SQL Server
To make everything completely clear, check this video and see how dbForge Studio for SQL Server helps you save time and make your data migrations more efficient and convenient.
Conclusion
Now you know all about the easiest and most flexible way to import and export SQL Server data. And this is where we should note that dbForge Studio for SQL Server goes far beyond SQL import/export operations, covering the entire database lifecycle, from design and development to management, administration, and maintenance.
We should also mention the integrated context-aware dbForge AI Assistant, which will prove invaluable for your routine SQL development by generating, optimizing, explaining, and troubleshooting SQL code, as well as answering any SQL- and database-related questions.
We gladly invite you to download dbForge Studio for a free trial and explore everything it has to offer.
FAQ
The SQL Server Import and Export Wizard is a tool in Microsoft SQL Server that allows transferring data between different data sources. It helps you do the following:
- Import data into a SQL Server database from sources such as Excel, CSV files, or other databases.
- Export data from SQL Server to files or other databases.
- Select the data to transfer and configure how it should be mapped.
- Review and run data transfers without writing complex SQL or ETL code.
If you don't already have SQL Server and/or SSMS installed, you can get the SQL Server Import and Export Wizard by installing SQL Server Data Tools (SSDT). Microsoft provides the following options:
- Install SQL Server. The wizard is included with the installation.
- Install SQL Server Data Tools (SSDT) for Visual Studio 2019 or later and add the SQL Server Integration Services extension.
- If you already have SQL Server Management Studio (SSMS), you can start the wizard from the database's Tasks menu without installing it separately. Select Import Data or Export Data.
Yes. If you are using a database import tool like dbForge Studio, you can easily import CSV into your SQL Server or Azure SQL database. A smart wizard with flexible settings will help you do it effortlessly.
Of course! If you are using dbForge Studio, you can freely export data to 14 formats, which include XLS, XLSX, and CSV.
The difference is in the IDE. The SQL Server Import and Export Wizard is a focused Microsoft tool for transferring data, which is available in SSMS. Meanwhile, dbForge Studio delivers its own import and export wizards with flexible settings.
If you are using dbForge Studio, you can automate both import and export from the command line. The Studio conveniently auto-generates command-line scripts that can be executed at any given moment or scheduled for regular execution using tools like Windows Task Scheduler.
You can also create reusable templates with import/export configurations, which can also greatly contribute to your automation workflow.
Yes, you can import data into an existing SQL table using dbForge Studio. Just make sure the mapping is correct.
Using dbForge Studio, you can export data to the following formats: HTML, TXT, XLS, XLSX, MDB, RTF, PDF, JSON, XML, CSV, ODBC, DBF, SQL, and Google Sheets.
Using dbForge Studio, you can import data from the following formats: TXT, XLS, XLSX, MDB, JSON, XML, CSV, ODBC, DBF, and Google Sheets.


