Although Windows is the main platform to consider when it comes to database development and management, what if you have a Mac and would like to start your endeavors from there? Well, challenge accepted. Here is the guide that will help you set up a MySQL environment on macOS.
What are the prerequisites for installing MySQL on a Mac?
You have two options: you can either download MySQL from the official website or use Terminal. You will find guides to both of these options below. In order to begin, you should have macOS 11 or later on your machine, and you need to install MySQL 8.0 or later to ensure full compatibility. Other than that, there are no specific prerequisites.
How to download MySQL on a Mac
You can download MySQL for Mac from the official MySQL website. Since there are many options, the following guide might come in handy and help you find what you need faster.
Then you will be prompted to either sign up or log in to your Oracle Web account. Just below the buttons, select No thanks, just start my download. The download will commence.
How to install MySQL on macOS
After MySQL is downloaded, you can proceed to the installation process.
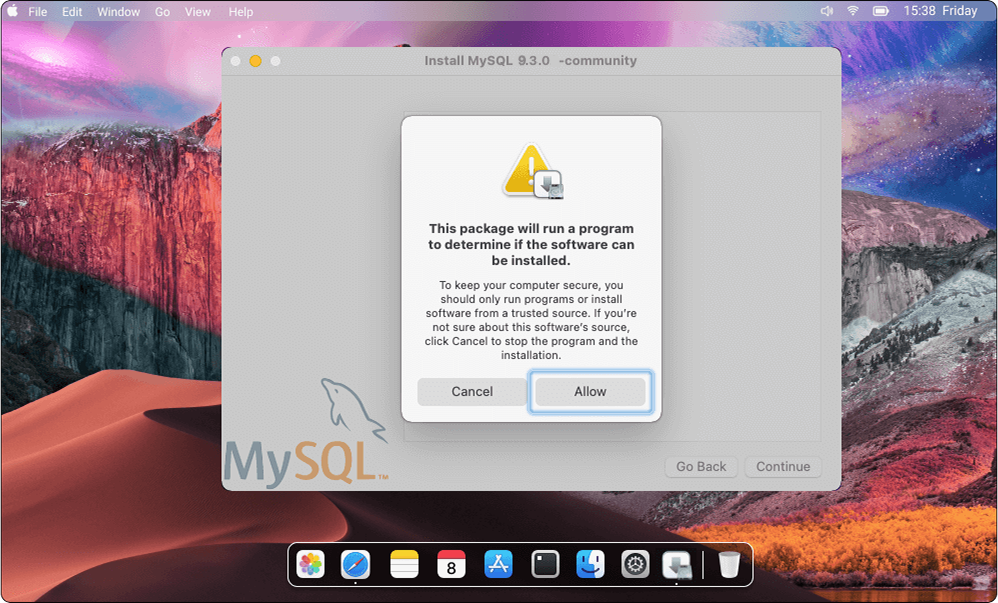
Double-click the downloaded DMG file to open a wizard-like installer. It will tell you it has to determine if the software it contains can be installed. Click Allow. Then you will see links to MySQL-related resources, including the documentation. Click Continue.
Next, you need to choose the download destination. By default, it's your main hard drive. If you want to change it, click Change Install Location. If you don't, click Install.
On the Configuration page, select Use Strong Password Encryption. Click Next. Enter your MySQL root password, click Finish, and the installation will be complete.
How to download and install MySQL Server using Homebrew and Terminal
You can also use the Homebrew package manager to install MySQL on your Mac from Terminal.
1. If you haven't previously installed Homebrew on your Mac, open Terminal and execute the following command:
After this command is executed, you will have commands such as brew install, brew upgrade, and brew uninstall available from Terminal.
3. The installation will take a while. After it's finished, you can start your MySQL server with the following command:
brew services start mysql
2. And so, in order to install MySQL, you need to run the following command:
brew install mysql
4. To secure your MySQL with a root password, run the following:
mysql_secure_installation
How to configure MySQL from the command line
MySQL can be further configured from Terminal. For instance, it allows you to manage users. To create a new database user from Terminal and grant all privileges on all databases, enter the following command, replace "username" with the user you want to create, and replace "password" with the user's password.
GRANTALL PRIVILEGES ON database.*TO'username'@'localhost';
To enable remote access to MySQL, we suggest creating a user with access from a specific IP address ('username'@'192.168.1.100') or from any host ('username'@'%').
How to start MySQL Server on macOS
Like we said previously, you can start MySQL in Terminal by running brew services start mysql. Similarly, you can stop MySQL by running brew services stop mysql and restart it via brew services restart mysql. Alternatively, you can easily start and stop MySQL server instances on your Mac from System Preferences > MySQL.
There, you can also choose whether you want to run the server automatically on startup, click Initialize Database to configure your default MySQL database, or go to the Configuration tab to select the configuration file (if required) and specify paths to base, data, and plugin directories, as well as paths to the keyring data file, PID file, and error log.
How to update MySQL on macOS
The easiest way to update your MySQL is to run brew upgrade mysql in Terminal.
Note that in this case, a manual update is far less convenient - it means that you will have to uninstall your current MySQL and then install a new version from scratch.
Need a reliable solution to manage your MySQL databases?
Get the most advanced IDE on the market - dbForge Studio for MySQL
The most productive and convenient way to manage MySQL databases is to use a specialized IDE. The most common choice is MySQL Workbench. But if you need to cover a wider range of tasks, you can try a more sophisticated solution like dbForge Studio for MySQL, which is designed to cover and streamline your routine database development and management.
With dbForge Studio, you can design databases and develop them, copy databases for migration, manage users, compare and synchronize databases, analyze table data, and much more. You can run the Studio on your Mac via CrossOver, a commercial compatibility solution that allows Windows software to run on macOS and Linux. To learn how to do it, refer to our product documentation.
Designing databases for a new project or altering your existing database structures has never been easier. dbForge Studio has everything it takes to help you keep up with the growth of your database-centered software and the ever-evolving requirements for data storage and management.
dbForge Studio for MySQL helps you ensure the integrity, security, and accessibility of your data. You get it with an inclusive set of features aimed at storing, organizing, editing, and migrating datasets of any size with next to no effort.
dbForge Studio makes you just as fluent in managing, migrating, and deploying your entire MySQL and MariaDB databases in different environments. Streamlining database operations is one of the most vital steps towards easy optimization and scaling of your entire product development.
Your routine database administration becomes an extremely easy task with the Studio at hand. Its variegated toolset provides you with full control over server configuration and performance tuning, session monitoring, service management, and table maintenance.
The Studio will help you aggregate any amounts of data and scrutinize it to identify possible trends, patterns, and anomalies. Thus you can get actionable insights that can be translated into compelling data reports.
Last but not least, a huge bulk of the Studio's functionality offers extensive automation options. Using the standard command-line interface, you can easily automate recurring database operations to save your precious time and sharpen your focus on things that require your attention the most.
Install dbForge Studio for MySQL on macOS: A video guide
Although dbForge Studio is a Windows-native application, you can easily install and run it on your Mac using CrossOver, a high-end compatibility solution by CodeWeavers. In this video, you will see the entire process, from downloading CrossOver to installing the Studio into a CrossOver bottle, running it, and using Terminal to automate recurring database operations.
How to migrate a MySQL database from Windows/Linux to macOS
Now what if you need to migrate a database from your Windows or Linux machine to a Mac? The Studio has a few tricks up its sleeve to cover various scenarios.
Whether you're migrating a local database from a Windows machine to a Mac or even transferring databases to different servers, we're sure one of the following ways will be a perfect fit for the job.
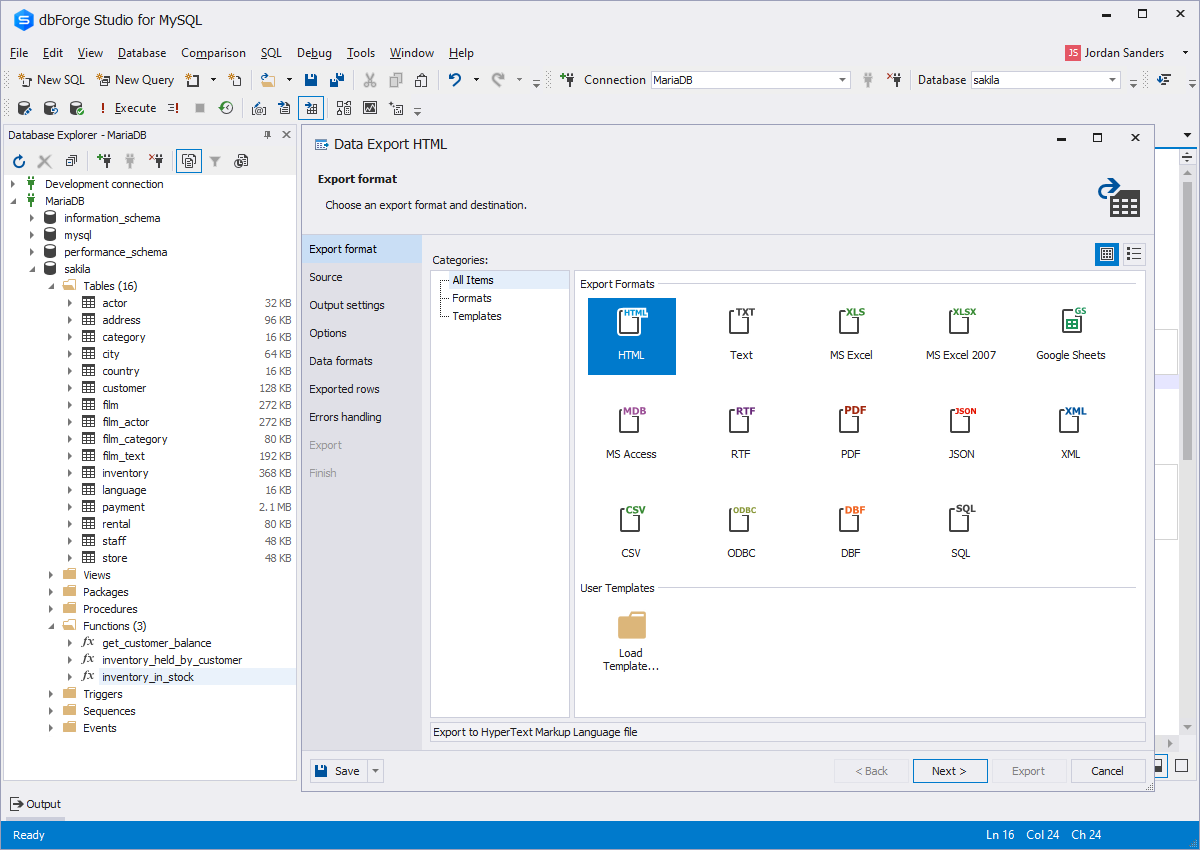
Data export and import cover 14 most popular data formats. They work well in case you want to export your tables or databases to files that you must import into a new database on another machine, for instance. You can use exported files as backups just as well.
Right-click the required table or database in Database Explorer and go to Tasks > Export Data.
In the wizard that opens, select the preferred format and configure export settings page by page.
Whenever you are ready, click Export. You fill find the exported file in the specified location.
Next, open the Studio on a new machine, right-click the destination table or database in Database Explorer, and go to Tasks > Import Data.
In the wizard that opens, select the format of your file and similarly configure import settings page by page.
Once you are ready, click Import and wait a bit until the import is completed.
Schema Compare and Data Compare have two key purposes: they help identify differences and synchronize MySQL schemas and table data, respectively. Out of the two, it is synchronization that can help you migrate a database to a different environment. As usual, the process is easy, and an intuitive wizard will aid you.
Go to the Comparison menu > New Schema Comparison or New Data Comparison.
In the corresponding wizard that opens, specify the Source and Target connections and click Compare.
After the comparison, you can proceed to sync your schemas/data by clicking the green arrow button. This will open the Synchronization Wizard.
To review the synchronization script, select Open the synchronization script in the internal editor.
To migrate your schemas/data immediately, select Execute the script directly against the target database and click Synchronize.
Copy Databases is yet another feature that will help you migrate a MySQL database to a new server.
Go to the Database menu > Tasks > Copy Databases.
On the Copy Database page that opens, select the source and target connections.
Select the required databases and the Include Data and Drop if exists on target checkboxes if needed.
Click the Settings icon at the top right corner of the Copy Databases page.
In the Copy Databases Settings dialog, make sure that all necessary options are selected as required.
To save the changes, click OK.
To start the migration process, click the green arrow icon. Once the process is over, you will see a status notification.
How to manage the security of your MySQL databases in dbForge Studio
It is no less important to make sure that your MySQL databases are properly protected from things like unauthorized access and data loss. This is where you can also rely on the integrated tools of dbForge Studio, which include SSH/SSL connections, user and permission management, a log of executed queries (called Query History), as well as backup and recovery of entire databases or selected objects.
SSH and SSL protocols help you establish secure connections to your MySQL databases. You can apply them when connecting to your database in dbForge Studio for MySQL.
Database backups are invaluable for ensuring the safety of your data in emergency cases. To create a backup, do the following.
Go to the Database menu > Tasks > Backup Database.
Database Backup Wizard opens. On the General page, select the source instance connection, the database you want to back up, and specify the path to the backup folder. Then switch to each subsequent page to configure optional settings. Once you are ready to proceed, click Next.
To start the backup process, click Backup. After the process is complete, you will see the progress status. You can open the output backup file by selecting Open Script. Finally, click Finish.
Database recovery is just as easy.
Go to the Database menu > Tasks > Restore Database.
Database Restore Wizard opens. On its first page, Database Script File, select the source instance connection and specify the name of the restored database, the path to the backup file, and, if needed, SQL file encoding.
To start the recovery process, click Restore.
When the process is successfully finished, you will see that the database has been restored on the target instance.
Query History is your perfect assistant when it comes to tracking the history of executed queries. To access it, go to the View menu > Other Windows > Query History.
Query text
Size in bytes
Date and time of execution
Duration of execution
Query file
Associated server
Associated database
The user who initiated the execution
From the toolbar, you can conveniently find queries by text, select to display executed queries from a required period, export your history to a CSV file, and clear the entire history right away.
Security Manager will help you set up users and permissions in the most flexible way. To access it, go to the Database menu > Security Manager. With its help, you will be able to perform the following actions.
"dbForge Studio for MySQL has been the most effective database tool supporting the design, architecture, development, administration and debugging of our next-generation CRM system. There is nothing else like it on the market. I do think dbForge is hands down the best IDE for MySQL. It's a fantastic tool."
David Allen,
Director of Development
"[With dbForge Studio] we became 25% more efficient as we saved 2 FTE hours per day. In most cases, about 30% of the time spent on a project is database work, and we have seen most of that work cut in half. This increase in efficiency has a big impact across many areas that depend on IT to deliver results."
Bob Guzek,
IT Manager at Creative Memories
"We used to have many problems developing and testing stored procedures. But now that I have this fast and reliable tool at hand, I am able to develop better and faster stored procedures for the entire company."
Manuel Avalos,
IT Manager at AROVIC
dbForge Studio for MySQL
Your ultimate IDE to manage MySQL and MariaDB databases
In Terminal, you can easily uninstall MySQL by running brew uninstall mysql
Alternatively, you can uninstall the required MySQL server instance on your Mac from System Preferences > MySQL.
FAQ
Is MySQL available for free on macOS?
Yes, MySQL is available for free on macOS. You can download the Community Edition of MySQL, which is open-source and free to use. To do that, go to the official download page, select the version for macOS, download the DMG archive, open it, and follow the instructions to install MySQL on your Mac.
How do I install MySQL on a Mac using Terminal?
To install MySQL on a Mac using Terminal, you can use Homebrew, a popular package manager for macOS. Here is how you can do it.
1. If you don't have Homebrew installed on your Mac, open Terminal and run the following command.
3. After the installation, you can start your MySQL server using the following command.
brew services start mysql
How do I add MySQL to PATH on a Mac?
To add MySQL to your PATH on a Mac, you'll need to modify your shell configuration file.
1. In Terminal, find the MySQL binary path with the following command.
which mysql
2. Depending on the shell your Mac is using, edit ~/.zshrc (for Zsh) or ~/.bash_profile (for Bash) to add MySQL's path. You can do it with the nano editor. This is what it looks like for Zsh.
nano ~/.zshrc
For Bash, the command is as follows.
nano ~/.bash_profile
3. In the configuration file, add the following line (replace the path with the correct one based on the result from which mysql).
export PATH="/usr/local/mysql/bin:$PATH"
4. After saving and closing the file (CTRL+X, then Y to confirm and Enter to save), apply the changes with a command. For Zsh, it is as follows.
source ~/.zshrc
For Bash, use the following command.
source ~/.bash_profile
5. To verify that MySQL has been added to your PATH, run the following command.
mysql --version
This should return the version of MySQL installed on your Mac, confirming that it's now accessible from any directory in Terminal.
What is the best way to install MySQL on a Mac for local database development?
Since the fastest and easiest way is the best here, we recommend installing MySQL on macOS via Homebrew. To do that, make sure you have Homebrew up and running on your Mac and execute brew install mysql from Terminal. MySQL will be installed on your Mac.
What are the advantages of using dbForge Studio for MySQL after installing MySQL on a Mac?
dbForge Studio for MySQL, available on macOS via compatibility solutions like CrossOver, will provide you with virtually everything you need to manage MySQL databases.
Smart SQL code completion, formatting, and refactoring
Query optimization
Source control integration
Visualization of queries on diagrams
Database design
Comparison and synchronization of MySQL schemas and data
How do I import and export MySQL databases on a Mac using dbForge Studio?
You can import and export individual tables or entire databases using the integrated data import and export functionality of the Studio. It supports up to 14 data formats and provides a comprehensive wizard with flexible settings for each format.
Alternatively, you can always migrate MySQL schemas and data to a different environment using the Studio's integrated tools called Schema Compare and Data Compare, respectively. With their help, you can synchronize a selected source database to a selected target database in just a few clicks.