Learn how to install,
allow remote connections, uninstall, update, and manage
MySQL Server 8.0 and 5.7 on the CentOS Linux distro both from the command line and a specialized GUI tool.
Data is the king of today's world. Businesses become more and more data-driven, and digital transformation steers development. But what does data mean to the growth of your business? Literally everything! That’s why storing, accessing, and analyzing data assume a large dimension nowadays, and the importance of having a proper database management system has soared infinitely high.
In this article, we will see how to install MySQL on Linux.
"Why MySQL and why Linux?" you would ask. Because it is, without exaggeration, the best combination for the effective development of database-centered software products. Both solutions are reliable, secure, and open-source. Here we will walk through the prerequisites for installing MySQL on Linux, have an overview of the peculiarities of installation via the MySQL Yum repository, and explore how to install MySQL on Linux from the command line.
The advantages of using Linux
Linux is an extremely popular operating system, just like Windows or macOS. However, unlike either of its rivals, Linux is open-source, which means that anyone can run, study, modify, and redistribute its source code. Today Linux is everywhere – half of the professional developers use Linux-based operating systems, and, moreover, Linux powers 85% of smartphones.
Benefits of using Linux for your business
Low cost
High performance
Ease of use
Security
Flexibility
Regular updates
Variety of distributions
Support for all common programming languages
What are the prerequisites for installing MySQL on Linux?
The prerequisites for the installation of MySQL on Linux are as follows:
Stable network connection
A system running Linux
Access to the terminal
A user account with sudo privileges
Before you start
There are several ways to install MySQL on Linux which depend primarily on the Linux distribution you are running. Thus, before starting to install MySQL, check your Linux distro.
For example, the MySQL Yum repository for Oracle Linux, Red Hat Enterprise Linux, and CentOS provides RPM packages for installing MySQL Server and client, MySQL Workbench, MySQL Utilities, etc. The MySQL APT repository provides .deb packages for installing and managing MySQL server, client, and other components on Debian and Ubuntu platforms.
In this article, we will demonstrate to you how to install MySQL on CentOS 7.
How to install MySQL from a Yum repository
Note
The following instructions refer only to the new installation of MySQL. In case you already have MySQL installed, you will need to upgrade or replace the installed MySQL package.
Step 1: Set up a Yum repository
To begin with, we need to add a MySQL Yum repository to our system's repository list. For this, we run the following command.
Since the Yum repository we’ve just downloaded has multiple repository configurations for multiple MySQL versions, we need to disable all repositories in the MySQL repo file. For this, we run the following command.
sudo sed -i 's/enabled=1/enabled=0/' /etc/yum.repos.d/mysql-community.repo
Now that we have downloaded the package for our Linux platform and disabled the repositories, we need to install MySQL server using the following command.
All we need to do now is to start the MySQL service using the following command. Provide the password when the system asks for it.
service mysqld start
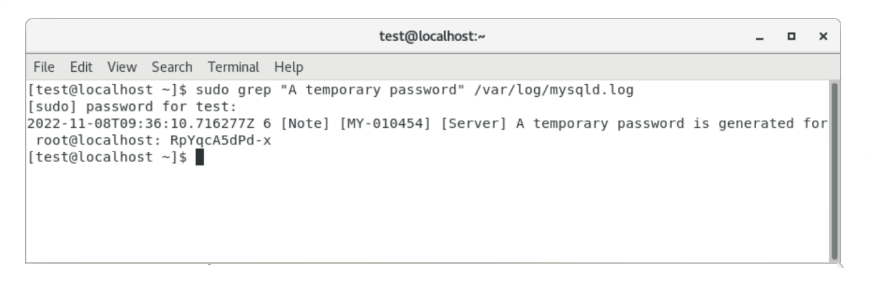
When you install MySQL server, the root user account is granted a temporary password; to be able to work with MySQL on Linux, you need to get this default password. To show the password, run the following command and provide a password for the Linux user when asked.
sudo grep "A temporary password" /var/log/mysqld.log
Afterward, you will need this temporary password to change the password of the root user account.
Step 4: Config the MySQL root user
Now that we have started the MySQL service and got the temporary password for the root user, we can proceed to install MySQL and configure the root user.
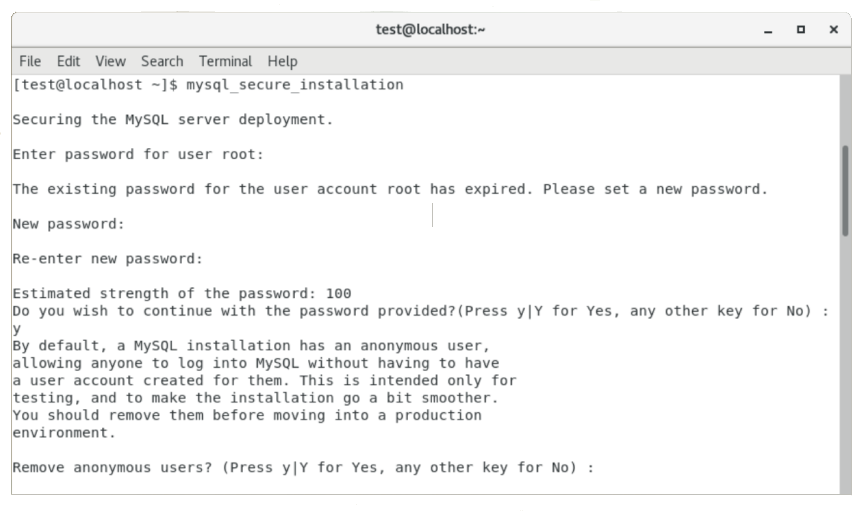
First of all, run the following command to secure your MySQL server.
mysql_secure_installation
The system will ask you for the current password of the root account. Provide the temporary password you got earlier. Next, you will need to enter and confirm a new password for the root user account. After that, the system will prompt a bunch of questions, and we recommend you to answer 'Yes' to each one.
Remove anonymous users?
Disallow root login remotely?
Remove test database and access to it?
Reload privilege tables now?
Afterward, it is recommended to restart and enable the MySQL service again.
service mysqld restart
If necessary, you can configure the MySQL service to start automatically at the system startup.
chkconfig mysqld on
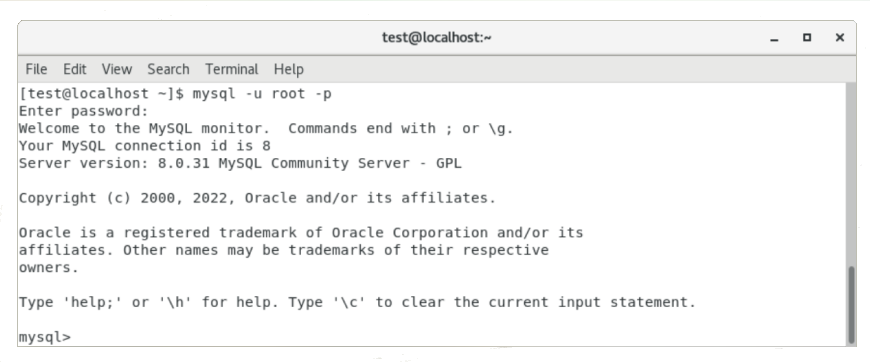
Step 5: Log in to MySQL
Run the following command to connect to MySQL server. When asked for the password for the root user, enter the password and press Enter.
mysql -u root -p
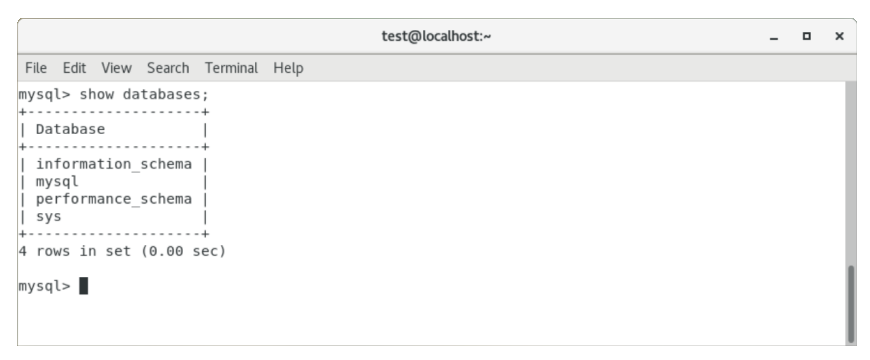
Run the show databases; command to display all databases residing on the current server.
Step 6: Choose another MySQL release version (5.6, 5.7)
To install a different MySQL release version, you will first need to uninstall the current version and remove all the packages associated with it. Then you will be able to download and install the required version.
3. Finally, we check the current MySQL version to make sure that the downgrade from MySQL 8.0 to MySQL 5.7 has been successful.
mysql –version
How to update MySQL with Yum
By running the following command, you will have Yum update all MySQL components on your system. Note that the process might take some time.
sudo yum update
After the update by Yum, MySQL server will be restarted. It is recommended to run the following command to check and resolve any possible incompatibilities.
mysql_upgrade
With Yum, you can also update only a specific component. For this, run the following command to list all the installed packages for the MySQL components.
sudo yum list installed | grep "^mysql"
Then identify the package to be updated and run the following command.
sudo yum update package-name
Installing MySQL without Yum
In case your Linux distribution doesn't support Yum, you can try using the APT repository.
Note
The Oracle Linux, Red Hat Enterprise Linux, CentOS, and Fedora distributions work well with the MySQL Yum repository, while Debian and Ubuntu distros require the APT repository.
3. In the package configuration window, specify your system and the version of the MySQL server you want to install. Click OK to confirm.
4. Then, update the APT repository.
sudo apt update
5. And finally, run the following command to install MySQL server and client. Press Y to begin the installation, then insert a password for the root user when asked.
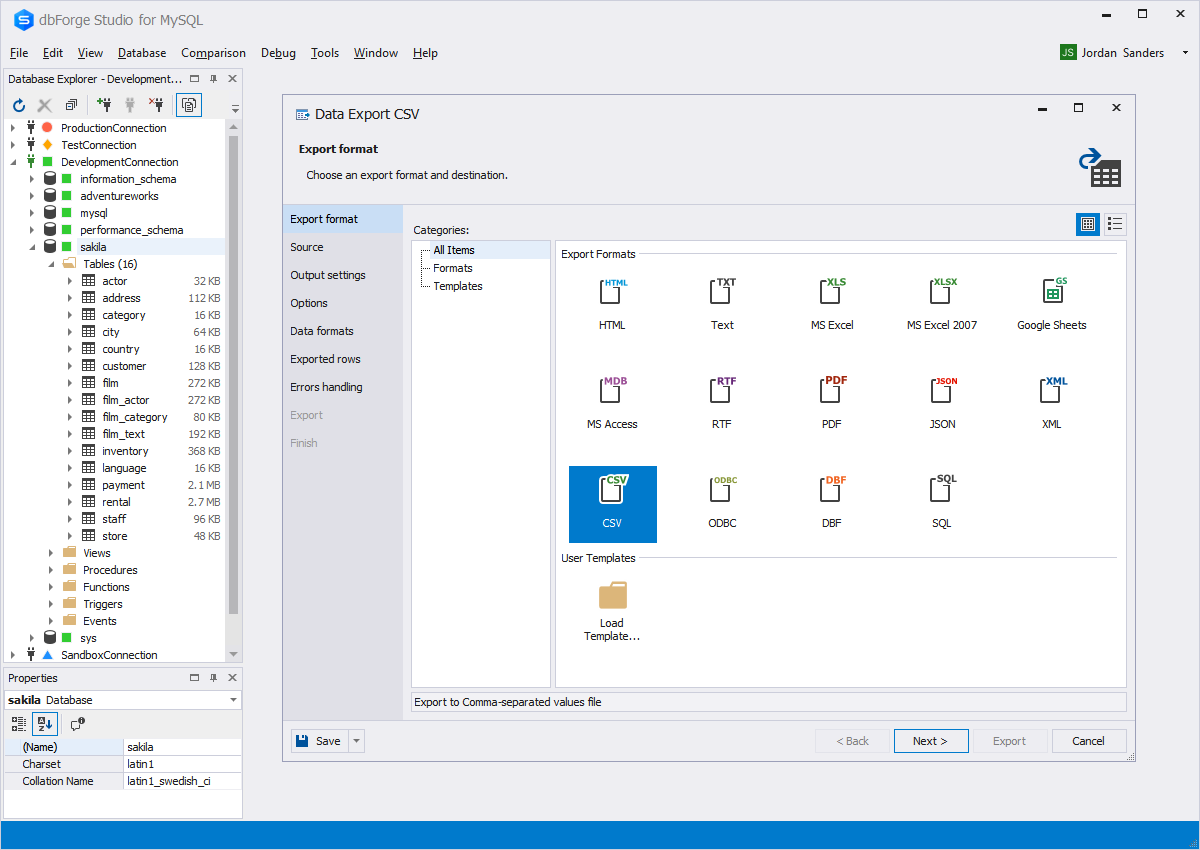
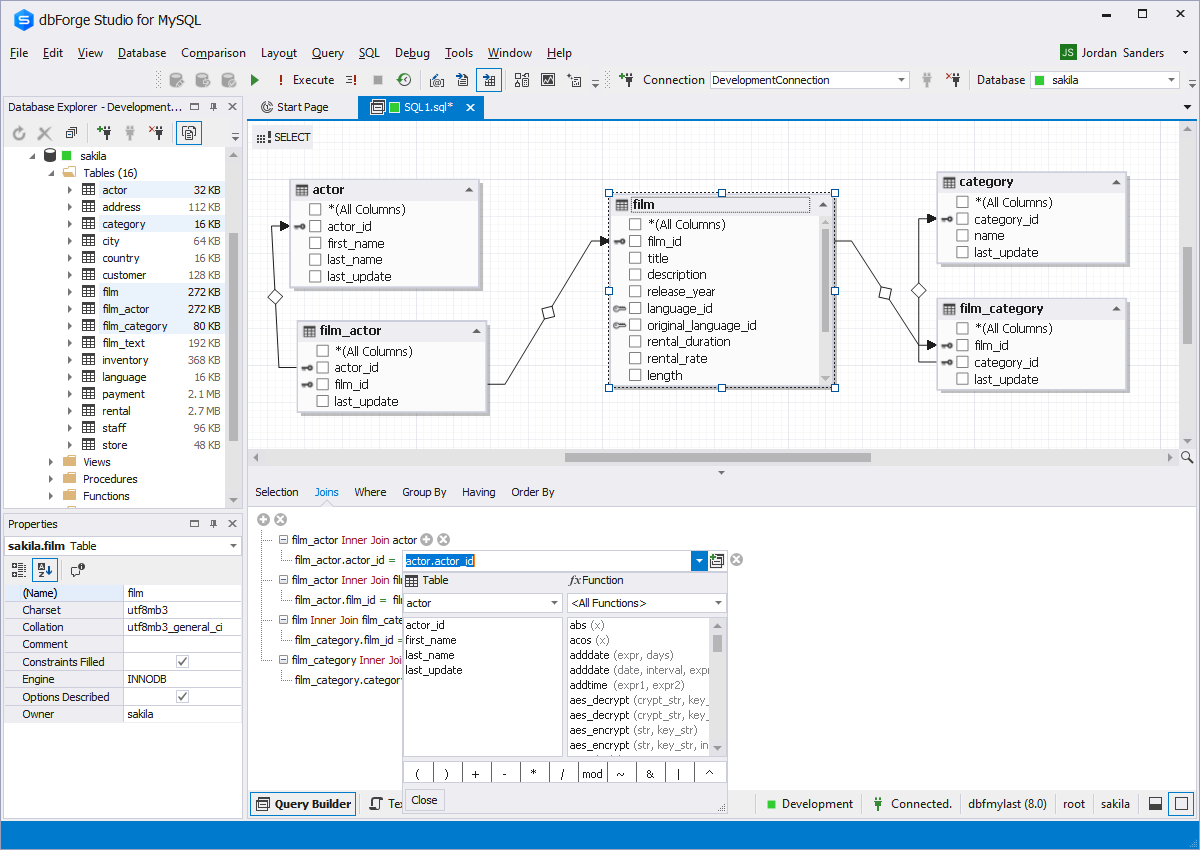
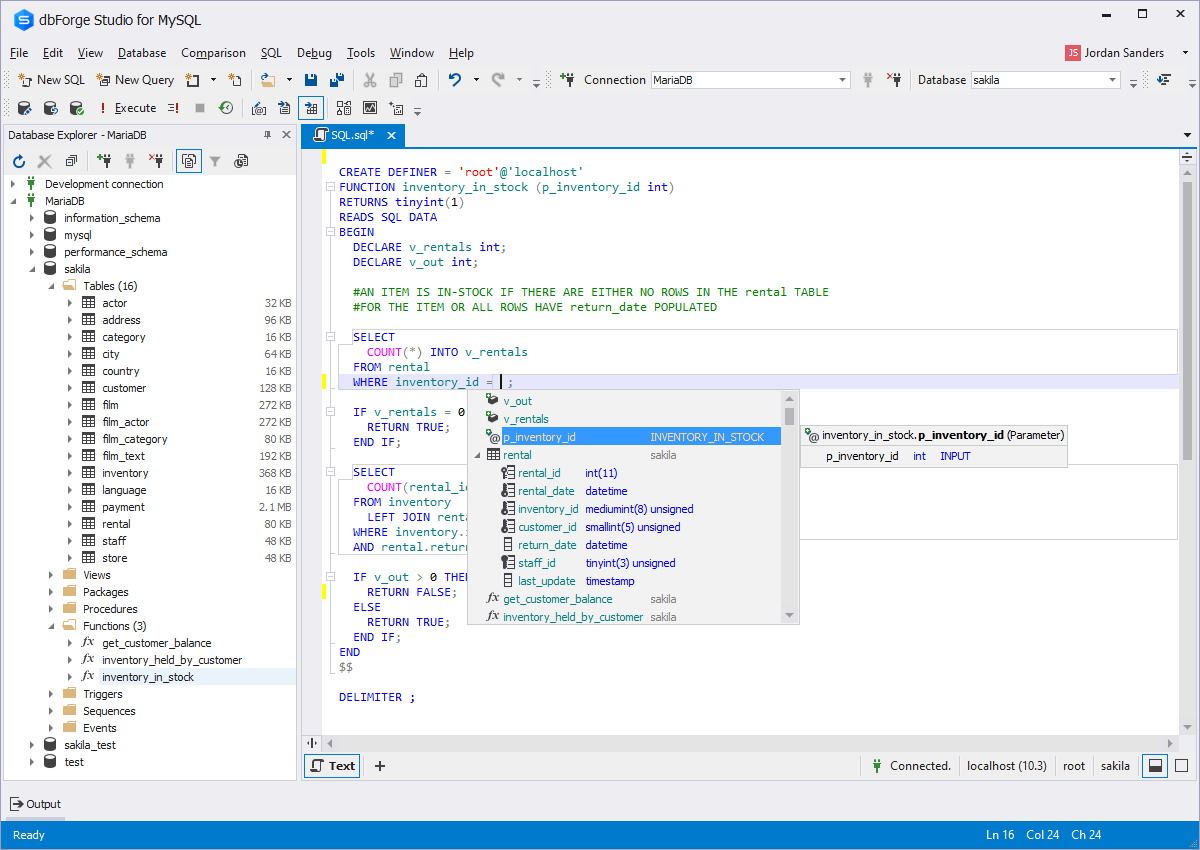
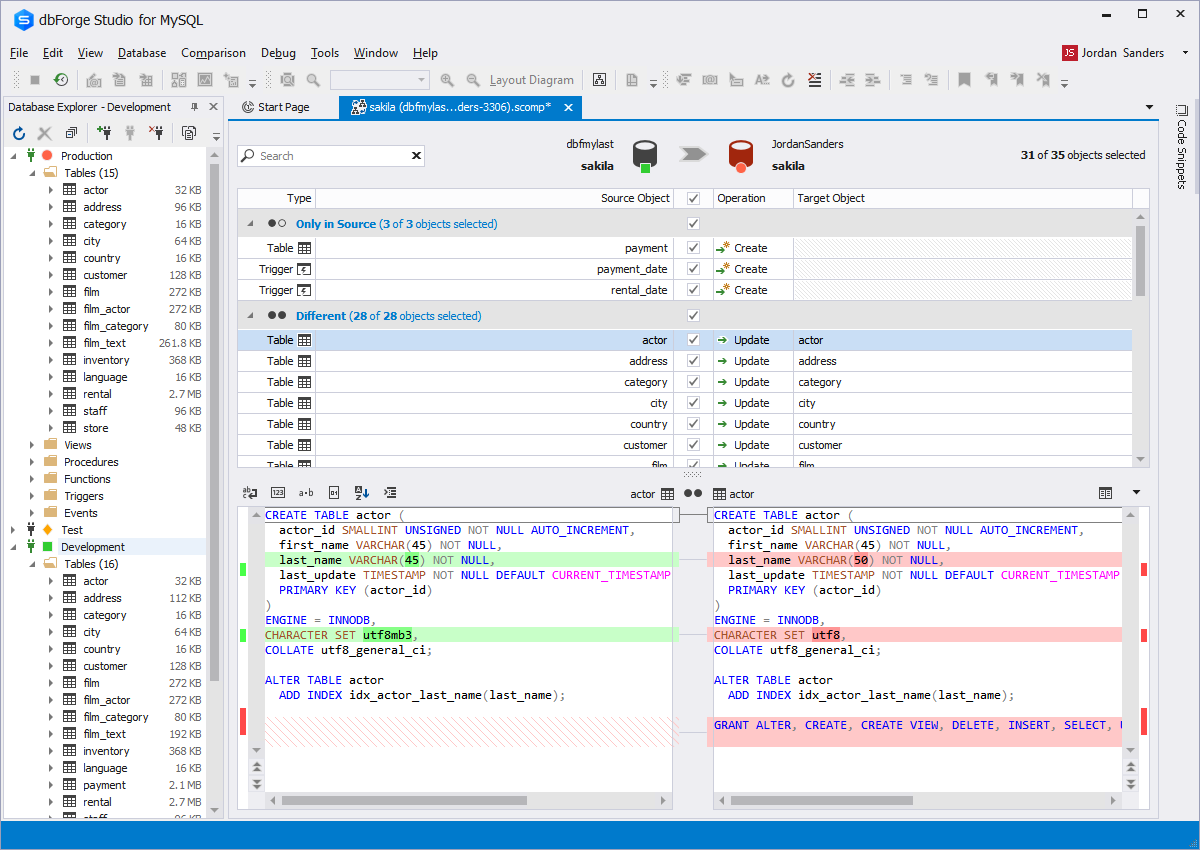
Handling relational database management systems on Linux requires a certain level of expertise. But equipping yourself with the right tool will help you do the job much faster and easier. One of the best GUI tools for MySQL on the market today that covers Windows, Linux, and macOS platforms is dbForge Studio for MySQL – a robust integrated environment, which is suitable for effectively managing even the most demanding MySQL development projects.
dbForge Studio for MySQL offers tools that help you instantly create database diagrams, objects, and entire projects, as well as efficiently compare and sync database schemas and table data.
You can write, debug, and run SQL queries faster using the built-in code completion and formatting tools, as well as measure and optimize query performance in a matter of moments.
An integrated set of database management tools help import and export table data, migrate, compare, and synchronize databases, as well as generate meaningful data for effective testing.
With the help of dbForge Studio, you can manage accounts, set up permissions, monitor open sessions and their activity, as well as perform table maintenance. In addition, it is possible to back up and restore databases to/from your backup files.
How to connect to MySQL server on Linux from dbForge Studio for MySQL
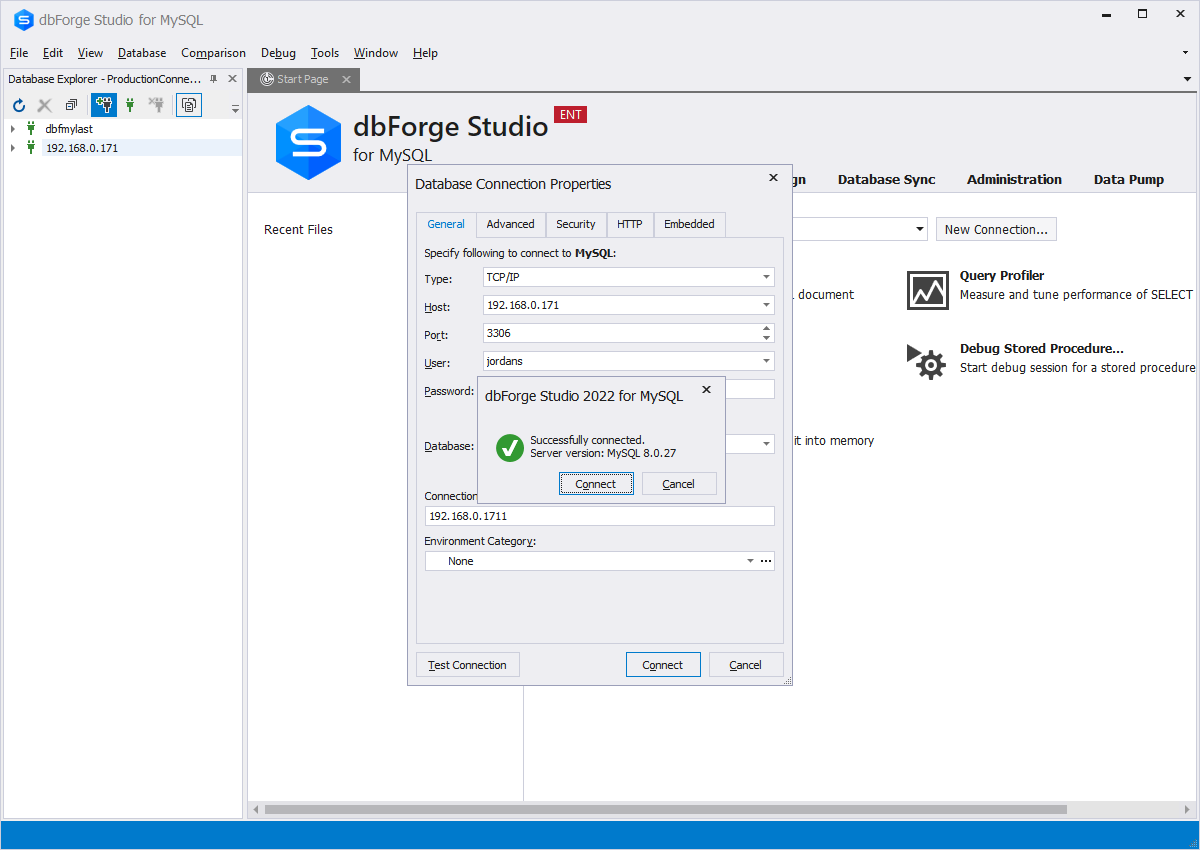
On the Database menu, select New Connection.
On the Database Connection Properties> General tab, specify the connection details:
Type: Select the connection type from the drop-down list.
Host: Provide the host name
Port: Provide the port number
User and Password: Enter the user credential details respectively. By default, the password is saved automatically. If you don’t want to save the password, clear the Allow saving password checkbox.
Database: Enter the name of a MySQL database you want to connect to or select it from the drop-down list.
Optional: Connection Name: The connection name is generated automatically from the host name. If you want to create a distinctive name for the connection, type the new name.
Click Test Connection to verify the connection details you have provided. Click Connect to connect to a MySQL server.
How to allow remote connections to MySQL server on Linux
Note
The instructions provided in this section apply to the CentOS Linux distribution.
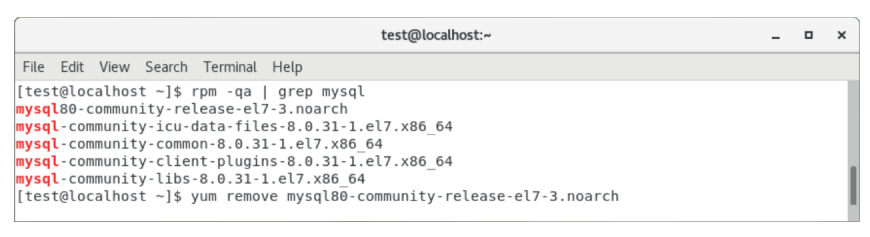
1. Log in to your MySQL server and run the following command to determine the location of the MySQL configuration file.
>mysql --help | grep "Default options" -A 1
Then, run the below command to uninstall your MySQL server and agree to remove MySQL packages:
sudo apt-get purge mysql-server mysql-client
2. Edit the configuration file by adding the bind address and save the changes. Add the following line:
bind-address=server.ip.
or
bind-address = 0.0.0.0
3. Open the 3306 port in the firewall by executing the following command.


 \
\